How to Configure OpenVPN on MikroTik?
OpenVPN is one of the VPN services MikroTik offers, used to create secure, encrypted connections between two sides over the internet. It is commonly used for remote access or linking networks through a protected tunnel.
To configure OpenVPN on a MikroTik router, there are two methods: Winbox and the CLI (command-line). In this guide, you will learn how to set it up with the Winbox GUI solution. Setting up OpenVPN with CLI is a more advanced method that you can learn too.
Prepare MikroTik for OpenVPN
Your MikroTik RouterOS version matters in setting up OpenVPN because in many RouterOS versions, OpenVPN doesn’t behave the same.
It’s recommended to use RouterOS Version 6 or 7, as if you are using a lower version, you can update your MikroTik version to newer versions, which offer more security and stability.
Before starting the steps, if you have other configurations on your router, make sure you back up your MikroTik configuration, as we will change some settings that may cause problems with your existing configurations.
Create OpenVPN certificates in MikroTik
To start the setup process, you need to connect your MikroTik device physically to the LAN or use a MikroTik VPS, which is a better option because it provides a secure internet connection with a public IP and removes many ISP and hardware limitations.
OpenVPN works with certificates to authorize connections between the user and the server. So in the first step, you need to create and sign certificates using MikroTik itself.
OpenVPN requires 3 certificates to work (CA certificate, Server certificate, Client certificate), which are used for authenticating both the server and client sides.
Start by navigating to the certificates tab to create the ones you need here.
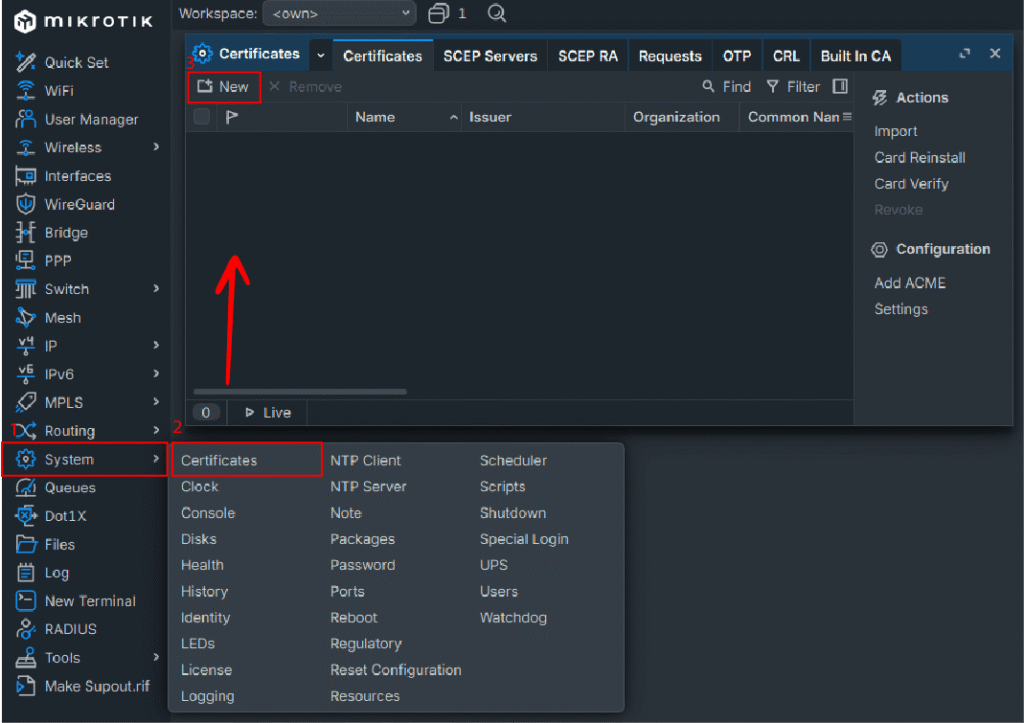
1- In the WinBox sidebar, go to the System menu
2- Click on certificates
3- Click on the + New button to add a certificate
Create OpenVPN CA Certificate in MikroTik
First, you need to generate a CA certificate, which acts as a root authority that signs and verifies the other certificates.
1- Name: Pick a name of your choice. It better be (CA or CA-certificate)
2- Common Name: Enter another name, preferably the same name
3- Enable Trusted
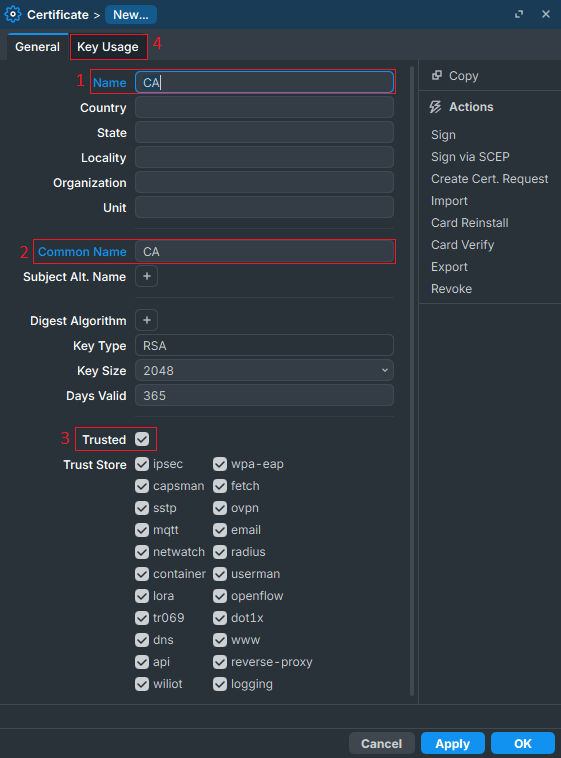
4- Click on the Key usage tab
5- Enable “crl sign” and “key cert sign” and disable any other options if checked
6- Click on Apply
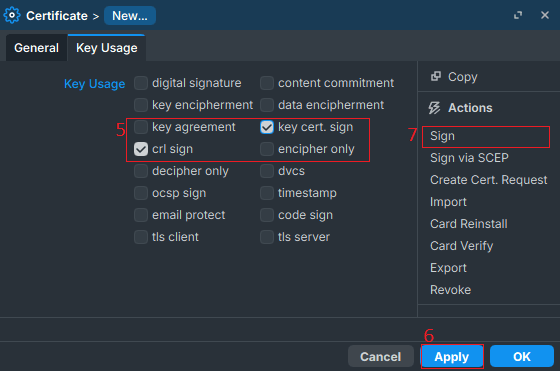
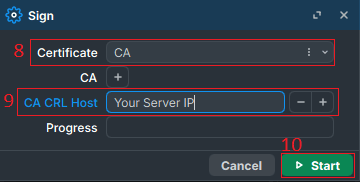
7- Click on Sign on the right side
8- In the certificate field, select your certificate
9- In CA, CRL host, Enter your public IP
10- Then click Start
Create Server Certificate in MikroTik
The server certificate is the certificate you need to apply to your OpenVPN server to authorize it.
1- Add another certificate, set its name server-certificate, and the same name for the Common Name field
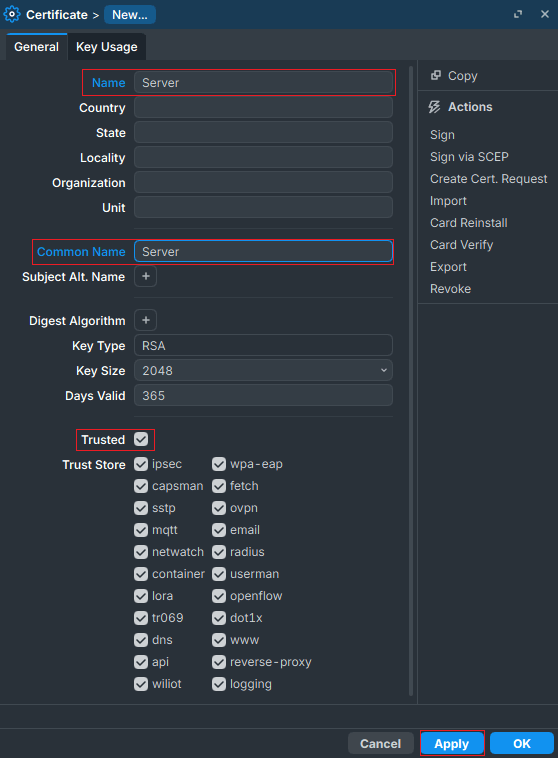
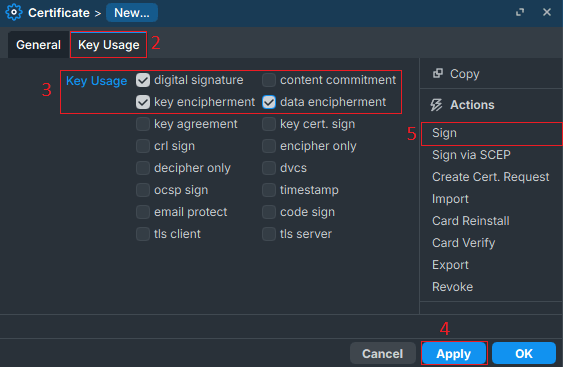
2- Click on the Key Usage tab
3- Enable “digital signature”, “key encipherment”, “data encipherment”, and “TLS server”, and disable any other thing
4- Click on Apply
5- Click on the Sign button
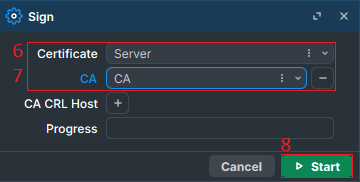
6- In the certificate field, select the server certificate
7- In the CA field, select your CA certificate
8- Click on Start
Create Client Certificate on MikroTik
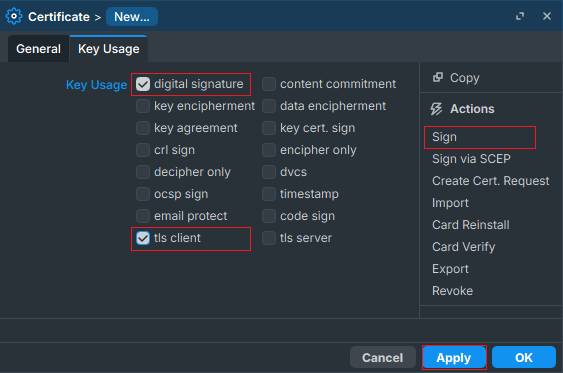
The client Certificate is the certificate that is going to be used for authenctication in client side. Create another certificate, same as before, but with a client-certificate name.
1- While creating a new certificate in the key usage tab, select “digital signature” and “tls client“.
2- Then click on Apply
3- Then click on the Sign button, select your client certificate, select the CA certificate to sign your certificate with, and click on Start.
Export OpenVPN Certificate MikroTik
You should export the CA and Client certificate; you will need them later to create the user config file. Be careful exporting the client certificate, which needs a password. Follow the steps carefully.
Export CA Certificate MikroTik
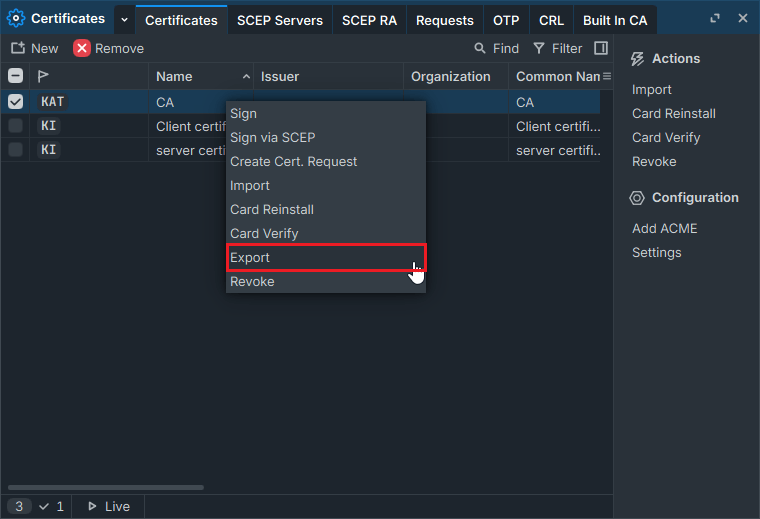
In the System / Certificates Tab, right click on your CA certificate file and click on export to export your certificate to create OpenVPN config file later.
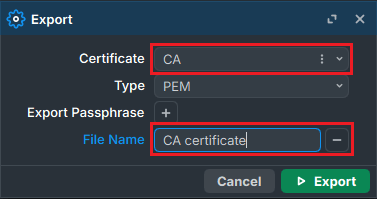
Select your CA certificate and specify a file name to export your certificate with this name.
Export Client certificate MikroTik
In the certificates tab, right click on your client certificate file, then select client certificate to export. Specify a passphrase for your certificate. This passphrase is necessary. Specify the file name to export with this name.
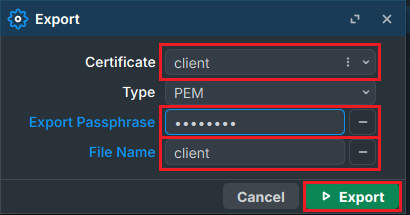
Note: Here in step 5, if you don’t specify a password for your client certificate, you will face a problem later using VPN config.
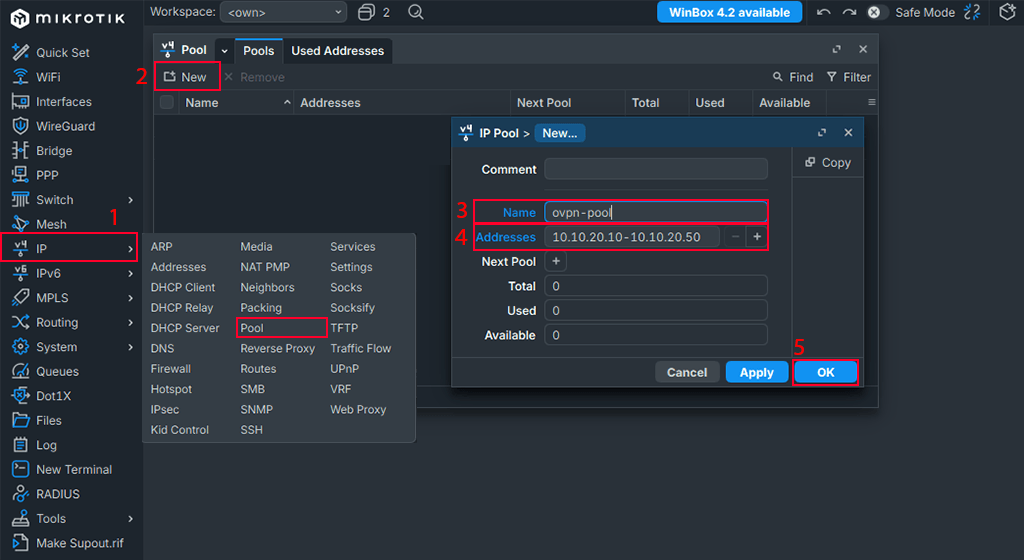
Create IP Pool in MikroTik
IP pool in MikroTik is a pool that specifies and stores a range of IPs for services that you are serving on your MikroTik Router, and it works as a DHCP Server itself when using OpenVPN.
1- Go to IP / Pool
2- Click on the New button to create a new IP pool
3- Specify a name for your IP pool like ovpn-pool
4- In the address, you need to specify a range of IP addresses, for OVPN, like: 10.10.20.10-10.10.20.50
5- Click on OK
Create PPP Profile for OpenVPN
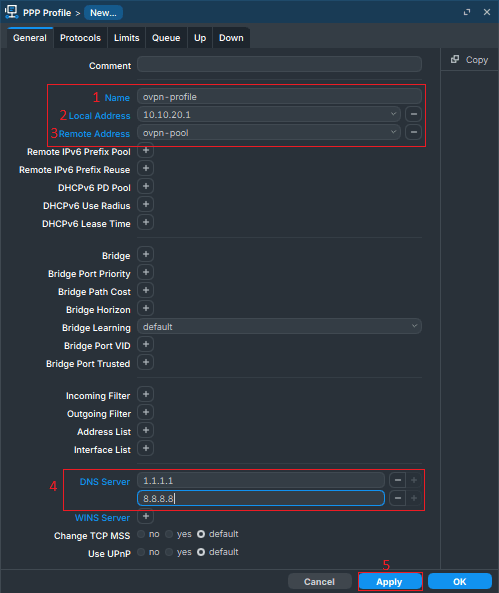
In this step, you need to create a PPP profile for your OpenVPN service. PPP profiles are a set of rules and specifications that we set for our VPN service. It defined permissions to connect users, IP addresses, etc.
Click on PPP, then click on Profile, and click on the New button to create a new PPP profile.
1- Select a name of your choice for your profile. Example: (ovpn-profile)
2- In the local address, enter an IP address out of your pool’s range. Example (192.168.100.1), it is better to be in the same NetID.
3- In the remote address, select the pool you’ve created before (ovpn-pool)
4- In the DNS field, enter 8.8.8.8 or 1.1.1.1 or both
5- Then click on OK
Create PPP Secret For OpenVPN in MikroTik
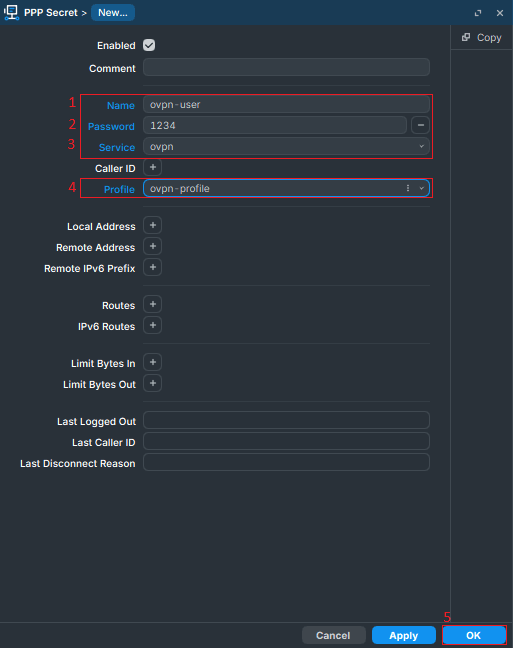
PPP secret is the user account used for your VPN service. You need to create a separate secret for each user who will connect to your VPN. If you need more advanced user management features, you can use the User Manager package on MikroTik.
In the PPP menu, click the secrets tab, then click the new button to create a new PPP secret (user) for your OpenVPN service.
1- Select a username for your client
2- Specify a password for your user
3- In the services field, select “ovpn”.
4- In the profile field, select your ovpn-profile you’ve created previously
5- Then click on OK
Create OpenVPN Server in MikroTik
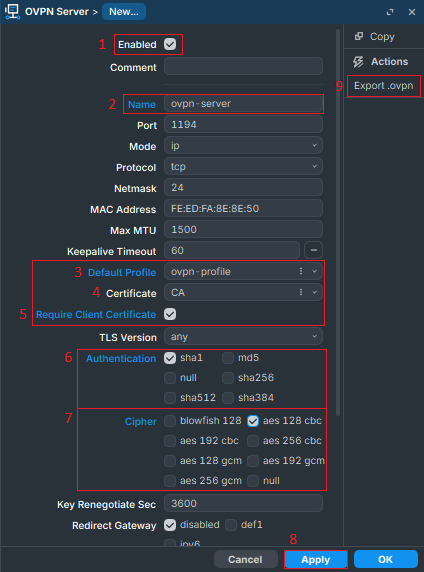
To use this service, you need to create and enable an OpenVPN server. This is the main server that will respond to your users.
1- Enable the OVPN server
2- Enter a name of your choice for the server, for example, “OVPN-server”.
3- In the default profile field, select the “ovpn-profile” you’ve created before
4- In the certificate field, select the “server-certificate” you’ve created and signed
5- Enable “Require Client Certificate”.
6- In authentication, uncheck all and enable “sha1”.
7- In cipher, uncheck all and enable “AES 128 CBC”
8- Click on Apply
9- Then click on Export .ovpn in the right sidebar
Export OpenVPN Config File in MikroTik
In this step, you will need to export an .ovpn file, which you will use on the client side to connect to your VPN. Here, you need the certificate files you exported before to generate the .ovpn file.
1- In the server field, select your ovpn-server
2- Then, in the public IP field, enter your MikroTik public IP or domain name if you have one
3- In the CA certificate, select the CA certificate you’ve exported before
4- In the Client certificate, select the client certificate you’ve exported
5- And in the client certificate key, select the client key you’ve exported
6- Click on start
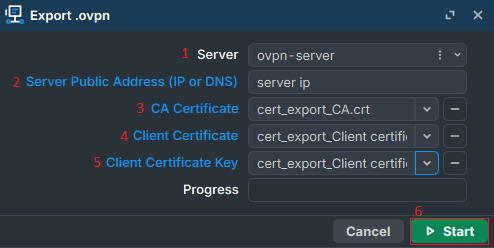
Note: In step 5, if you don’t see the client key in your MikroTik files, it means you didn’t set a password for your client certificate while exporting. Go back to step 2, “How to export certificates”, and export your client certificate again.
Create Nat Rule In MikroTik
To route connections coming from the VPN to the internet and give them access to the internet, you need to create a NAT rule in the MikroTik firewall.
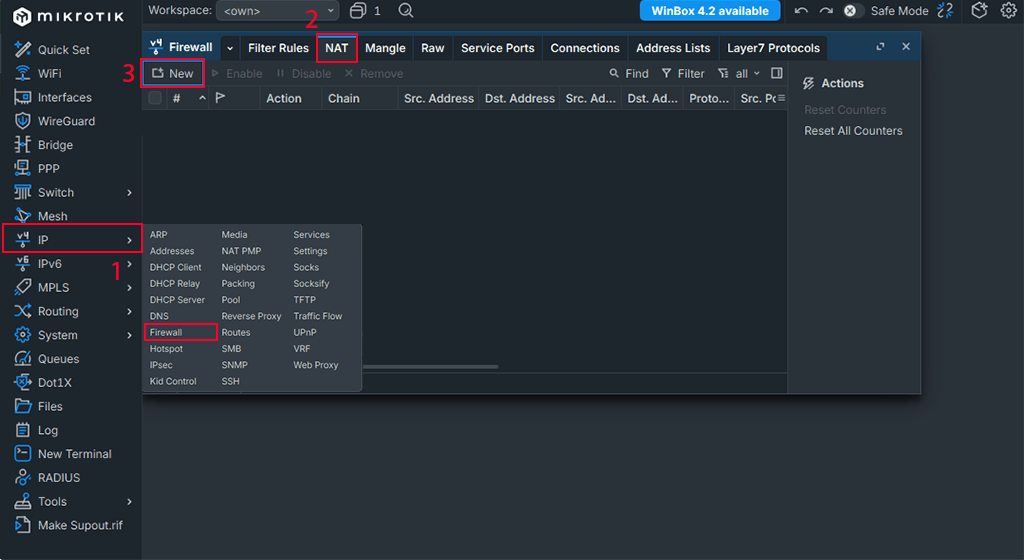
1- Click on the IP > go to the Firewall menu
2- Switch to the NAT tab
3- Click on the + New button to add a new NAT rule
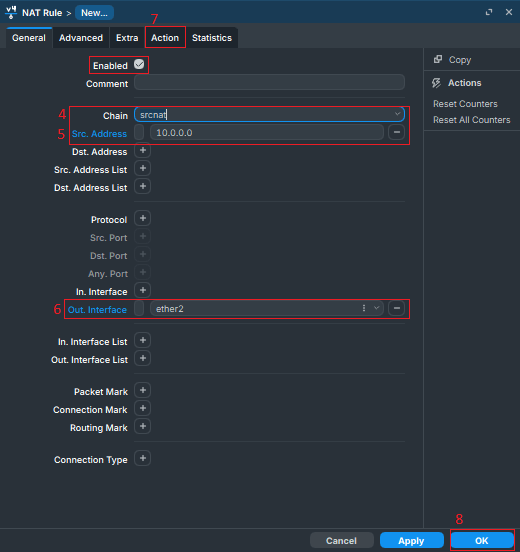
4- Set chain to “srcnat”
5- Set the source address to your VPN NetID.
6- Set out the interface to the interface where you have an internet connection. Example: “ether2”
7- And in the Action tab, set action to “masquerade”
8- Then click on OK
Note: OpenVPN uses TCP port 1994 for connection by default. Make sure the port is open in the firewall; you may have blocked the port in MikroTik.
Download OpenVPN config File From MikroTik
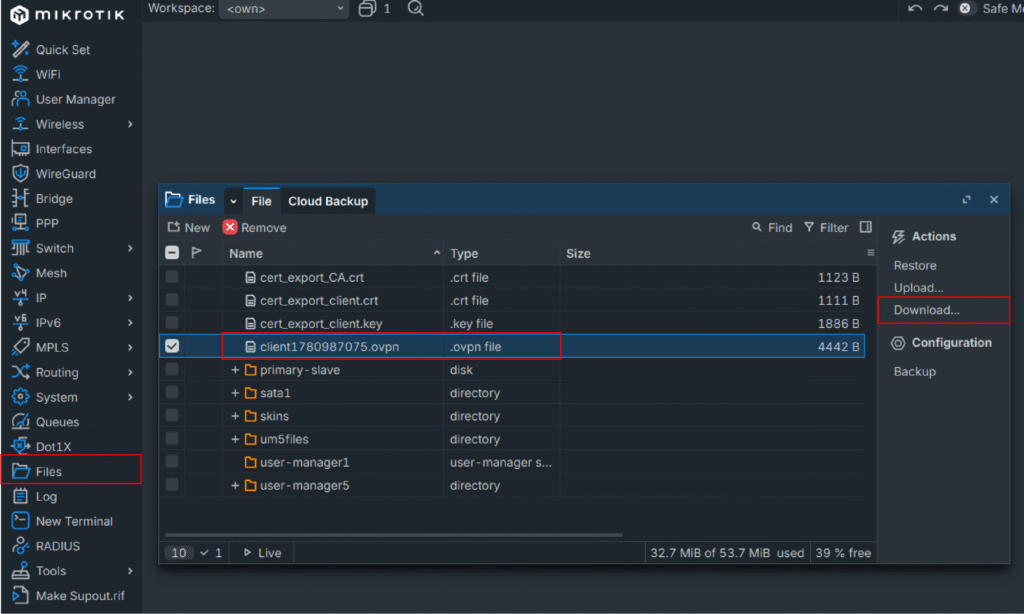
You need to download the exported config file from your MikroTik and use it to connect to your VPN.
Click on Files > Look for a file ending with .ovpn > click on your ovpn file > click on download
Connect To OpenVPN on Windows
First, you need to download the OpenVPN application from the OpenVPN website. Its application sis availble for every operating system, so you can choose what operating system you are using and download it.
After downloading and installing the OVPN application. You need to import the .ovpn configuration file into your OpenVPN application. The import process is the same in the latest versions across all platforms.
1- Open the OpenVPN application
2- On the main page, click on Upload file
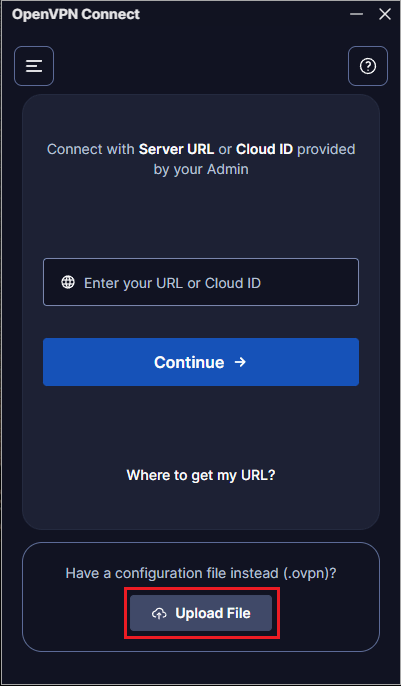
3- Locate your .ovpn file and select it. Locate your .ovpn file you’ve downloaded from your MikroTik, import it, and click on the connect button.
4- You will be asked for your username and password you entered to your PPP secret, and a passkey (phrase key you set while exporting the client certificate)
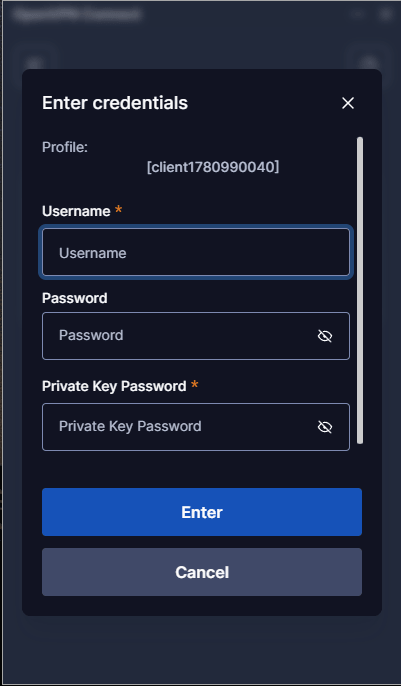
Note: If you encounter a peer certificate verification error while connecting to your VPN, review your certificates, re-export the .ovpn file, and try again.
OpenVPN limitations on MikroTik
OpenVPN on MikroTik works properly but has some limitations. OpenVPN uses both TCP and UDP protocols in standard setups, but in MikroTik, you are limited to TCP only, and it doesn’t support UDP.
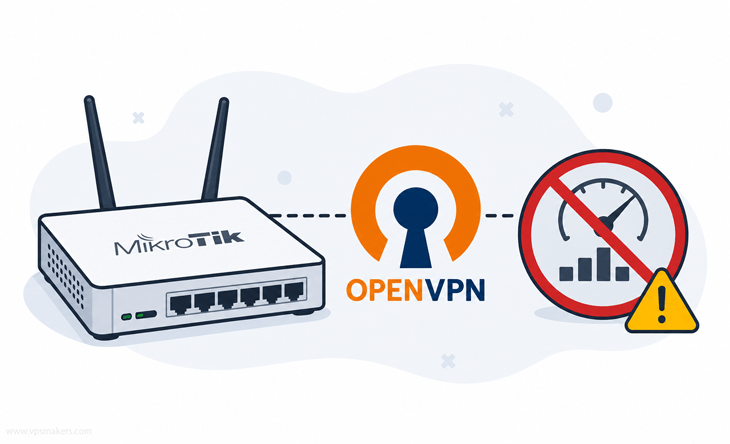
You have limited encryption and cipher options in MikroTik, which can cause connection issues with modern clients and peer certificate errors.
You may face performance limitations if you are using low-end MikroTik devices because encryption can overload when you are giving service to multiple users at the same time. You can overcome this problem by purchasing a high-end MikroTik VPS, which doesn’t have these performance issues.
OpenVPN Common Issues In MikroTik
Some small system settings may not look important, but in many cases, it breaks VPN connections if wrong.
System time and DNS settings must be correct before starting the configuration of OpenVPN. An incorrect time can cause certificate validation errors.
And wrong DNS configuration can lead to routing and NAT problems. Your VPN would connect, but there is no internet access.
Make sure that all of your DNS configurations are correct. You can set them to public DNSs like 8.8.8.8 and 1.1.1.1.
Conclusion
OpenVPN is one of the VPN services offered by MikroTik, alongside other options such as L2TP/IPsec and WireGuard.
It is heavily based on certificates for authenticating connected devices and establishing a secure, encrypted tunnel between the client and the server.
Compared to other MikroTik VPN solutions, OpenVPN has a more complex setup due to its certificate-based authentication and strict configuration requirements, but it provides strong security and flexibility for remote access and site-to-site connections.
Hope this guide helps you set up a secure connection and stay safer on the internet.

The Author Jacob R
i am Jacob a developer and cybersecurity enthusiast with strong skills in web development and a passion for building practical digital solutions,Working on web development for 4 years. Hope my guides be helpful
More from Jacob R