How to Generate SSL Certificate on Windows Server?
Generating an SSL/TLS certificate on Windows Server depends on whether the service is for private use or public access. This guide explains how to create an SSL/TLS certificate on Windows Server.
It covers choosing between Enterprise and Standalone CA, making certificate requests with certreq, issuing certificates with AD CS, creating self-signed certificates with PowerShell, using OpenSSL, and getting trusted certificates with Let’s Encrypt and Certbot.
Whether the webpage is local or global on the Internet, a new version of the browser needs an SSL certificate trusted for that specific Domain so they trust the connection between the client and the server is encrypted, especially when you install features like AD FS on Windows Server.
Generate SSL Certificate Using AD CS in Windows Server
Windows Server AD CS has two types of Certificate Authorities: Standalone CA and Enterprise CA. An Enterprise CA is integrated with Active Directory Domain Services (AD DS) to automatically issue certificates for systems and services that are part of the domain, including AD FS.
Generate INF For SSL Certificate in Windows Server
After you install AD CS with a Standalone CA, next, create a certificate request for the server that will use the SSL certificate.
First, download the .inf file from the ZIP archive we provided, extract the file, and open it in a text editor. Update the certificate request configuration with your server and domain information.
The file contains only certificate request settings, so you can safely use it as a starting point for generating your SSL certificate request.
Using certreq to Generate a CSR
After creating the INF file, use certreq in your Server’s PowerShell to generate the certificate signing request by providing the request configuration (INF file) location and also the new file that will be created:
certreq -new C:\ssl-request.inf C:\ssl-request.req
You have to see this output:
CertReq: Request Created
The .req file must be created on your C drive, and you can see it by navigating to the drive; it contains the certificate request that will be submitted to the CA.
The next step is to submit the .req file to the Standalone CA. You can do this directly from the Certificate Authority in Server Manager.
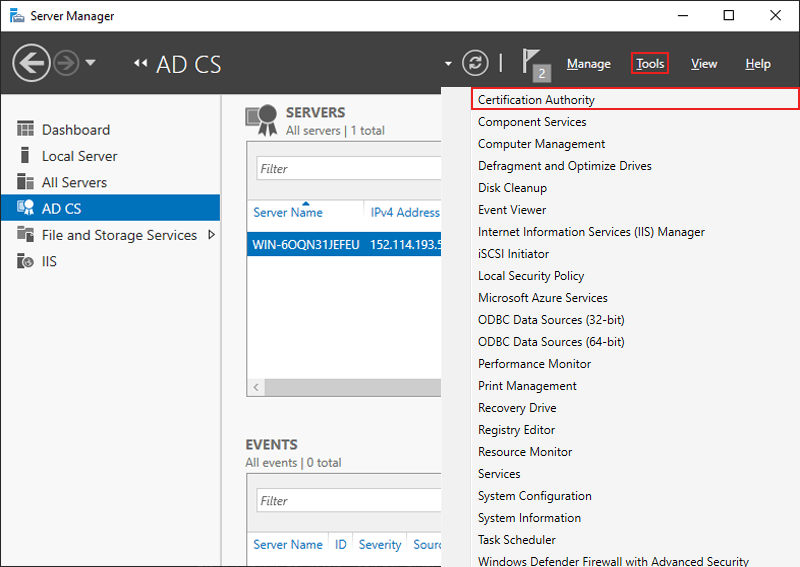
Go to CA on Windows Server From Server Manager
First, navigate to CA from Server Manager on your Windows Server, following the diagram below:
Request Certificate From Windows CA
After going to Certificate Authority, you have to right-click on your current CA that you installed during AD CS configuration, then choose Submit New Request. A window will open and prompted for importing the .req file: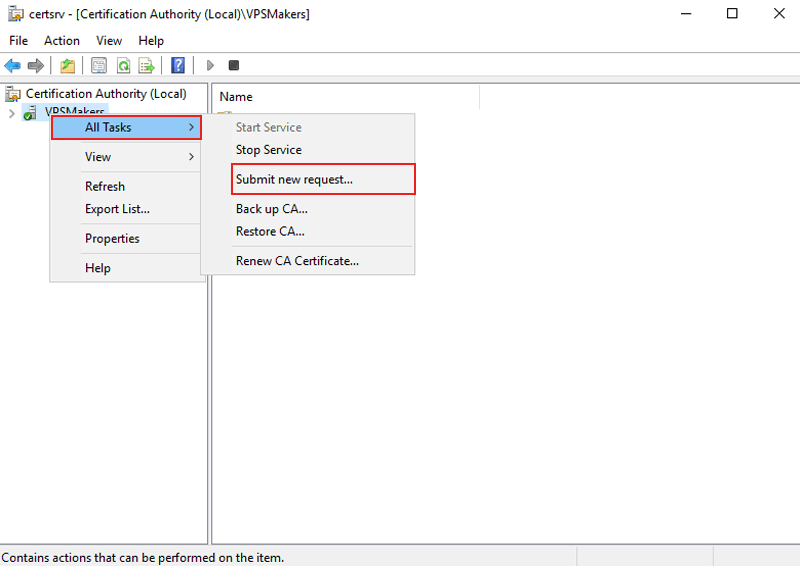
Issue Certificate with certsrv
Next, you have to issue the certificate request so the certificate is trusted by the CA and you can use it by expanding the CA and going to Pending Requests. Also, keep the request ID of your req file under the Request ID column:
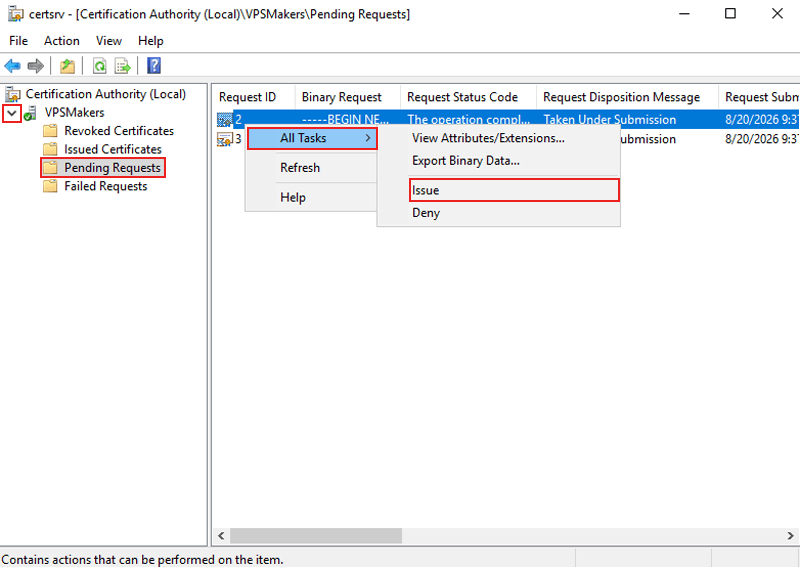
and you can verify the issuance of the certificate by navigating to Issued Certificates:
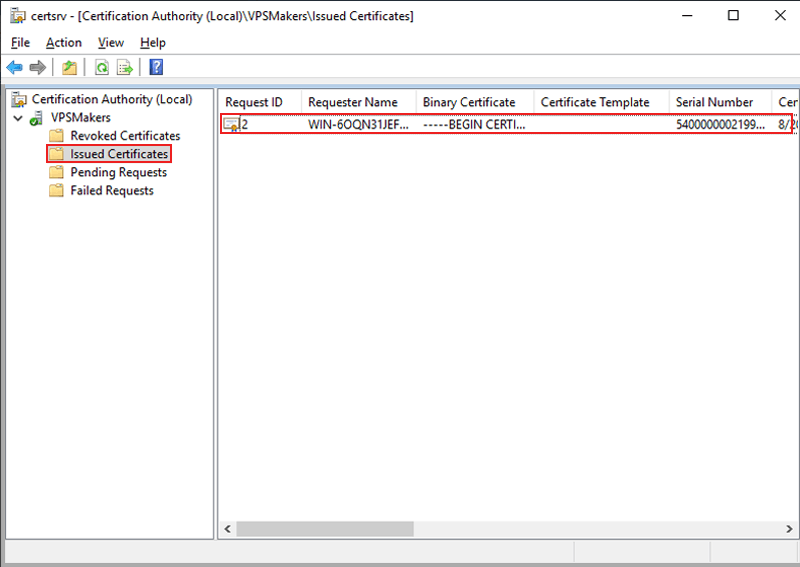
Export of Issued Certificates From CA
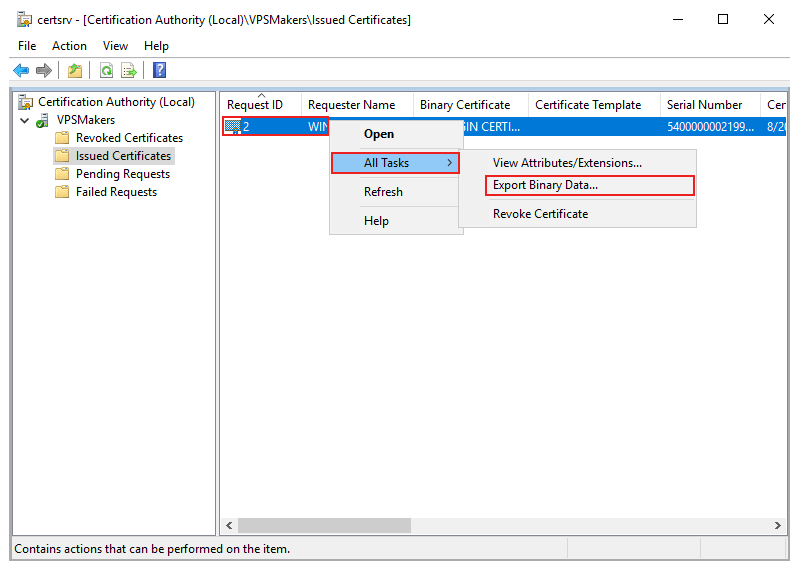
Then, to export the certificate, you have to right-click on your issued certificate and, from All Tasks, select Export Binary Data:
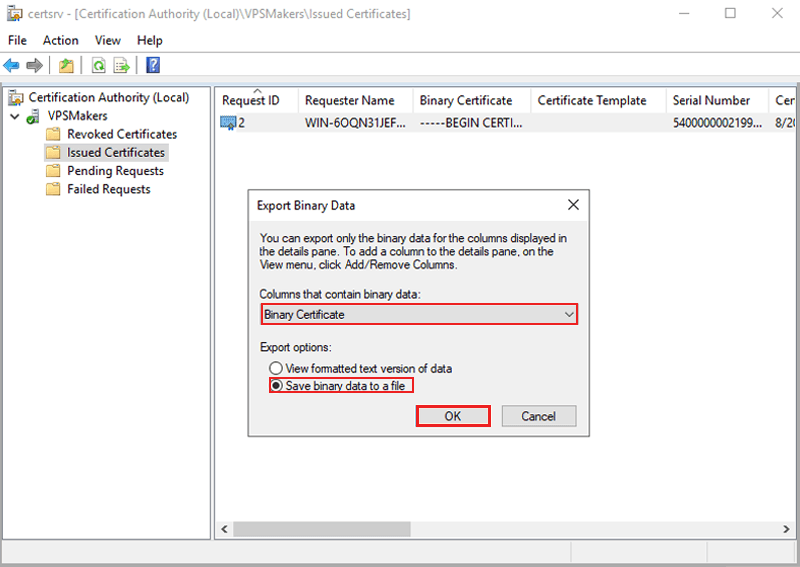
Now, you have to select Binary Certificate and choose the Save binary data to a file option to save it on your server. A window will open and prompt you to enter the name of the certificate file:
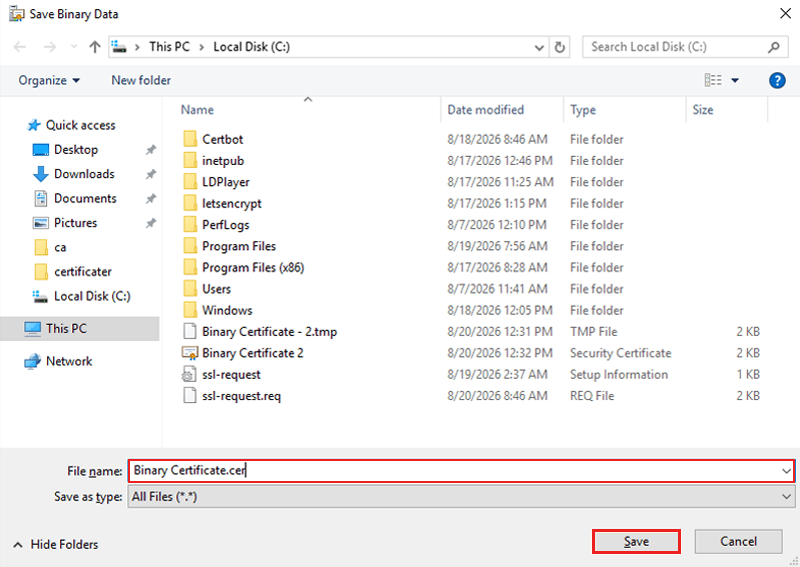
Make sure the file name ends with the .cer extension, and then save your certificate:
Generate a Self-Signed Certificate Using OpenSSL
OpenSSL can generate the private key and self-signed certificate directly. First, download OpenSSL from its website (it’s open-source software) and install it on your Windows server. Then continue using OpenSSL in PowerShell.
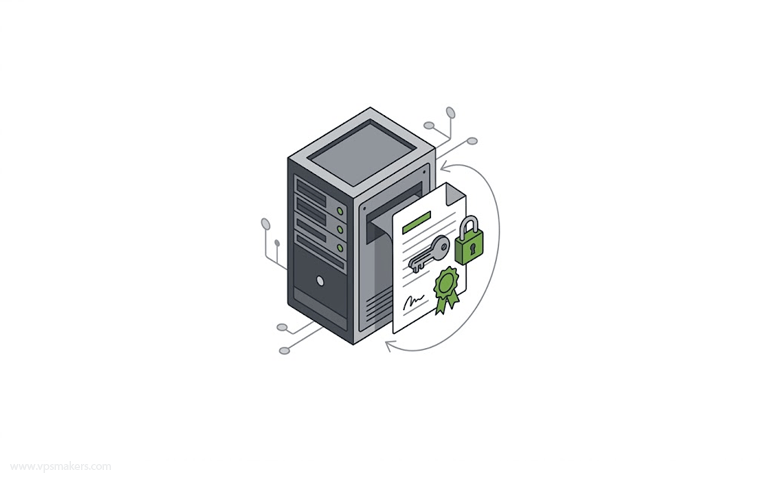
Create SSL Certificate Using OpenSSL on Windows Server
First, download the PowerShell script from the VPSMakers GitHub and run it on your Windows Server.
The script checks whether OpenSSL is installed, asks you to choose the output path, primary domain, SAN entries, requests a password for the .pfx file and certificate file name, then automatically creates the required OpenSSL configuration, generates the private key and a self-signed SSL certificate.
Finally, it exports the certificate and private key as a password-protected PFX file, which you can import into Windows Server and use with services that require an SSL certificate.
Generate Self Signed Certificate Using PowerShell
First, open PowerShell with administrator access on your Windows Server. Then, you have to specify your Domain and replace it with the default Domain name below in -DnsName, and also name your cert by replacing the value of -FriendlyName with what you want to name it:
$cert = New-SelfSignedCertificate `

-DnsName "web.contoso.local", "www.contoso.local" `

-CertStoreLocation "cert:\LocalMachine\My" `

-NotAfter (Get-Date).AddYears(2) `

-KeyLength 2048 `

-KeyAlgorithm RSA `

-KeyExportPolicy Exportable `

-Type SSLServerAuthentication `

-FriendlyName "Dev-WebServer-SSL"

$cert.Thumbprint
Save the generated certificate’s Thumbprint.
Export pfx File with Password
pfx files bundle the public certificate, its corresponding private key, and any intermediate/root CA certificates into a single, password-encrypted archive, and installing ADFS also requires a .pfx file.
First, make a folder for certs by following the command in the previous PowerShell window:
md C:\Certs\
In the PowerShell window on your Windows Server, export your certificate and provide your password by replacing the -String value with the character you want to lock the certificate:
$password = ConvertTo-SecureString -String "P@ssw0rd123!" -Force -AsPlainText
After providing your password, export the certificate by using the script, replace the -FilePath value with what you want to name your cert file, and also replace the {thumbprint} with your certificate’s thumbprint:
Export-PfxCertificate `

-Cert "cert:\LocalMachine\My\{thumbprint}" `

-FilePath "C:\Certs\DevWebServer.pfx" `

-Password $password
Generate SSL Certificate Using letsencrypt
If you have installed IIS on your Windows Server and want to use it with HTTPS, you have to issue a certificate from a valid CA, not the Windows Server itself, because it’s not in the browser CA list, and if you use a self-signed certificate, the browser encounters an error.
Keep in mind that Let’s Encrypt doesn’t give an SSL certificate to an IP using win-acme, you have to use an ACME client that supports issuing SSL certificates for IP addresses.
Note: An SSL certificate for an IP Address only valid for 6 days, they are short-lived.
Setup win acme
To make a Let’s Encrypt SSL certificate on Windows Server for a domain, first download and unzip win-acme to C:\letsencrypt. Then, open PowerShell as Administrator, go to that folder by typing cd C:\letsencrypt, and run .\wacs.exe.
Usually, you can press N to start the default certificate process and then choose 1 to check the IIS bindings. But if you only have the IP address and no domain name, this method won’t work with win-acme. You need an ACME client that can handle Let’s Encrypt IP address certificates.
Install Certbot
Certbot is an ACME client that supports IP SSL certificates for 6 days. To use Certbot, you have to install Python, then install it from Python’s library.
First, install Python on your Windows server by going to Python’s Official webpage.
Next, install Certbot with the pip command in PowerShell or CMD using the command below:
pip install certbot
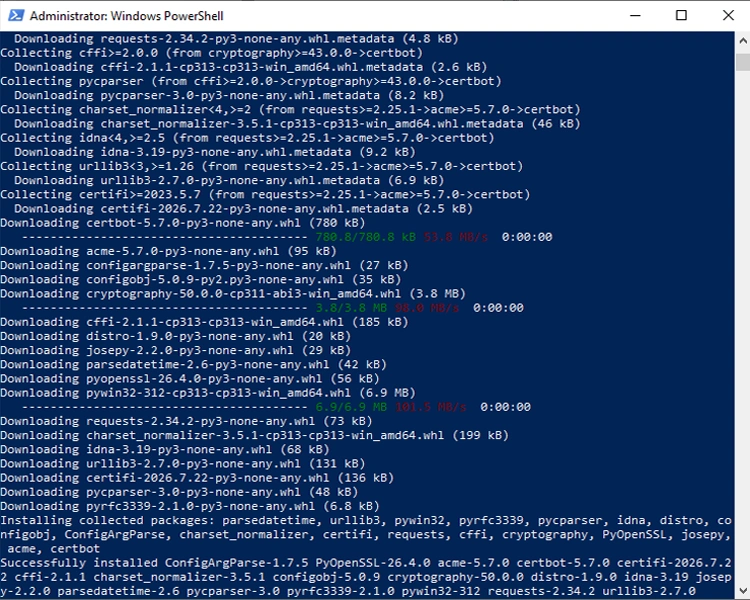
Verify Certbot Installation
After installing Certbot, verify that it is installed and PowerShell can call it:
certbot --version
You must see the version of Certbot and output like this:
certbot 5.7.0
Temporarily stop IIS on Windows Server
Certbot needs HTTP/80 ports for validation. Temporarily stop IIS using PowerShell, so Certbot can use it for verification:
iisreset /stop
Configure Firewall on Windows Server
ACME validation needs to connect to port 80/tcp on the Windows server, so you have to open port on your Windows server.
Use the command below in PowerShell to add firewall rules for port 80 to accept HTTP connections:
New-NetFirewallRule -DisplayName "Allow HTTP Port 80" -Direction Inbound -Protocol TCP -LocalPort 80 -Action Allow
Request SSL Certificate From Certbot
Finally, request an SSL certificate using Certbot for your IP Address. You’ll be asked for your email and to accept the terms.
Use the command below in PowerShell or CMD to request the certificate:
certbot certonly --standalone --preferred-profile shortlived --ip-address {your Server IP}
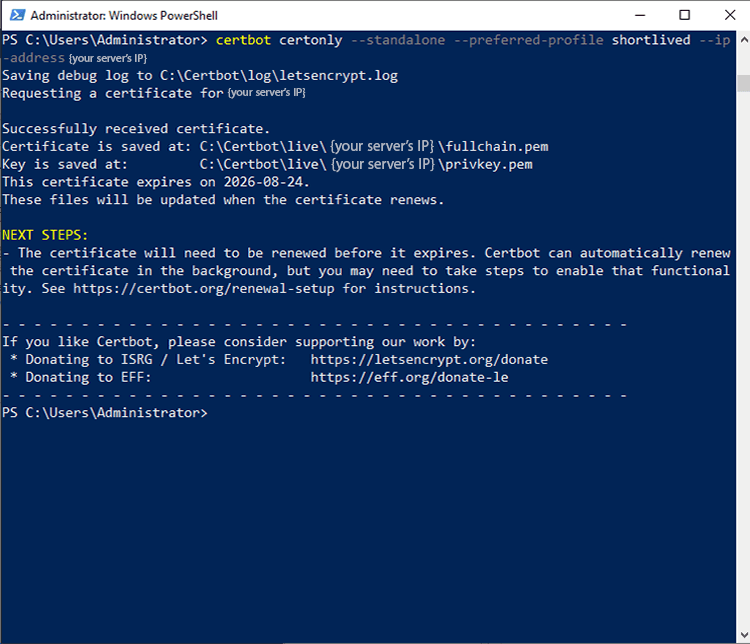
The certificate save on the C:\Certbot\live\{your server IP}\ with 4 file icluding: fullchain.pem, privkey.pem, cert.pem, and chain.pem.
Start IIS with Command
After issuing the certificate, start IIS by following the command:
iisreset /start
IIS HTTPS Binding
Next, you have to install the SSL certificate on your Windows Server so the connection is encrypted with the certificate.
Choose the Right SSL Certificate for Your Windows Server
Choosing the right SSL certificate depends on your needs; if you are using a private, local, or testing environment, the Internal / Private CA or Self-Signed certificate is the best choice for you.
Or if you, for example, build a website on your IIS Web Server or for any other Public usage, you have to use a Public CA like Let’s Encrypt.
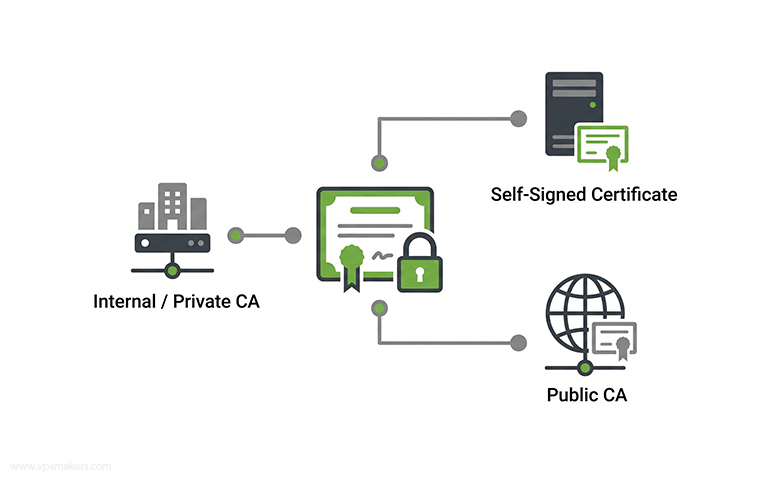
Internal / Private CA
An Internal or Private CA is a certificate authority run by your organization. It is often used for internal services like AD FS, intranet sites, internal APIs, management panels, and development environments.
You can use Windows Server AD CS to create an internal CA and give certificates to servers and other devices in your domain. Since the CA is private, browsers and devices that do not trust your organization’s root CA will usually show a certificate warning.
Public CA
A Public CA is a company that gives out certificates that are trusted by most operating systems and web browsers. These certificates are used for websites that people visit online, like www.example.com.
Some examples are Let’s Encrypt and companies like DigiCert. When a public CA gives a certificate for your website, visitors usually do not have to install anything because their browser already trusts the public CA’s certificates.
Self-Signed Certificate
A self-signed certificate is a digital certificate made and signed by the person who created it, not by a trusted company. It keeps data safe while it moves for free and is simple to create, but web browsers do not trust it automatically and will show security warnings.
| Type | Managed / Issued By | Default Trust Level | Common Use | Examples |
|---|---|---|---|---|
| Internal / Private CA | Your own organization | Trusted only within the domain / managed devices; untrusted devices show warnings | AD FS, intranet sites, internal APIs, management panels, dev environments | Windows Server AD CS |
| Public CA | Commercial / non-profit root authority | Automatically trusted by OS and web browsers | Public websites, customer portals, internet services | Let's Encrypt, DigiCert |
| Self-Signed Certificate | server host | Not trusted by default, triggers browser security warnings | Quick testing, local development | OpenSSL generated certs, PowerShell generated certs |
Which CA Should You Use?
1. Internal service: Use a Private/Internal CA and AD CS.
2. Public website: Use a Public CA like Let’s Encrypt.
3. Testing/development: Use a Self-signed certificate with PowerShell or OpenSSL.
4. AD FS in Active Directory: Use an Internal CA or a suitable public certificate, based on whether the AD FS service is for internal use or for the Internet.
Difference Between Enterprise and Standalone CA
An Enterprise CA is good for domain environments because it supports certificate templates, automatic enrollment, and automatic trust using Active Directory, so you have to install Active Directory on Windows Server.
A Standalone CA does not require Active Directory and is better for development and testing systems or environments where certificates are managed manually.
Summary
The key step is to pick the right method based on your needs: use an internal CA for private environments, self-signed certificates for testing, and a public CA for services that need to be trusted by users online.
After creating the certificate, ensure it has the right domain names or IP addresses, protect the private key, install it correctly, and set up the service to use it.
With the right CA and setup, you can safely enable HTTPS and TLS on your Windows Server while keeping the certificate trusted and secure.
FAQ
How long will an SSL certificate be valid for?
The time an SSL/TLS certificate is valid depends on its type and issuer. Trusted public certificates are usually valid for a short time due to security rules.
For example, Let’s Encrypt certificates last for 90 days and renew automatically.DigiCert public certificates used to last up to 398 days, but starting in 2026, the limit is 200 days.
Now, DigiCert limits new public TLS certificates to 199 days, which is about 6.5 months. This limit will get shorter over time: to 99 days starting March 15, 2027, and then to 46 days from March 15, 2029.
Self-signed and internal certificates, like those from Microsoft AD CS, can last much longer, usually one to three years or more, depending on the organization’s rules.
Why Does SSL Certificate Lifetime Change?
SSL certificates now last for a shorter time to improve security and limit problems with old or hacked certificates. New certificates can be renewed automatically, while longer SSL purchases usually cover the service time instead of one certificate being valid for the whole time.

The Author Robert Smite
Hello! I'm Robert, specializing in virtual servers and cloud technology. With expertise in managing and optimizing virtual servers, my focus is on delivering understandable and practical content in this field. My goal is to enhance knowledge and assist individuals in selecting the best virtual services for their needs.
More from Robert Smite