How to install WordPress on cPanel?
To install WordPress on cPanel, you need to have cPanel hosting from a shared hosting provider or install cPanel yourself and configure it manually on a Linux VPS.
Both shared hosting and VPS can provide access to cPanel, but they differ in how the server resources are allocated and managed. After getting access to cPanel, you have several ways to install WordPress using the cPanel WordPress Toolkit or installing WordPress manually.
In this guide, we will walk through how to install WordPress using WP Toolkit, which is one of the easiest methods available on cPanel.
Install WordPress on cPanel using cPanel WP Toolkit
First, access your cPanel with its IP address or your domain name. If you are using cPanel on shared hosting, you may be provided with a dedicated subdomain for your cPanel, something like this
cpanel.example.com
Log in to cPanel and Open WP Toolkit
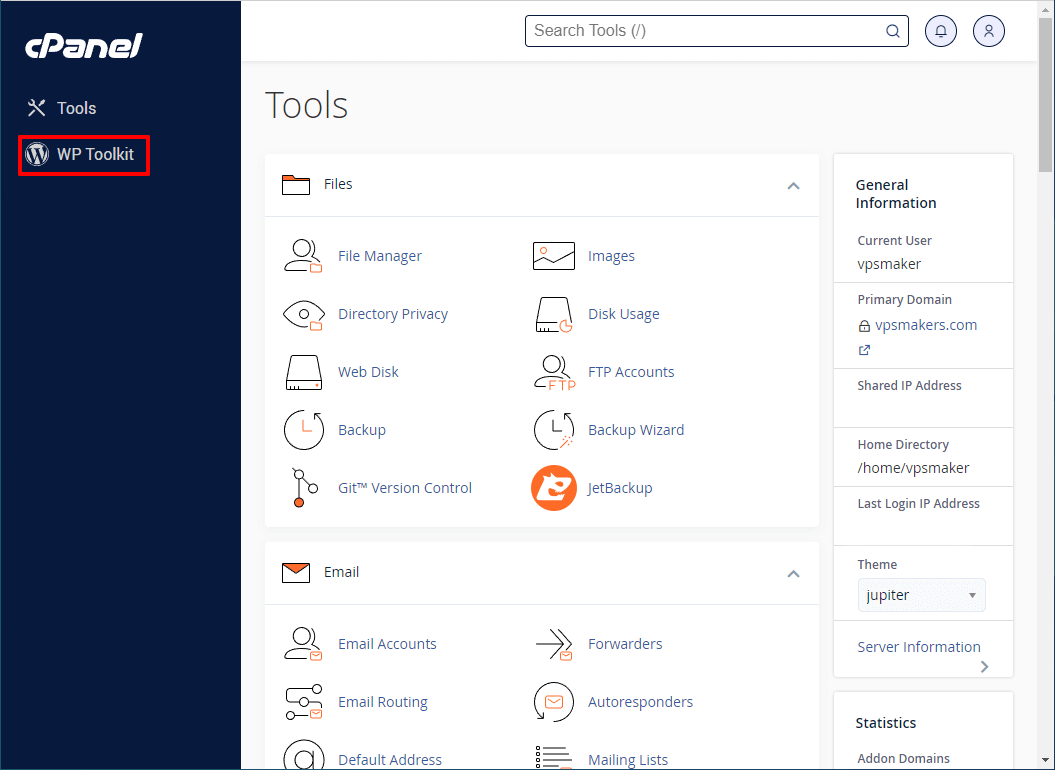
Log in to your cPanel account using your credentials. Then, from the cPanel sidebar, find and click WP Toolkit to open the WordPress management interface.
Start WordPress Installation
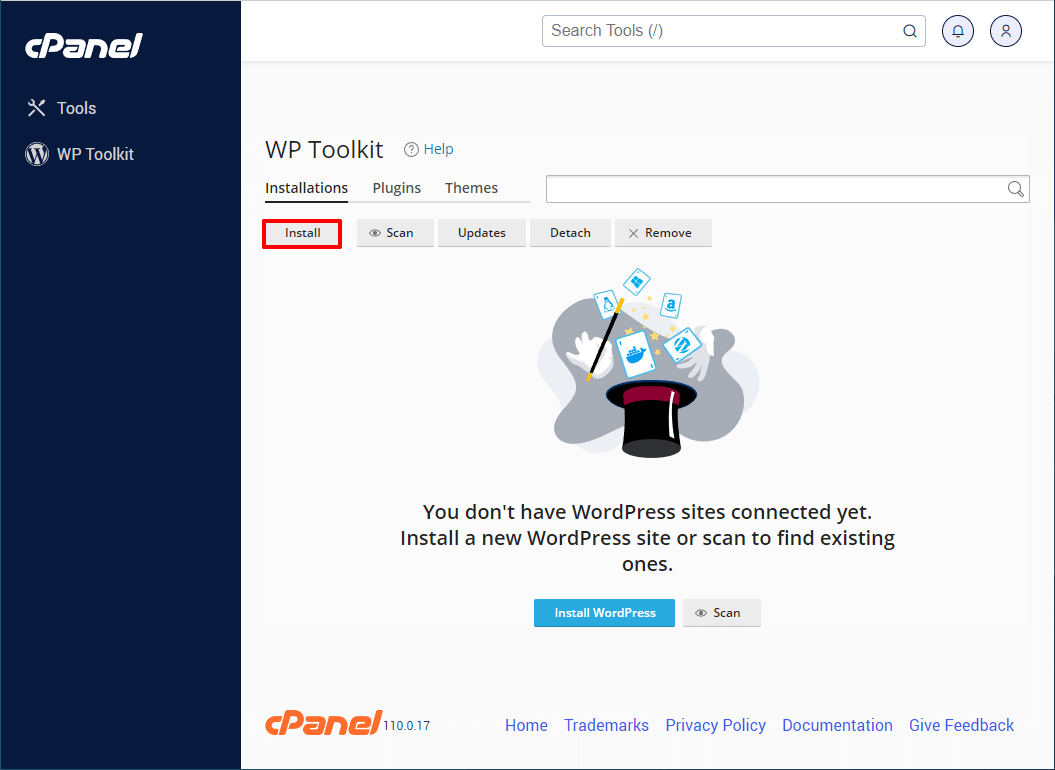
The Toolkit page appears. Under the “Installation” section, click “Install”.
Configure the WordPress Installation in WP Toolkit
In the opening panel, you can configure the WordPress configuration, including your website title, the starting theme, website language, and the destination to install WordPress in.
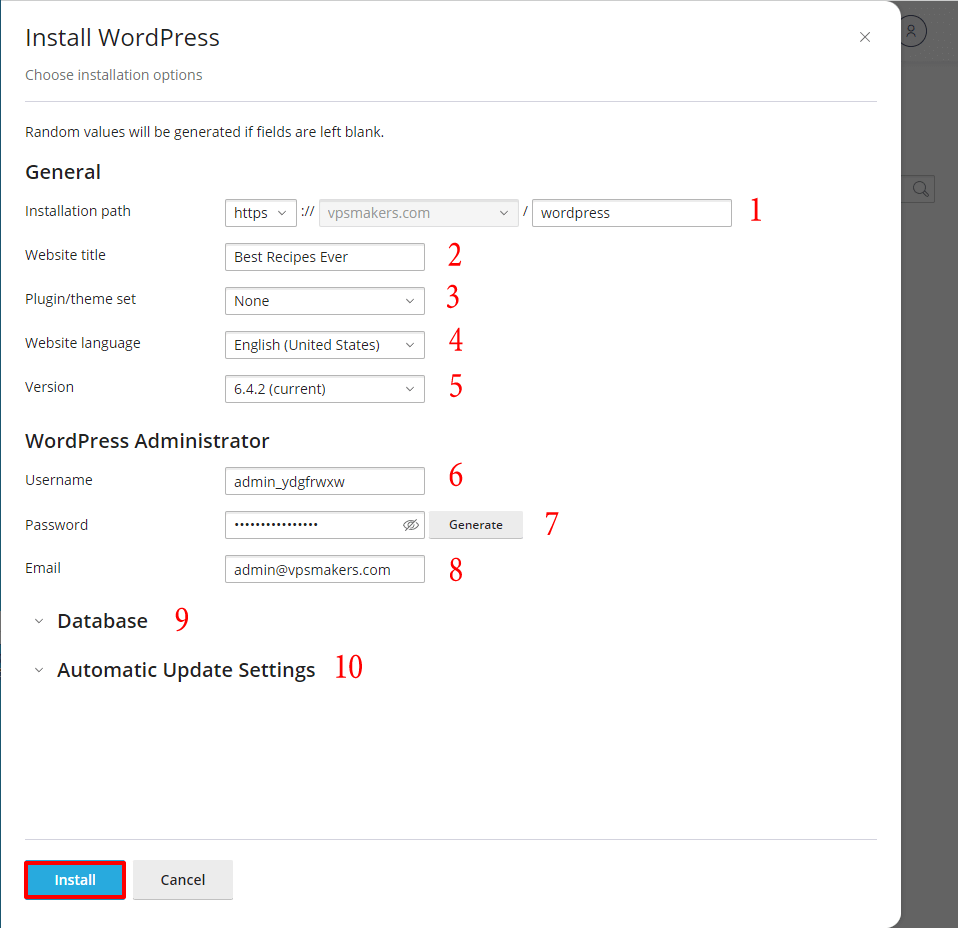
Note: If you want WordPress to load directly on your main domain when visitors enter it, leave the Installation Path field empty and use the default setting. Do not add a directory or change the path.
Fill the field with your username, password, email address, and all other options you want to use for this WordPress website, then continue.
Configure the Database
The database options allow you to customize how the WordPress database is created and configured. If you don’t have a specific reason to change these settings, you can leave them at their defaults.
Configure Automatic Updates
In Automatic Update Settings, you can optionally configure how WordPress, plugins, and themes are updated. These update settings can also be managed directly from the WordPress dashboard, so it is generally best to leave them at their default settings unless you have a specific reason to change them.
Install WordPress
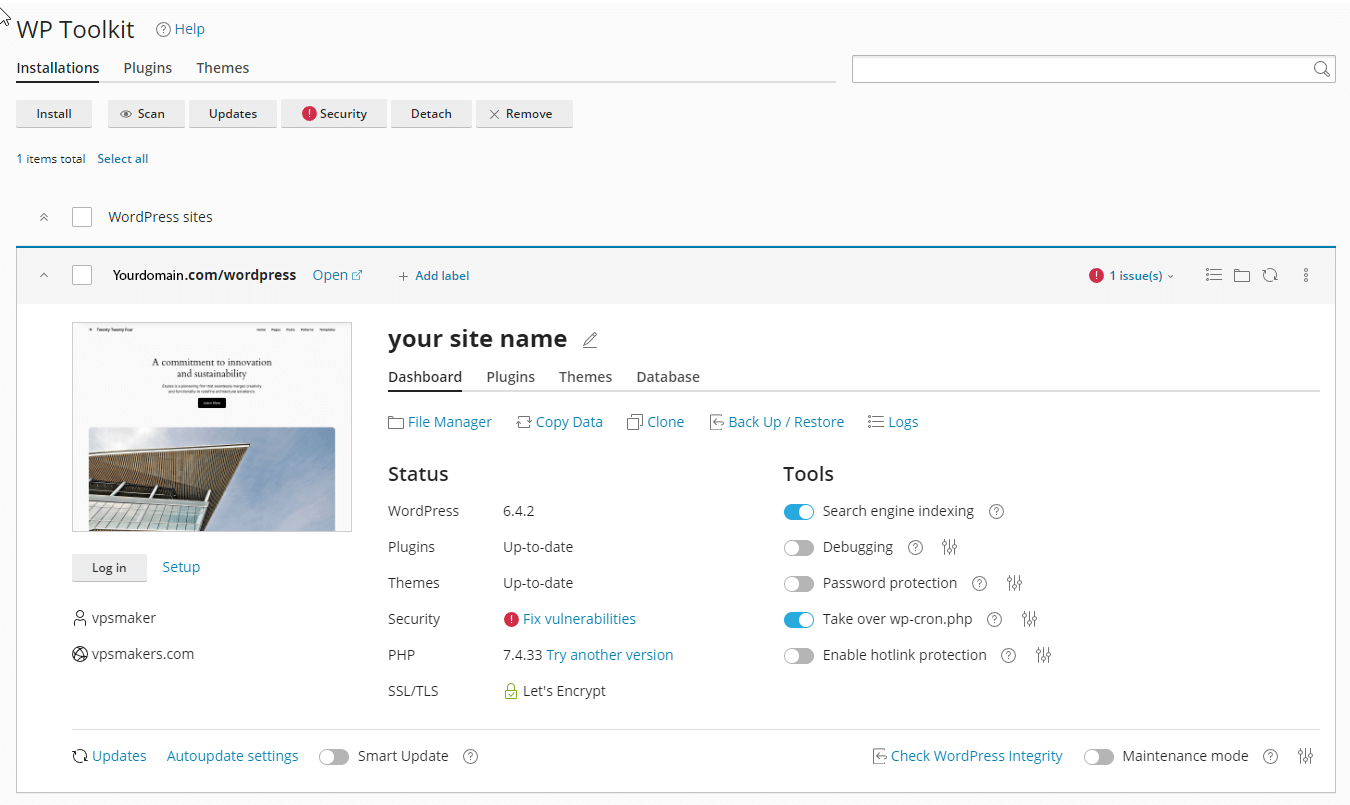
After doing these steps, wait a while for WordPress to install. After the installation is complete, WP Toolkit will display your new WordPress installation and provide various management options. To access the full WordPress dashboard, click Open.
Here, you can click Open in the top heading section to open the WordPress control panel itself, or you can enter the WordPress dashboard by replacing your website domain name in the URL below:
https://example.com/wp-admin/
WordPress VS WP Toolkit Comparison
WordPress and WP Toolkit are used for different purposes. WordPress is the content management system (CMS) where you build and manage your website, while WP Toolkit is a management tool that helps you install, configure, update, and maintain WordPress from cPanel.
The table below highlights the main differences between WordPress and WP Toolkit and shows what you can use each one for.
| Feature | WP Toolkit | WordPress |
|---|---|---|
| Install WordPress | ✅ | ❌ |
| Manage Plugins | ✅ | ✅ |
| Manage Themes | ✅ | ✅ |
| Create Pages / Posts | ❌ | ✅ |
| WordPress Settings | ⚠️ | ✅ |
| Backup & Restore | ✅ | ⚠️ |
| Clone Website | ✅ | ❌ |
| Security Management | ✅ | ⚠️ |
| Change PHP Version | ✅ | ❌ |
| Manage Files / Database | ✅ | ⚠️ |
Note: ⚠️ means the feature is possible, but may be limited or require another tool or plugin.
Shared Hosting vs VPS for WordPress
Both VPS and shared hosting can be used to host a WordPress website. Shared hosting is usually the most practical choice for smaller websites because it is simpler to manage and requires less server configuration and, most of the time, costs less than a VPS.
But it has some disadvantages when you want to run mail servers for your website. In many shared hosting environments, websites share an IP address with other customers. If other websites using the same IP have a poor sending reputation, it can affect email deliverability and increase the chance of legitimate emails being sent to spam.
As your website and business grow, you will face some other limitations in shared hosting too, which may prompt you to migrate to a VPS hosting solution, which typically provides dedicated virtual resources and the option to use a dedicated IP address, along with greater control over the server environment.
For a small or new WordPress website, shared hosting is often enough. As your website grows and requires more resources or control, you can consider moving to a VPS.
Summary
Installing WordPress involves multiple methods, and using WP Toolkit is the simplest method on cPanel. In this guide, we’ve walked through the WordPress installation and explained the differences between shared hosting and VPS hosting to help you choose the right environment for your WordPress website.
FAQ
What is the difference between WordPress and cPanel?
WordPress and cPanel names come up a lot, but they serve different purposes and are not the same thing. WordPress is a content management system (CMS) used to create, manage, and publish website content.
cPanel is a web hosting control panel used to manage your hosting environment. Using cPanel, you can manage files, domains, databases, email accounts, and other applications such as WordPress that are installed in cPanel.
Why use WordPress with cPanel?
Using WordPress with cPanel makes it easier to manage both the website and hosting environment with a graphical interface. WordPress provides you with the powerful tools you need to build and manage your website.
On the other hand, cPanel provides a simple but powerful environment for managing all the files, domains, databases, and other hosting features your WordPress website relies on.
Can I install WordPress without cPanel?
Yes. You can install WordPress on a simple web server, which gives you the same performance and the same WordPress tools, but in this case, managing the web server’s own hosting settings and configuration can be harder than using cPanel.
However, it can be hard for beginners. If you want, you can learn how to install Nginx, which is a powerful web server you can use to host your WordPress website on an Ubuntu VPS.
Can I install WordPress manually on cPanel?
Yes. You can also install WordPress manually by downloading the WordPress files from the official WordPress website, uploading them to your cPanel, creating a database and DB user, and completing the installation through your browser.

The Author Richard.M
Richard started out as a member of the support team and is now a full-stack web developer and support team lead at VPS Makers. He is passionate about providing people with top-notch technical solutions based on his 5 years of experience in web hosting, but as much as he enjoys coding and creating new works, he secretly dreams of becoming a sports star.
More from Richard.M