
Install Nginx From Source Code on Ubuntu
Nginx can be installed with a tar file, which you can download from the official Nginx website. In this method, you need to download the tar file, extract it, and then compile the source code yourself to build the application.
This is a more advanced method. If you want an easier option, we recommend installing it with the Linux package manager; you can learn how in this guide: How to Install Nginx on Ubuntu Server Article.
Nginx Hardware Requirements
- Ubuntu OS 20.04 up to 26.04
- CPU 1 Core
- 512MB RAM
- 100MB Storage
These are the minimum requirements for Nginx. If you want to run a proper web server with Nginx, we recommend using an Ubuntu Server that meets or exceeds the requirements above.
Update Ubuntu packages
To start installation, log in to your server with Bitvise, PuTTY, or your OS CLI and enter user&pass to connect. Then you need to update your Ubuntu packages to make sure you download the latest packages. By using the command below, you can update your Ubuntu repository list:
sudo apt update
Install Prerequisites for Nginx
Some dependencies need to be installed for Nginx to run correctly with stability.
Also, to compile Nginx from its source, you have to install some dependencies that you will need later.
Execute the command below to install dependencies:
sudo apt install libpcre3 libpcre3-dev zlib1g zlib1g-dev libssl-dev curl gnupg2 ca-certificates lsb-release ubuntu-keyring net-tools -y
After you have the prerequisites, begin the installation by following the step-by-step instructions.
Download Nginx Tar gz on Ubuntu
You can download any version of Nginx you want from Nginx Archive using the wget command.
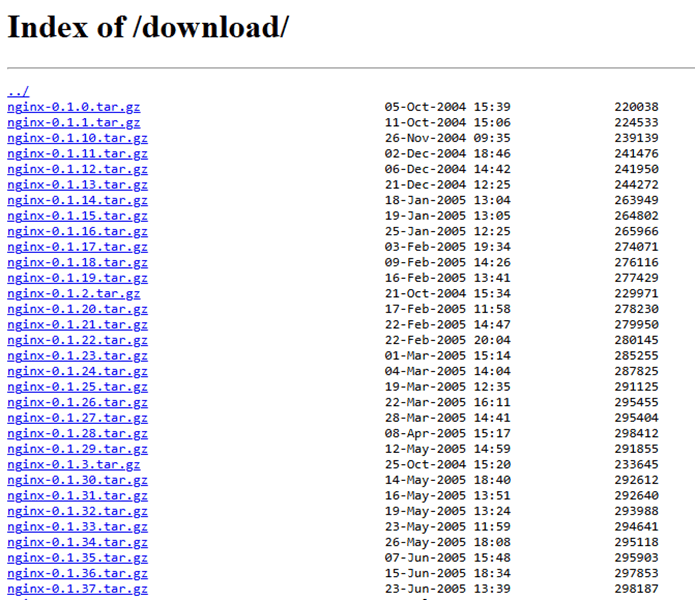
All you need to do is select your version and copy its download link to the command below.
This command downloads the latest version of the Nginx Tar File:
wget https://nginx.org/download/nginx-1.31.2.tar.gz
Extract Nginx Tar File on Ubuntu
Extract the downloaded Nginx archive with the tar tool by running this command:
tar -zxvf nginx-1.31.2.tar.gz
Navigate to Nginx Directory
After extracting the tar file, you have to find the directory of the extracted nginx content with the ls command:

In this step, you need to go to the Nginx directory to start compiling the Nginx Application using the cd command:
cd nginx-1.31.2
Here, in this example, our version is 1.31.2; your version can be different.
Install Build Essential on Ubuntu Server
You need to install Build Essential, which provides tools for compiling and building software from source in Linux devices.
sudo apt install build-essential -y
Create Nginx Configuration File
This command creates a config file for the build-essential tool that will be used later for configuration of the installation file.
./configure
Additional Configuration for Nginx
It’s better to configure Nginx with these switches (options) for a better-structured and specified location of Nginx files.
This command configured Nginx with the needed switches that we passed to:
./configure --sbin-path=/usr/bin/nginx --conf-path=/etc/nginx/nginx.conf --error-log-path=/var/log/nginx/error.log --http-log-path=/var/log/nginx/access.log --with-pcre --pid-path=/var/run/nginx.pid --with-http_ssl_module --with-http_v2_module --without-http_autoindex_module
Compile Nginx on Ubuntu
Running this command starts compiling Nginx from source and configures it automatically from the configure file built in the previous step.
sudo make
Install Nginx Compiled Source
In this step, you need to install the compiled Nginx file by running the command below:
sudo make install
Create Service for Nginx in Systemd
To use Nginx in Linux with this method, the installed Nginx location should be added to systemd to make the system recognize Nginx.
Running this command will open the Linux text editor to edit systemd configurations.
sudo vim /lib/systemd/system/nginx.service
Copy Command of Nginx Service
To use Nginx, copy the text below and paste it into the Linux text editor. After pasting, press ESC on the keyboard, press “:”, and enter “wq” (write and quit) in the Linux text editor.
[Unit]

Description=The NGINX HTTP and reverse proxy server

After=syslog.target network-online.target remote-fs.target nss-lookup.target

Wants=network-online.target

[Service]

Type=forking

PIDFile=/var/run/nginx.pid

ExecStartPre=/usr/bin/nginx -t

ExecStart=/usr/bin/nginx

ExecReload=/usr/bin/nginx -s reload

ExecStop=/bin/kill -s QUIT $MAINPID

PrivateTmp=true

[Install]

WantedBy=multi-user.target
You can find the configuration text above on GitHub: GitHub Gist.
Enable Nginx Service
You have to reload the daemon because the system service folders and services have changed
sudo systemctl daemon-reload
After reloading the daemon, we have to enable and start the Nginx service in systemd.
sudo systemctl enable --now nginx
Note: –now switch: it both enables and starts the services.
Verify Installation of Nginx on Ubuntu
After you have installed Nginx from source, verifying the installation is necessary to ensure it’s successful because this method installs it manually. Use the command below to prove it:
nginx -v
You’ll have output like:
Nginx version: nginx/1.24.0 (Ubuntu)
Nginx has a default welcome page; seeing it in your browser completely shows that your installation is successful and your web server is running correctly.
Open your browser and go to http://YOUR-VPS-IP or, if you have a domain, you can use it.
You will see the Nginx welcome page:
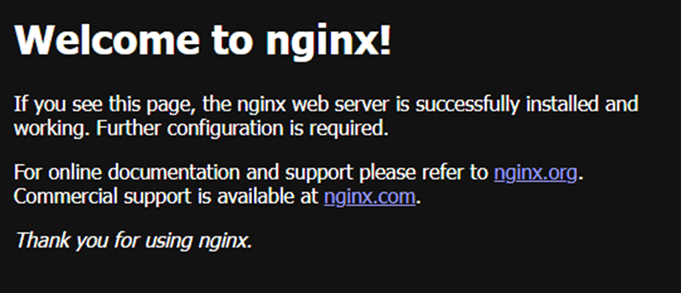
You’ve completed the installation of Nginx. Now you need to configure the firewall by adding allow rules on it, to accept Nginx connections.
Configure Ubuntu Firewall
Security is important when you install an online service, especially a web server; it’s recommended to set up a firewall on an Ubuntu server for more security.
Default ports for Nginx are HTTP/80 and HTTPS/443. If the firewall is installed but refuses connections to these ports, you have to open ports in the Linux firewall so users can establish connections to your web servers.
Using the command below, add and apply the Nginx needed port rules to your firewalls:
sudo ufw allow ‘Nginx Full’

sudo ufw reload
Summary
you’ve successfully installed Nginx from source on Ubuntu by downloading the Nginx source tar file, extracting it, compiling the source code with the make command, and verifying the installation by accessing the Nginx web server in your browser.

The Author Richard.M
Richard started out as a member of the support team and is now a full-stack web developer and support team lead at VPS Makers. He is passionate about providing people with top-notch technical solutions based on his 5 years of experience in web hosting, but as much as he enjoys coding and creating new works, he secretly dreams of becoming a sports star.
More from Richard.M