How to Install Ubuntu Desktop on VMware Workstation Pro 26?
To install Ubuntu Desktop on your Windows PC without installing it directly on your hardware, you can install it as a virtual machine using VMware Workstation, which gives you an isolated environment for development or testing.
But if you want to use it for a production enviornment its not recommended to use VMware on your local computer; you can instead use an online Ubuntu VPS for real production use cases.
The process involves downloading the Ubuntu ISO, creating a new virtual machine, assigning hardware resources, and completing the installation process with the Ubuntu Desktop visual installer.
In this guide, you will learn how to install Ubuntu on a virtual machine using the VMware application.
How to Install Ubuntu on VMware Workstation Pro 26
First, you need to download VMware Workstation Pro 26 from the Broadcom official website and install it, then continue to install Ubuntu on it.
After installing VMware Workstation, follow the steps below that cover the full installation process from downloading the Ubuntu ISO to starting a new Ubuntu virtual machine.
Download Ubuntu Desktop ISO
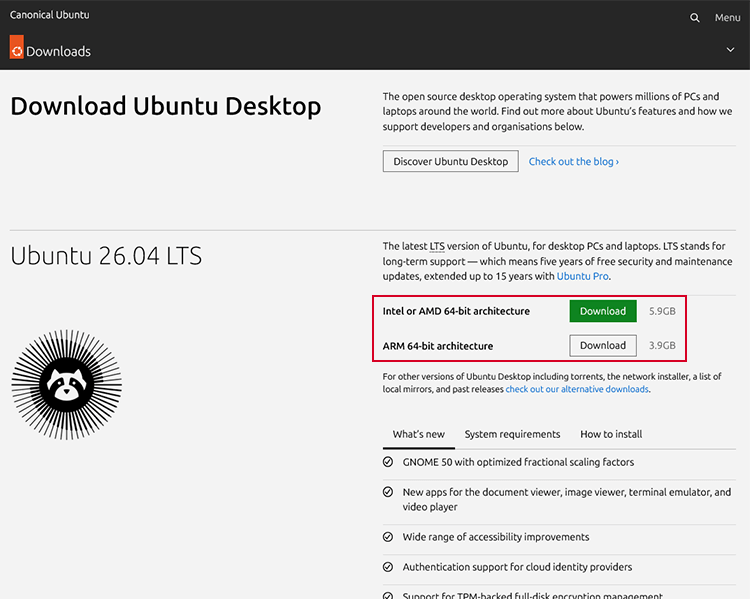
Before creating a virtual machine, start by downloading the Ubuntu Desktop ISO from the official Ubuntu website. The ISO contains the installation file required to install Ubuntu on VMware.
Go to the Ubuntu Desktop download page and download the latest LTS (Long Term Support) release. The LTS version is generally the better choice for a stable virtual machine; it receives long-term security and maintenance updates.
Download the Ubuntu Desktop version that is compatible with your CPU architecture.
Create a New Virtual Machine in VMware Workstation
Now, after downloading your desired Ubuntu version, we will use Ubuntu Desktop 26.04 LTS in this installation.
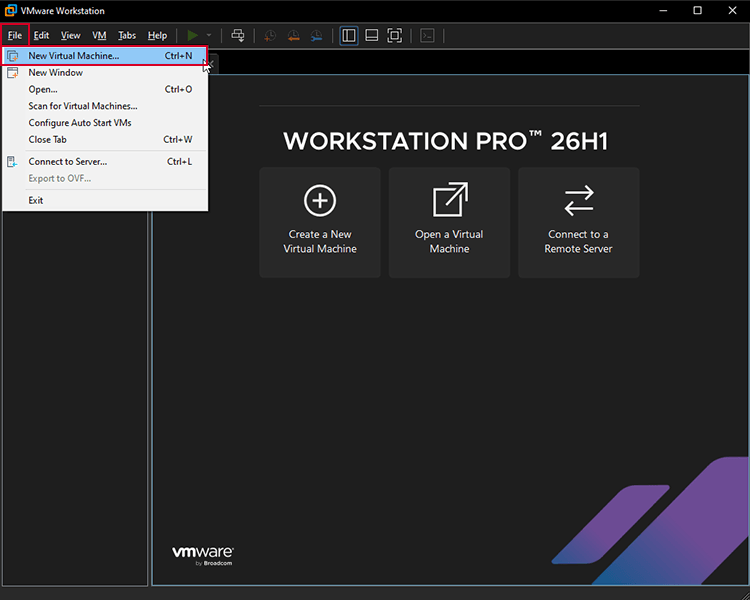
Step 1 – Open VMware Workstation and click File > New Virtual Machine or press the Ctrl + N shortcut to open the VM creation wizard.
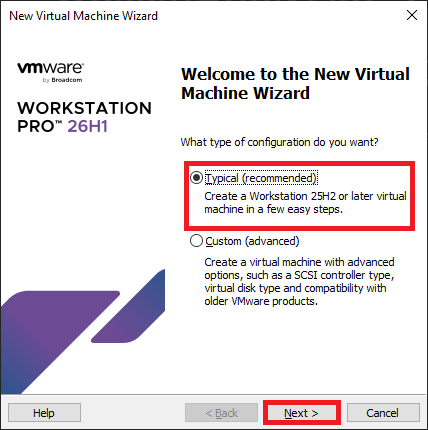
Step 2 – After opening the virtual machine creation wizard, select Typical installation and click Next.
Select the Ubuntu ISO
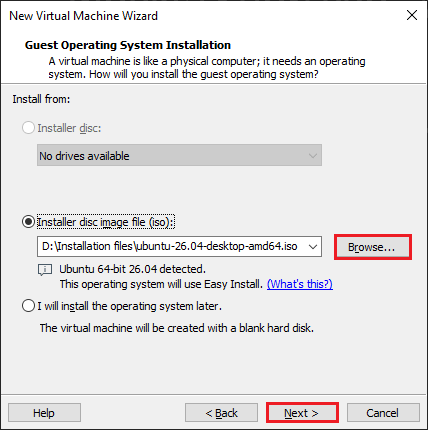
Here, in this step, you need to select the downloaded Ubuntu installer ISO, or you can choose I will install the operating system later to only create the virtual machine and add the operating system later.
Click on Browse and select the downloaded Ubuntu installer ISO, then click Next.
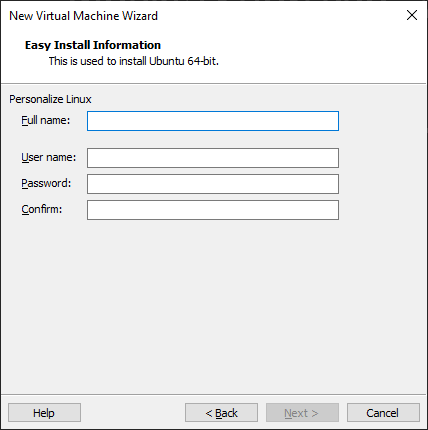
Here you will need to create a user by entering a full name, username, password, and password confirmation. It will automatically create a user with this information on your Ubuntu after installation.
Specify a name for your virtual machine and specify the location that you want all the files to get stored in.
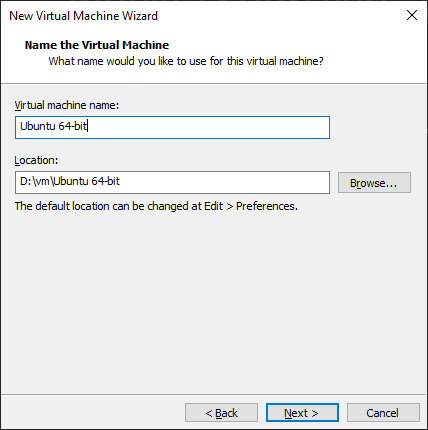
Note: The location you are selecting should at least have 20GB of space to store the virtual machine files.
Set Virtual Disk Size in VMware
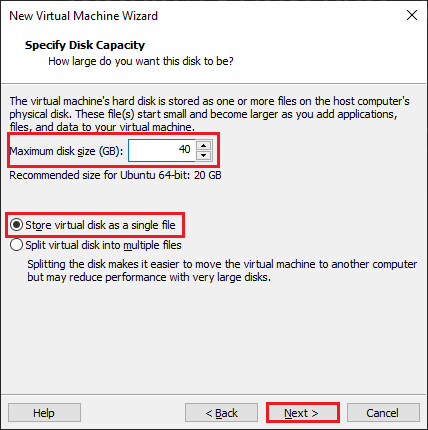
Specify disk space for your virtual machine and select how you want your virtual machine files stored. It can be either one file or split into multiple files. It is recommended to single file option because it’s easier to transfer to other devices if needed.
All files will get stored in the location you’ve selected in the previous step, so check that the location you want to store your files has enough storage.
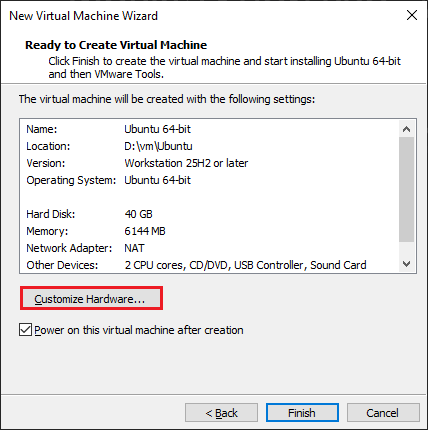
Here you will see an overview of your virtual machine specification. If you want to change RAM and CPU resources, click on Customize Hardware.
Configure the Virtual Machine Hardware
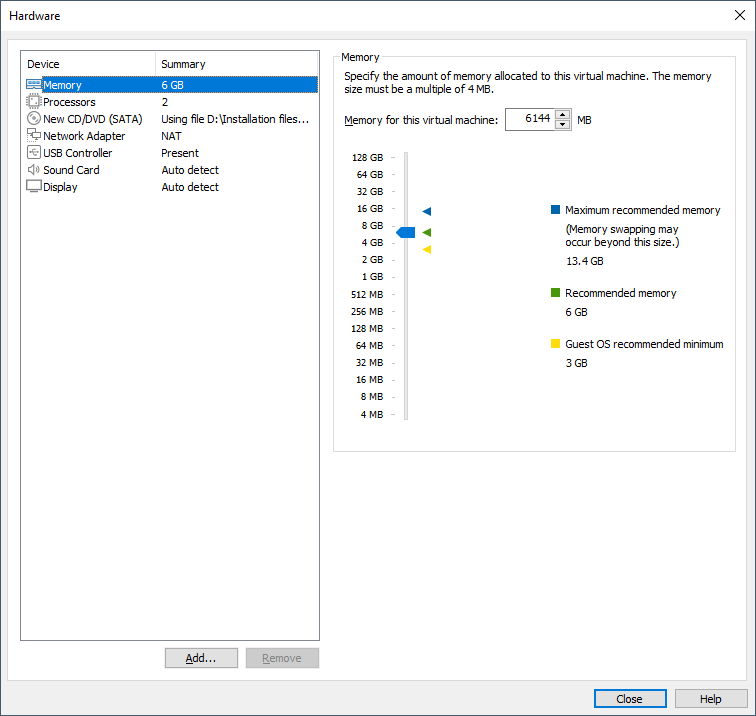
On this page, you can configure your VM settings in a more advanced way, like you can change its virtualization settings and network connection methods.
In the Memory tab, you can increase and decrease the memory according to the capacity of your computer.
In the Processor tab, you can change how many CPU cores you want to specify for your Ubuntu VM to run with:
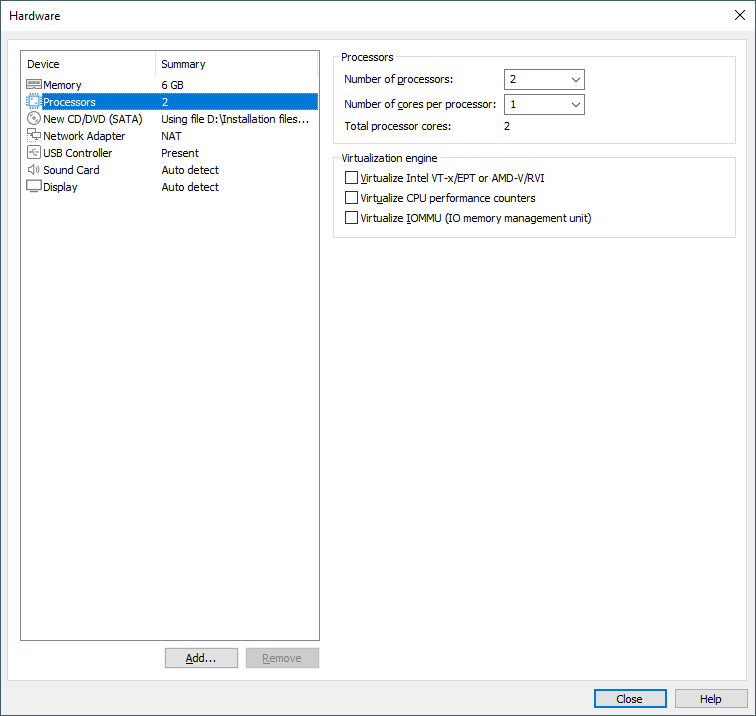
Note: Here, don’t assign more resources than your system has. Otherwise, the VM may not start. Also, leaving too few resources for your own OS can cause lag.
Start the Ubuntu Virtual Machine
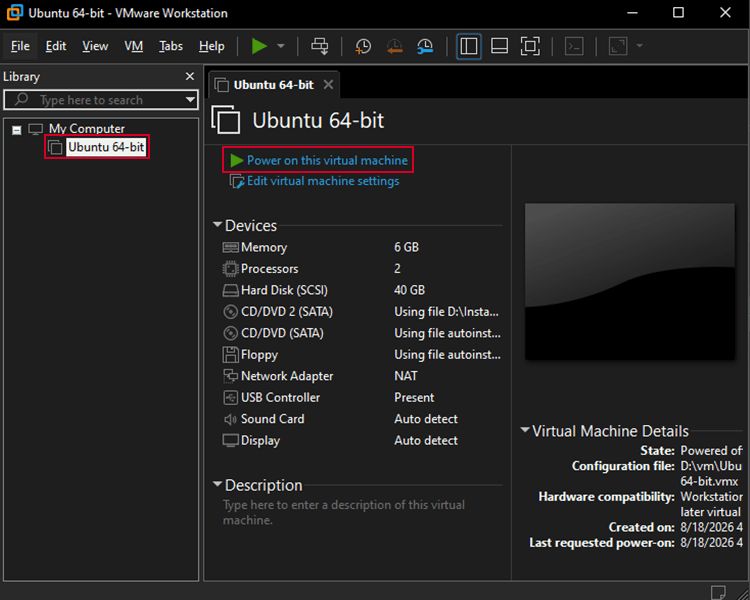
After setting up the virtual machine, it will automatically start the virtual machine, or if it didn’t select your virtual machine, click on Power On Virtual Machine to start it.
Select your virtual machine from the side panel and click on Power On Virtual Machine.
Install Ubuntu
When your virtual machine turns on, it will automatically open the Ubuntu Desktop installer, which shows you a page to select whether you want to try Ubuntu or install it.
Select Install Ubuntu and click Next.
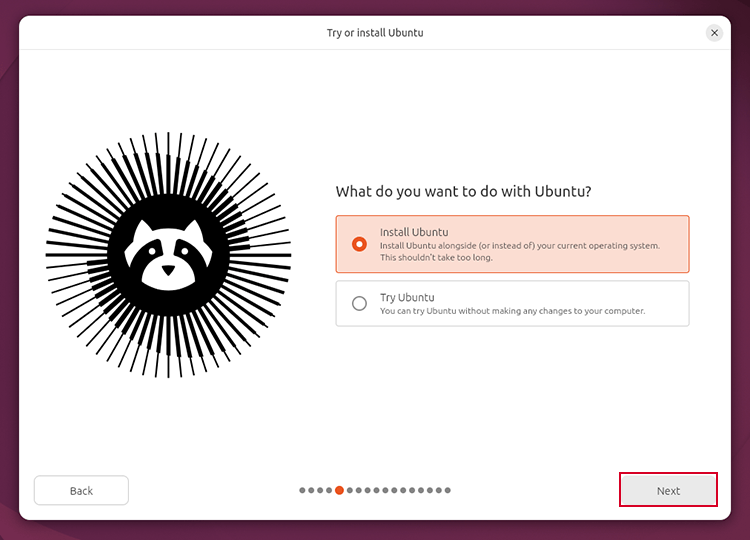
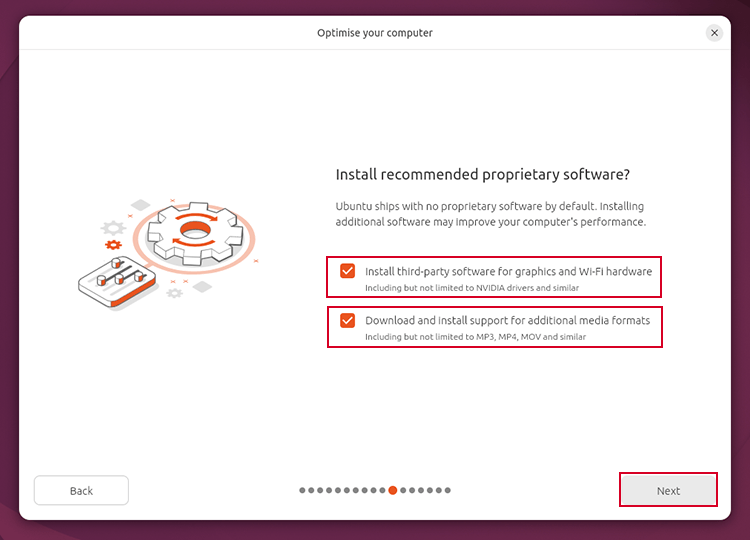
Follow the installation steps and select your preferred language, keyboard layout, and installation options. You can also choose whether to install additional software and updates during the installation.
It is recommended to check Install additional software, which installs needed software and drivers and makes your use case easier later on.
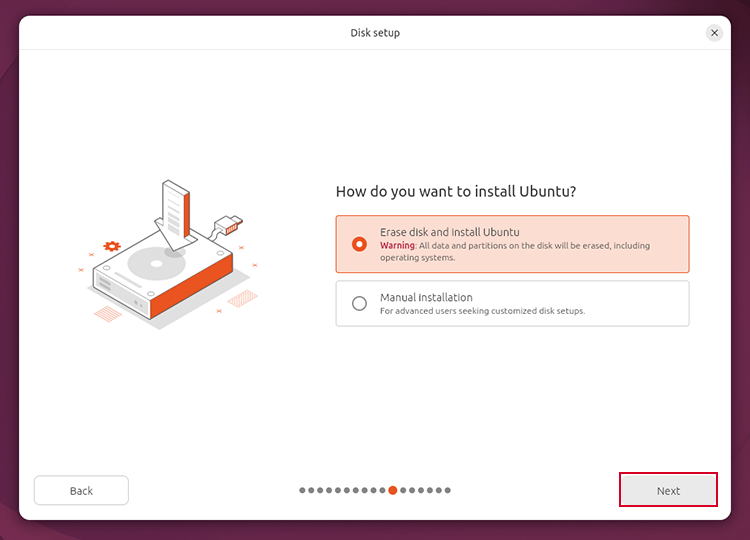
When you reach the disk setup page, select Erase Disk and install Ubuntu. Since this is a new virtual machine, this will affect the new virtual disk created for this VM.
Continue the installation steps until Ubuntu asks you to create a new user account.
Create Your Ubuntu User Account
Enter your name, username, computer name, and password. These credentials are going to be used for logging in to the Ubuntu virtual machine.
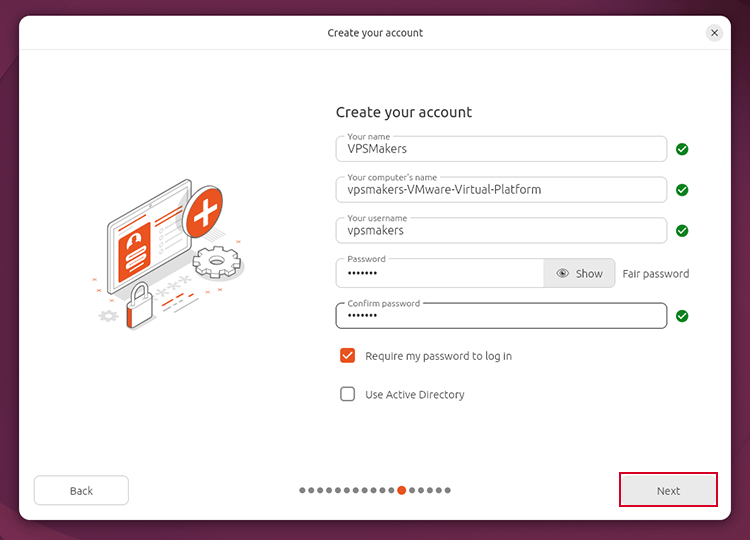
After entering your information, click Next and review the installation settings. If everything is correct, start the installation.
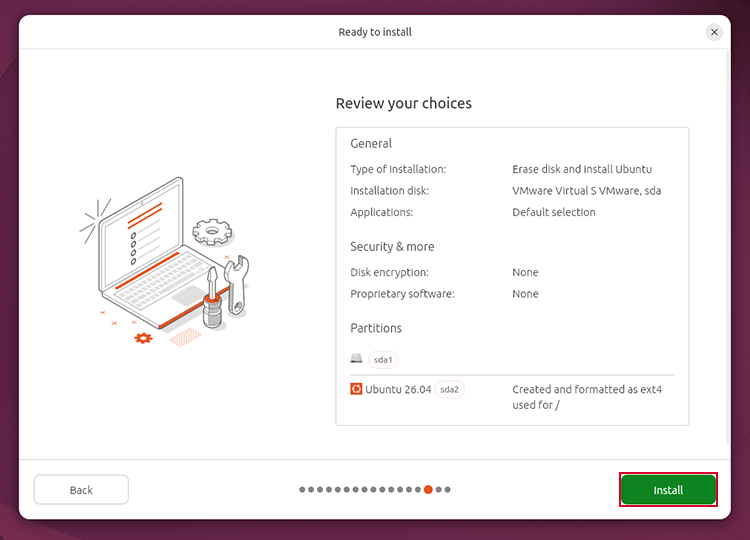
Ubuntu will then copy the required files to the virtual disk and install the operating system. This will take a few minutes, but the time depends on the resources you’ve assigned to it.
Note: If you experience network issues during the installation or accidentally power off the VM, you may need to restart the installation process from the beginning.
Restart and Complete the Installation
After the installation process finishes, Ubuntu will ask you to restart the virtual machine. Click Restart Now to complete the installation.
After restarting, if the VM requires you to remove the installation ISO, follow the steps below:
Step 1 – In the VMware library, select your virtual machine and click on Edit Virtual Machine Settings.
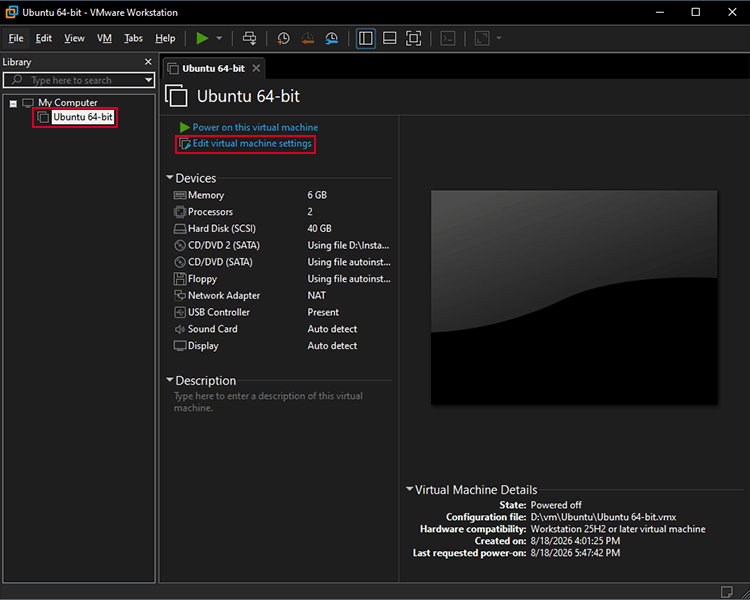
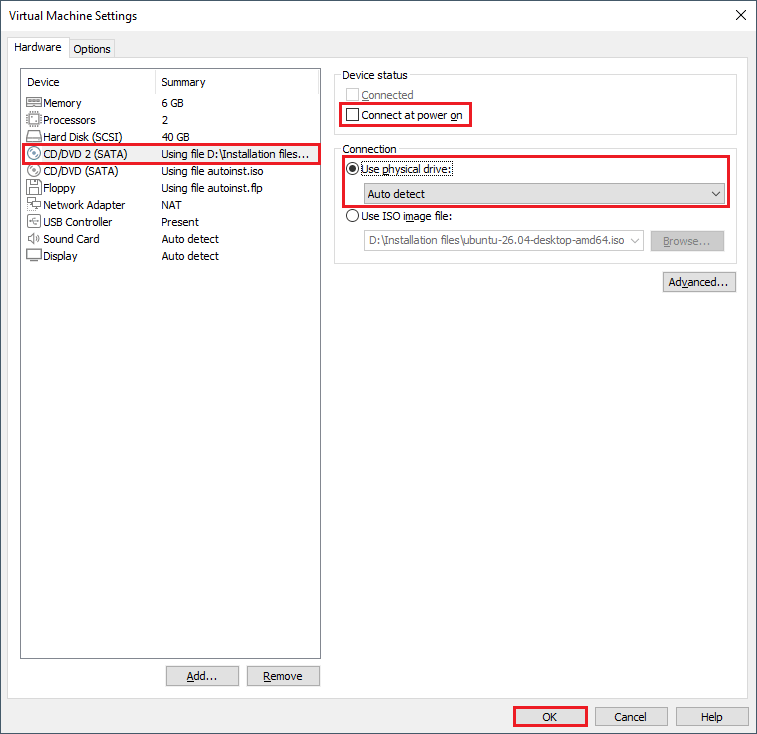
Step 2 – Select the CD/DVD driver on which the installer ISO is mounted, and in the device status disable “Connect at power on” and in the connection section select use physical drive and let it be auto-detected.
Configure Ubuntu Desktop After Installation
After logging in to Ubuntu for the first time, you should make a few basic configurations to ensure the system is up to date and works properly with VMware. Start by connecting the VM to the internet and installing any available system updates.
You can use the software updater application or run the command below in the terminal. Open the terminal with the Ctrl + Alt + T shortcut or select it from the taskbar.
sudo apt update && sudo apt upgrade
After updating, check display resolution, time zone, network configuration, and other basic configurations. You can also remove the applications you don’t need and install new things from the Ubuntu app store.
Install VMware Tools on Ubuntu Desktop
To improve the integration between Ubuntu and VMware, install open-vm-tools. It provides integration between your local Operating system and the vm such as better display handling, clipboard sync, and improved interaction between the host and VM.
Run the command below in the terminal to install VMware Tools:
sudo apt install open-vm-tools open-vm-tools-desktop
After installing VMware Tools, restart the virtual machine:
sudo reboot
Note: If you don’t install VMware Tools, Ubuntu may not provide the option to change the screen resolution properly.
Common Issues When Installing Ubuntu on VMware
Even though installing Ubuntu on VMware Workstation Pro is straightforward, you may encounter some problems during the installation or when starting the virtual machine.
Most issues are related to VM resources, virtualization settings, network configuration, or the Ubuntu ISO file.
VMware Virtual Machine Does Not Start
If the new virtual machine does not start, check that your computer has enough RAM, CPU, and storage. Allocating a lot of resources to the virtual machine can slow down both local and virtual systems.
If you are using a computer with limited memory, you can manage Windows RAM usage to improve performance.
Ubuntu Installation Freezes or Becomes Slow
If the installation freezes or runs very slowly, make sure the VM has enough resources to run properly. You can also verify that CPU virtualization is enabled in your computer BIOS/UEFI.
Network Connection Does Not Work on VMware Ubuntu
If after installing the operating system, Ubuntu can’t connect to the internet, check the VM’s network adapter settings and make sure it’s connected and that “Connect at power on” is enabled. You can also try switching between NAT and Bridged networking depending on your requirements.
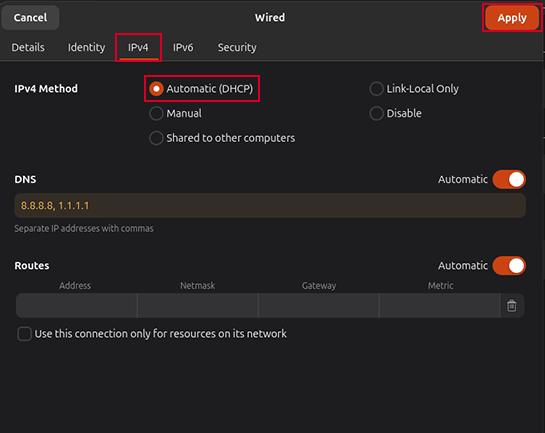
You can also try changing the Ubuntu network configuration to DHCP.
Go to Settings > Network > Wired > Settings and set the IPv4 method to Automatic (DHCP). This allows Ubuntu to automatically obtain an IP address and other network settings from the network adapter, which may resolve the issue.
If you want command-line solutions for finding the IP address, you can follow our guide on how to find Ubuntu IP address.
SMBus Host Controller Error in VMware
System Management Bus (SMBus) is a low-speed communication bus used by the operating system to communicate with hardware devices. As you are running Ubuntu on a virtual machine, it can communicate with hardware devices directly, and it has access to hardware that VMware provides.
This warning is harmless and doesn’t damage your virtual machine, but if you want to hide the warning, you need to change the GRUB kernel, which is not recommended.
Ubuntu Keeps Booting Into the Installer
If Ubuntu starts the installer again after installation, the installer iso may still be connected to the VM’s virtual CD driver. Shut down the VM and remove or disconnect the ISO from your virtual machine.
Summary
To install Ubuntu Desktop on VMware Workstation Pro 26H1 or another supported version, first download and install VMware Workstation from the Broadcom website. Then download the latest version of Ubuntu Desktop, or choose the version that best suits your needs.
Next, create a new virtual machine in VMware Workstation and configure its hardware resources and network settings. Attach the Ubuntu ISO to the virtual CD/DVD drive and start the virtual machine to begin the Ubuntu installation.
Once the installation is complete, remove the Ubuntu ISO and install VMware tools to improve integration between Ubuntu and VMware.
If you want to use Ubuntu in a production environment rather than for testing, you can use Ubuntu Server on a VPS, which provides better accessibility, availability, and server management features.

The Author Robert Smite
Hello! I'm Robert, specializing in virtual servers and cloud technology. With expertise in managing and optimizing virtual servers, my focus is on delivering understandable and practical content in this field. My goal is to enhance knowledge and assist individuals in selecting the best virtual services for their needs.
More from Robert Smite