How to Backup SSH Key on Ubuntu?
The safest way to back up SSH keys on Ubuntu is to create an encrypted archive of your .ssh directory and store it on a separate server or storage device.
If you use SSH key authentication to log in to your server, backing up your SSH keys is crucial. If your SSH private key is corrupted or deleted, you could be locked out of your server.
In this article, we will cover multiple methods for backing up your SSH keys and explain how to restore them when needed.
Install Required Tools for Backup
The basic backup process doesn’t require any additional tools because Ubuntu already includes the utilities needed for creating archive files. However, if you want to use encryption and automate the backup process, you need to install some tools:
GnuPG (GPG): Used to encrypt the SSH backup file with a passphrase
rsync: Used to transfer the backup to another server
Cron: Used to schedule the backup script and run it automatically at a specific time.
You can install the required tools with:
sudo apt update
sudo apt install gnupg rsync
How to Backup Ubuntu SSH Keys Quick Method
If you need an immediate backup solution before modifying system settings, reinstalling Ubuntu, or migrating servers, you can use a single command to create an encrypted backup of your SSH files.
Below are the two fastest ways to back up your ~/.ssh directory directly from the terminal.
Create Encrypted Backup Archive
This command creates a compressed archive of your .ssh directory and encrypts it with GnuPG.
tar -czf - -C ~ .ssh | gpg --pinentry-mode loopback -c -o ~/ssh-backup-$(date +%Y-%m-%d).tar.gz.gpg
Running this command requires you to enter a passphrase for encryption; write down the passphrase you set here because you will need it for decryption.
This creates an encrypted backup file that can be safely transferred or stored separately from the original server. The output name will be something like this: “ssh-backup-YYYY-MM-DD.tar.gz.gpg“.
SSH Keys Direct Backup to a Remote Host
If you have access to a secondary Linux VPS or backup node, push your entire .ssh directory securely over the internet via SCP.
scp -r ~/.ssh user@backup-server-ip:~/ssh-backup/
Replace user with your username and backup-server-ip with your target server IP address. This transfers the contents of the .ssh directory over an encrypted SSH connection, but the files remain unencrypted on the destination server.
Warning: This method does not encrypt the data. If the data is exposed or accessed by an unauthorized user, it could pose a security risk.
Where are SSH Keys on Ubuntu
Before creating a backup, you need to understand where Ubuntu stores your SSH keys and which files are important to secure. By default, OpenSSH stores all user-specific key pairs, client configurations, and known hosts in a dedicated hidden folder.
Find Default SSH Directory in Linux
On Ubuntu, your SSH user keys are stored in the .ssh directory located inside each user’s home directory path (/home/username/.ssh) or for root (/root/.ssh)
Navigate to this directory and inspect its contents using the commands below:
cd ~/.ssh
Show content:
ls -la
The output will show key files, their permissions, and ownership:
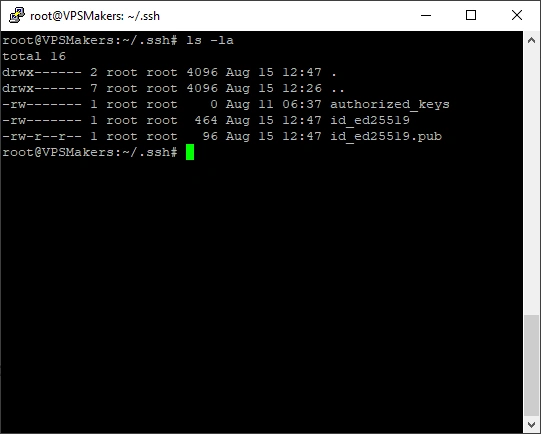
If the .ssh directory doesn’t exist, it may mean that SSH has not yet created the directory for your user. If the directory exists but doesn’t contain a private key, you may not have generated an SSH key pair for that user.
Which SSH Key You Need to Backup
You should back up the SSH key pairs that you use to authenticate your server login. This usually includes private and public keys.
For example, if you are using Ed25519 key, you should have:
~/.ssh/id_ed25519

~/.ssh/id_ed25519.pub
The private key is the most important file because it is required to authenticate to the server. It should be fully private and never be exposed and shouldn’t be transferred over the internet without encryption.
You may also want to backup authorized_keys file, which contains the public keys that are allowed to log in to this server. It is stored in:
~/.ssh/authorized_keys
If you have multiple SSH key pairs, check which keys you are using before creating a backup rather than backing up unused keys.
Backup SSH Keys in Ubuntu to Encrypted Archive
Backing up SSH keys by storing them in a compressed file helps you keep your files more organized. It makes the keys easier to restore and safer to transfer to other devices. You can also protect the compressed backup with a password by encrypting it using GPG.
This approach is easier to back up, transfer, and restore and doesn’t expose your private key without encryption.
Compress SSH Folder in Ubuntu
On Linux distributions, you can create compressed files using the built-in tool tar, as well as other tools such as zip and 7-Zip.
First, you need to compress the .ssh folder using tar with the command below:
tar -czvf ~/ssh-backup.tar.gz -C ~ .ssh
This command creates a separate compressed file from your directory with the name given to it and stores it in the home directory (~), which you can use like this or encrypt it following the next step.
Encrypt SSH Backups with GPG
You can use the GPG (GNU Privacy Guard) tool to encrypt and set a password for your backup files, which is helpful to make your files more secure.
To use this tool, you need to install GnuPG on your Ubuntu server and use it for encryption.
After compressing SSH files with tar, run the command below to encrypt them:
gpg -c ssh-backup.tar.gz
Note: Instead of ssh-backup-tar.gz, replace your own compressed file name if you changed it in the previous command.
After running the command, you will be prompted to enter a passphrase for your file:
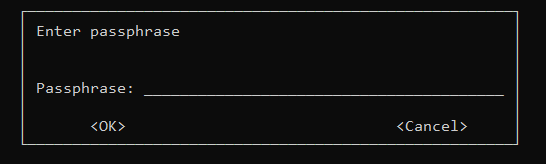
After entering the passphrase, GPG will ask you to enter it again for confirmation. If the passphrase is considered weak, GPG will display a warning and give you the option to use it anyway or choose a stronger passphrase.
In this screen, you can navigate between buttons using your keyboard’s arrow keys. And select with Enter.
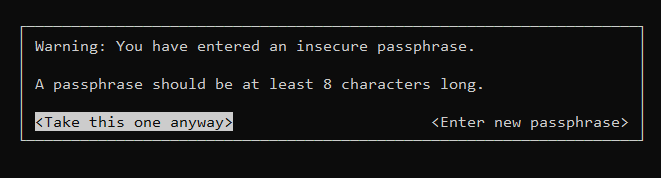
After entering the password, your file will be created. And you can now remove the old tar.gz file and keep the encrypted one.
Transfer Encrypted Archive to External Storage
After encrypting the backup, you should store it somewhere separate from your server. This protects your SSH keys if the server is lost, damaged, or becomes inaccessible.
For example, you can transfer the encrypted archive to another Linux server using scp:
scp ~/ssh-backup-20260815.tar.gz.gpg user@backup-server-ip:~/ssh-backup/
Replace user, backup-server-ip, and destination with your target server information.
You can also download this file to your local computer and store it there, or you can use cloud storage like Google Drive or Dropbox to store the encrypted file.
Automate SSH Key Backup in Ubuntu
To automate the backup process, you need to run a bash script with a cron job on your Ubuntu server to schedule the backup tasks.
This script can create a compressed backup of your .ssh directory, encrypt it with GPG, and transfer the encrypted backup to another server using the rsync command.
Download Backup Automation Script
Here, you can download the script as a compressed ZIP archive for easier transfer and handling. Simply extract the ZIP file, and you can use the .sh script directly on your Ubuntu server.
Download SSH key backup cron script,
or you can download the extracted .sh file from VPSMakers official GitHub.
After downloading the file, if you are using Windows, extract the ZIP file and transfer the .sh file to your Ubuntu server.
If you are working directly on Ubuntu, you can use the following command to download and extract the file automatically:
wget -q https://vpsmakers.com/wp-content/uploads/ssh-key-backup-script.zip && unzip /tmp/ssh-key-backup-script.zip
Configure the Backup Script
Before running the script, you need to configure and change some of its values and set your server IP address. Open the script with a text editor:
nano backup-ssh-keys-cron-script.sh
1. Replace REMOTE_USER with your backup server user. It’s not recommended to use the root account.
2. Replace REMOTE_HOST with your backup server IP
3. Replace REMOTE_DIR with the directory address you want to transfer the backup file to.
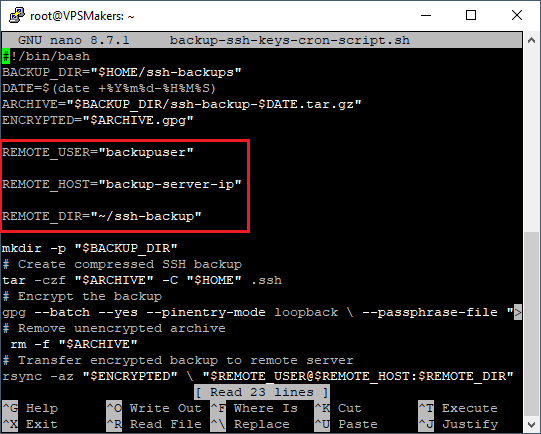
After changing the values, press Ctrl + X. When prompted to save the changes, type Y and press Enter. When asked for the filename, leave it unchanged and press Enter to save the file.
Create the Backup Passphrase
The script uses GPG to encrypt your SSH backup, so you need to create a passphrase that GPG will use for encryption. This passphrase is stored in a separate file on your Ubuntu server.
The passphrase file is required for automated backups. Keep its permissions restricted and remember that anyone with access to both the server and the passphrase file may be able to decrypt your backups.
Create the passphrase file and restrict its permissions with the commands below:
nano ~/.ssh-backup-passphrase
Enter a strong passphrase in the file; the file should contain only the passphrase without any additional text or configurations.
After entering the passphrase, save the file by pressing Ctrl + X, then Y, and Enter.
For security reasons, it is better to restrict file access to the public using this command:
chmod 600 ~/.ssh-backup-passphrase
Note: Make sure the file name is exactly “.ssh-backup-passphrase”; otherwise, it won’t work.
Note: Write down this passphrase somewhere safe; you will need this passphrase for restoring the backup later.
Configure SSH Key Authentication
The backup script uses rsync to transfer the backup file to another server. To allow the script to run automatically without requiring an SSH password each time, you need to configure SSH key authentication between your Ubuntu server and the backup server.
If you don’t already have an SSH key, generate a new SSH key pair.
Then copy the public key to your backup server using this command:
ssh-copy-id backupuser@backup-server-ip
Replace the backupuser and backup-server-ip with your backup server info.
After setting up backup keys, test connecting with SSH keys to your Ubuntu server.
Make the Backup Script Executable
Before running the script or setting it to run automatically with cron, you need to give it executable permission. Run the command below to change its permissions.
chmod +x backup-ssh-keys-cron-script.sh
Test Backup Script Manually
Run the script manually before setting it to run scheduled with cron to make sure everything is running correctly.
./backup-ssh-keys-cron-script.sh
The script should create a compressed backup file, encrypt it with GPG, transfer it to the remote server, and remove the one stored locally.
If any problem occurs during the backup process or you didn’t provide the passphrase for GPG encryption, it will abort the process and show the error to you.
Note: Do not skip this test. Make sure the backup works correctly before scheduling it with Cron.
Schedule SSH Key Backup with Cron
Once you’ve tested the script running and confirmed it works correctly, you can create a cron job to run your script at a scheduled time. However, you should consider that the cron job is set for one user.
If you want to back up the SSH files of multiple users, you need to create a separate cron job for each user.
Open the current user’s Crontab:
crontab -e
Then it will show you its configuration file. Go to the end of the file and paste the text below:
0 2 * * * /home/your-username/backup-ssh-keys-cron-script.sh
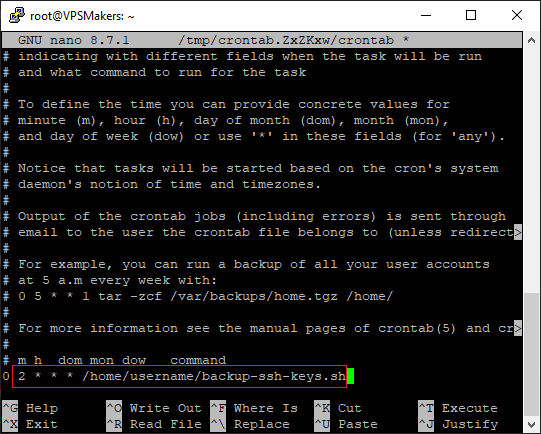
You should replace your script address with the green part above. Press CTRL + X, type Y, and press Enter.
Verify the cron added by running the command below:
crontab -l
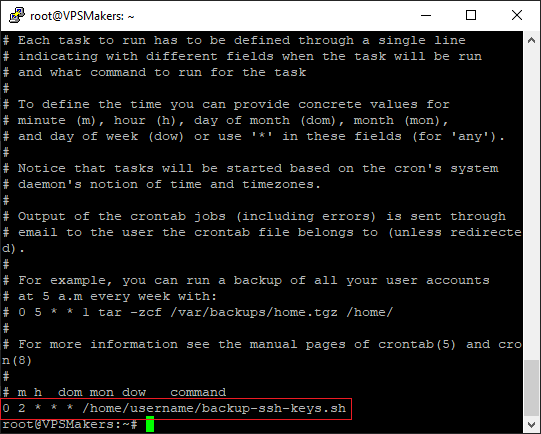
Restore SSH Keys on Ubuntu from Backup
Because the archive is first compressed and then encrypted, the restore process reverses these steps: decrypt -> extract.
If you need to restore your SSH keys from backup, first you need to decrypt the .gpg backup file with the same passphrase you’ve used for encryption. After decrypting it, you can extract the archive to the .ssh directory.
Download SSH Backup From Remote Server
First, download the backup file from the separate Linux server where you stored it. If you have stored the backup locally instead, copy the encrypted archive to your Ubuntu server and skip this command.
rsync -avz backupuser@backup-server-ip:/backupLocation /tmp/
Replace the backupuser, backup-server-ip, and backupLocation with the information of the server you’ve stored the backups on. The backupLocation should be the location where the file is stored, for example:
~/ssh-backup/ssh-backup-20260815-120000.tar.gz.gpg
Decrypt the Backup File
Use GPG to decrypt the backup file; replace your file address with FileLocation in the command below:
gpg --output /tmp/ssh-backup.tar.gz --decrypt /tmp/FileLocation.tar.gz.gpg
It will ask for the passphrase which you’ve used when encrypting. Or instead of writing the passphrase manually, you can use the same passphrase file by running the command below:
gpg --batch --yes --pinentry-mode loopback --passphrase-file ~/.ssh-backup-passphrase --output /tmp/ssh-backup.tar.gz --decrypt /tmp/FileLocation.tar.gz.gpg
Extract the SSH Backup
The decrypted file is a .tar.gz archive containing your .ssh directory. Before extracting, verify its content with this command:
tar -tzf /tmp/ssh-backup.tar.gz
Before restoring the backup, make a temporary backup of the existing .ssh directory if it contains any current SSH configuration or keys. Use the command below to move them:
mv ~/.ssh ~/.ssh-before-restore
Note: If you are connected with these SSH keys, moving them will terminate your connection. Make sure you have other connection or instead of moving them, copy the files using the command below:
cp -r ~/.ssh ~/.ssh-before-restore
If you are restoring the backup for another user, replace /root/ with your user’s home directory. Then run the command below to extract the tar file:
tar -xzf /tmp/ssh-backup.tar.gz -C /root/
Other user home directory example:
tar -xzf /tmp/ssh-backup.tar.gz -C /home/john/
After extraction, the SSH files will be restored; the only thing you need to do is set the correct permissions for them.
Set Permissions to SSH Keys
SSH requires restrictive permissions for the private key and the .ssh directory itself. After restoring the files, set the appropriate permissions following the table below:
| Filename | Permission | Command |
|---|---|---|
| .ssh Directory | Full access to root user | sudo chmod 700 ~/.ssh |
| Private Key | Read and Write access to root user | sudo chmod 600 ~/.ssh/id_ed25519 |
| Public Key | Readable for all users and modifiable by root | sudo chmod 744 ~/.ssh/id_ed25519.pub |
Note: If you are using another user, replace the directory address with your user’s home directory/.ssh folder.
After setting permissions, verify them using the command below, and if you don’t have information about Linux permissions, check our article about What are Linux Permissions
ls -la /root/.ssh
Conclusion
Backing up your SSH configuration is an important part of managing a Linux VPS, especially when you rely on SSH key authentication. By keeping an encrypted backup of your .ssh directory in a separate location, you can recover your SSH configuration if your original keys are lost, corrupted, or the server becomes inaccessible.
In this article, we covered how to compress and encrypt SSH keys with GPG, transfer the backup file to another server, and automate the entire process using a Bash script, cron, and restoring the backup.
For the best protection, keep your backup file on an external server or device like a USB or hard disk, and keep your GPG passphrase somewhere safe too, like a password manager.

The Author Richard.M
Richard started out as a member of the support team and is now a full-stack web developer and support team lead at VPS Makers. He is passionate about providing people with top-notch technical solutions based on his 5 years of experience in web hosting, but as much as he enjoys coding and creating new works, he secretly dreams of becoming a sports star.
More from Richard.M