
When managing disk space on a Windows VPS, you may need to resize existing partitions to make better use of the available storage. This can involve shrinking a partition to create unallocated space or extending an existing partition to use that space.
When you buy Windows VPS from VPSMakers or upgrade your existing plan, you get a primary drive with 40 GB of storage, along with additional unallocated space depending on your plan. You can use this space to extend your existing partition or create a new drive.
Windows provides built-in tools such as Disk Management and DiskPart to manage partitions. In this guide, you’ll learn how to shrink and extend partitions using these tools and troubleshoot common resizing issues.
Note:
This guide is based on practical testing by the VPSMakers technical team on all our available VPS hosting plans running Windows as the operating system. Each method has been tested in a real VPS environment, and the instructions have been reviewed to help you resize partitions safely and avoid common configuration issues.
Before Resizing a Partition on Windows
Before resizing a partition on your Windows VPS, there are a few things you should check to avoid data loss or unexpected issues during the process.
First, make sure to back up your important data. Windows built-in tools allow you to resize partitions without formatting data, but unexpected errors can still cause data loss. To learn how you can take a backup, follow this guide:
Backups on Windows VPS and can be done in two ways: manual and automatic. We have taught you both of them in the simplest way without the need for any software.
Read the full articleMake sure your disk has enough free space to shrink a partition or sufficient unallocated space to extend one. Before proceeding, review your partition layout to determine which partitions can be resized and whether the available space is positioned correctly.
Resize a Partition Using Disk Management
Disk Management is a built-in Windows utility that allows you to manage disks and partitions through a graphical interface. You can use it to shrink an existing partition, create unallocated space, remove drives, or extend partitions to use available unallocated space without using command-line tools.
Open Disk Management
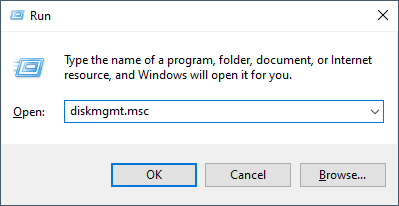
First, log in to your Windows VPS and open the Run dialog by pressing Win + R. Type diskmgmt.msc and press Enter to launch Disk Management.
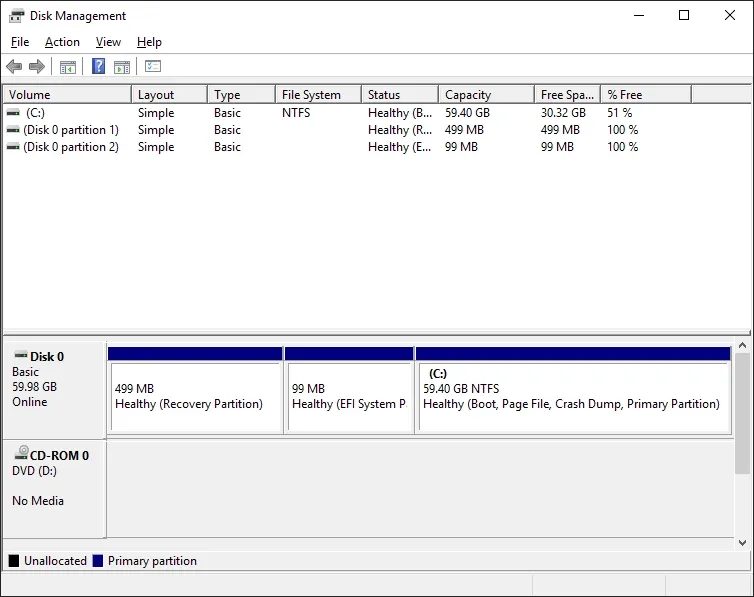
In Disk Management, you can see all available disks, their partitions, file systems, capacities, and unallocated space. Identify the partition you want to resize before proceeding.
Shrink Partition on Windows
Shrinking a partition reduces its current size and creates unallocated space on the same disk. You can use this space to create another partition or extend another eligible partition.
Step 1 – In Disk Management, right-click the partition you want to shrink and select Shrink Volume. It will open a wizard, where you can select the amount you want to shrink from your other volume.
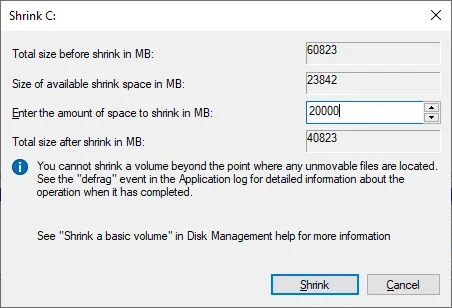
After the operation completes, Windows displays the released space as Unallocated in Disk Management.
Note:
The amount of space you can shrink may be limited by unmovable files, such as the page file or shadow copies. If Windows does not allow you to shrink the partition by the desired amount, check the available shrink space shown in the dialog.
Extend Partition on Windows
When you buy a new VPS or when you upgrade your Windows VPS, you may have unallocated space on your disk; you can use it to increase the size of an existing partition. Windows Disk Management generally requires the unallocated space to be immediately to the right of the partition you want to extend and on the same disk.
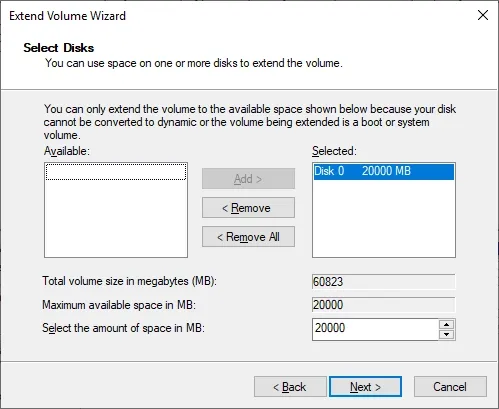
In Disk Management, right-click the partition you want to extend and select Extend Volume to open the Extend Volume Wizard. Click Next to proceed through the introductory pages. Then, select the disk containing the unallocated space and specify how much of that space you want to add to the partition. Click Next, then Finish to complete the operation.
Why Can’t You Extend a Partition? (Important)
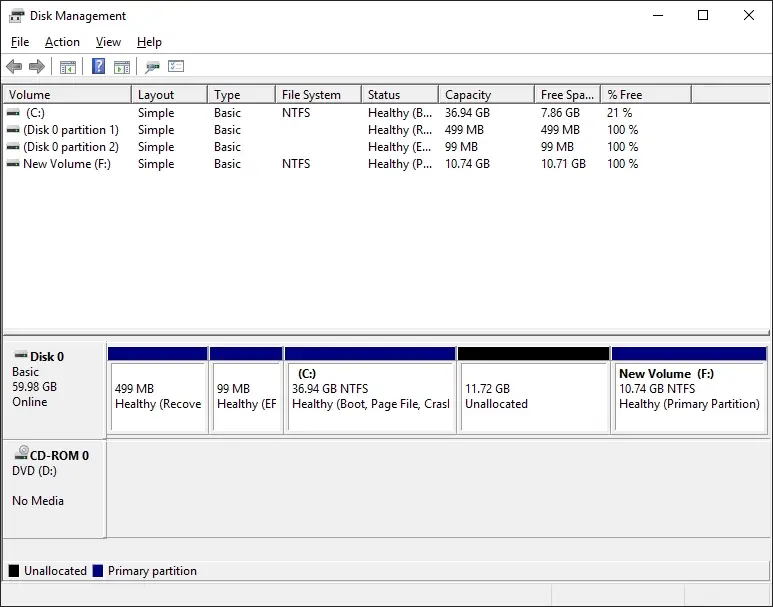
One of the common issues you may face when resizing partitions is that the extend volume option is unavailable or grayed out. This usually happens because Windows cannot find suitable unallocated space next to the selected partition.
In this example, the Unallocated space is located to the left of the New Volume (F:). Windows Disk Management cannot use this space to extend F: because the unallocated space must be immediately to the right of the partition you want to extend.
However, since the unallocated space is immediately to the right of C:, you can use it to extend that partition.
Another possible reason is that the disk uses the MBR partition style and has reached its partition size or layout limitations.
You can check the partition style by right-clicking the disk name (such as Disk 0), selecting Properties, opening the Volumes tab, and checking the Partition style field.
Tip:
There is an app that you can use to extend a partition even when the unallocated space is located on its left side or separated by another partition. It is called MiniTool Partition Wizard, which you can download from their website.
Resize a Partition Using DiskPart
DiskPart is a built-in Windows command-line utility that allows you to manage disks, partitions, and volumes. You can use it to shrink existing partitions, extend partitions into available unallocated space, and create new partitions directly from the command line without using the graphical Disk Management interface.
Unlike PowerShell, DiskPart operates through an interactive command-line environment where you first select a disk or volume before performing operations on it.
Open DiskPart and List Available Volumes
To get started, Open Command Prompt (CMD) or PowerShell as Administrator and follow the steps below.
First, run the following command to launch DiskPart:
diskpartOnce DiskPart opens, enter the following command to display available volumes:
list volume Volume ### Ltr Label Fs Type Size Status Info
---------- --- ----------- ----- ---------- ------- --------- --------
Volume 0 D DVD-ROM 0 B No Media
Volume 1 C NTFS Partition 59 GB Healthy Boot
Volume 2 Recovery NTFS Partition 499 MB Healthy Hidden
Volume 3 FAT32 Partition 99 MB Healthy SystemThis command displays information about available volumes, including their drive letter, file systems, sizes, and status. In the output example above, you can see output tested on VPSMakers Windows VPS.
Select Volume with DiskPart
To start the operation, you should select your desired volume by running the command below:
select volume 1Shrink Volume Using DiskPart
To reduce the size of a volume and create unallocated space, use the shrink command. Before shrinking, you can check how much space can be shrunk and removed from the current partition.
shrink querymaxThe maximum number of reclaimable bytes is: 30 GB (30998 MB)Disk Part displays and uses the values as MBs; here, it shows 30 GB (30998 MB) available for shrinking. We want to shrink 20GB of it. So you can replace the number 20480 in the command below with your required value.
shrink desired=20480Note:
The desired parameter specifies the amount of space to shrink, not the new total size of the volume.
Extend a Volume Using DiskPart
If you have unallocated space available immediately after the selected partition, you can use the extend command to increase its size.
To use all available adjacent unallocated space, run in the selected volume:
extendIf you want to extend the selected volume by a specific amount and not use all the available unallocated space, use this command and replace your number with 10240:
extend size=10240This command adds 10 GB (10,240 MB) to the selected volume.
Important:
DiskPart has the same general limitation as Windows Disk Management: the unallocated space must be on the same disk and immediately follow the selected partition. It cannot automatically move other partitions to make room.
Exit DiskPart
After completing the resizing operation, run the following command to exit DiskPart:
exitYou can then open Disk Management or use Get-Partition in PowerShell to verify the updated partition size.
Note:
Always double-check the selected volume before running shrink or extend, especially when managing the Windows system partition. Back up important data before making partition changes.
Conclusion
Resizing partitions on Windows allows you to manage available disk space without reinstalling Windows or formatting your existing partitions. You can use Disk Management for graphical partition management or DiskPart to shrink and extend volumes directly from the command line.
In this guide, we covered how to shrink partitions to create unallocated space, extend existing partitions, and troubleshoot common issues such as the unavailable Extend Volume option.
Before making changes, always check your disk layout and back up important data to avoid unexpected data loss. If you face a problem extending a partition because of the order of the unallocated space, you can also use a third-party partition manager such as MiniTool Partition Wizard.