How to Backup from Windows VPS Server?
For backing up a Windows VPS, there are various methods available, each of which can be beneficial depending on your specific needs. In this article, we will explore different approaches such as scheduled backups, manual backup. Depending on your situation and level of access, you can choose any of these methods to protect your data.
Note: Before enabling automatic backups, please verify that you have enough storage space available. Insufficient space will cause the backup process to fail.
in this article, we provide a step-by-step guide to these methods that will help you select the optimal backup solution for your Windows VPS.
How to enable Windows Server backup feature?
The Windows Server backup feature is one of the most important measures to protect data and ensure business continuity against data loss, cyberattacks, technical problems, and hardware failures. By doing so, you will ensure the security of your data.
Enabling and configuring these features for automated backups can make the process more efficient and secure. Even without enabling these elements, automated backups are possible, but fine-tuning and customization can provide a higher level of protection for your server data.
Follow the steps below to activate Windows Server Backup:
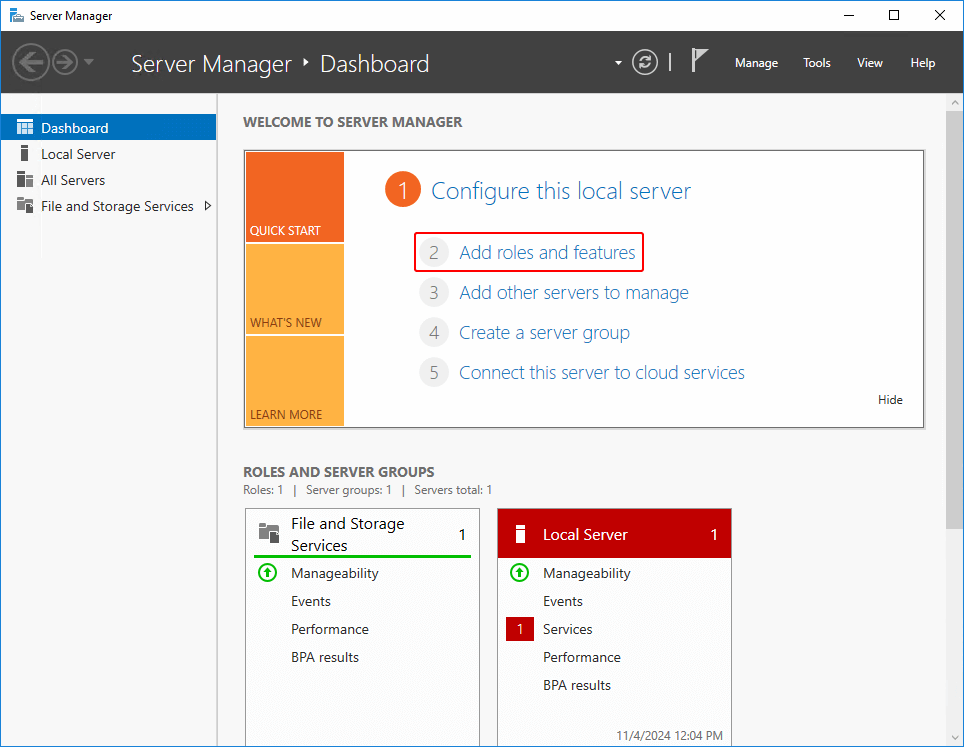
Step 1: ADD New Roles and Features
open the server manager and click on the Add roles and features.
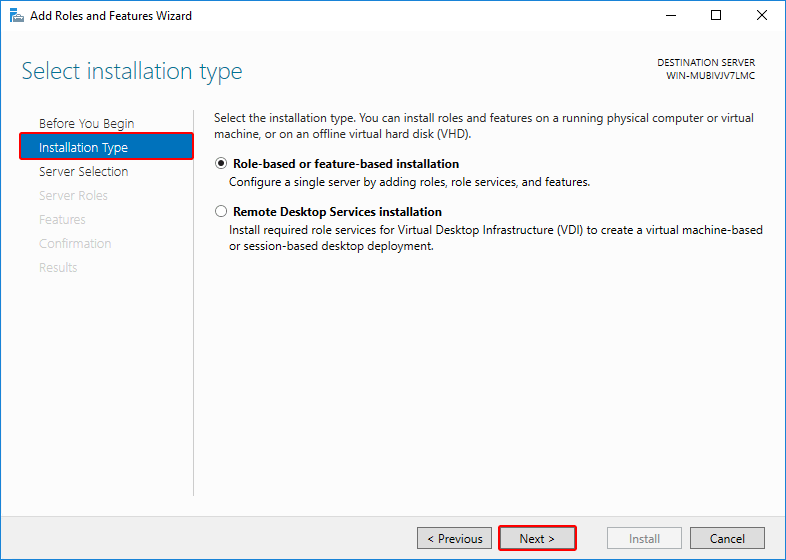
Step 2: Installation type for Roles
Select installation type as Role-based or Feature-based installation, click Next.
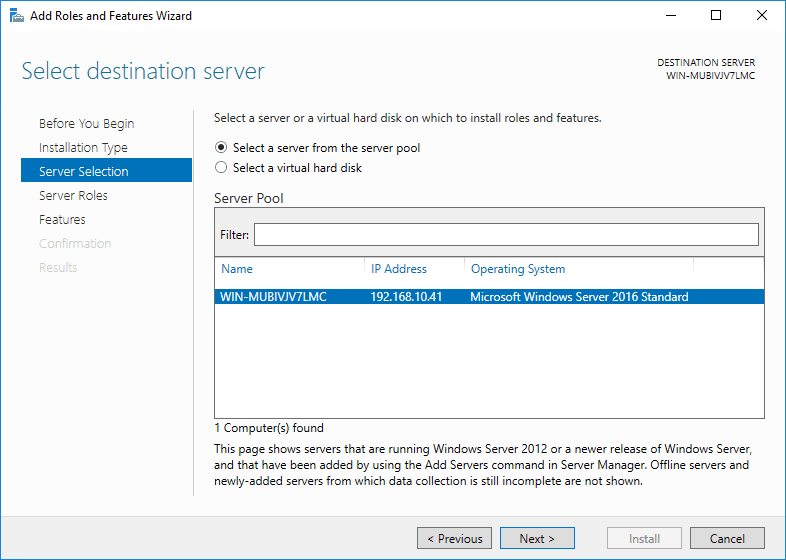
Step 3: Select destination sever
Select destination sever as select a server from the server pool, click Next.
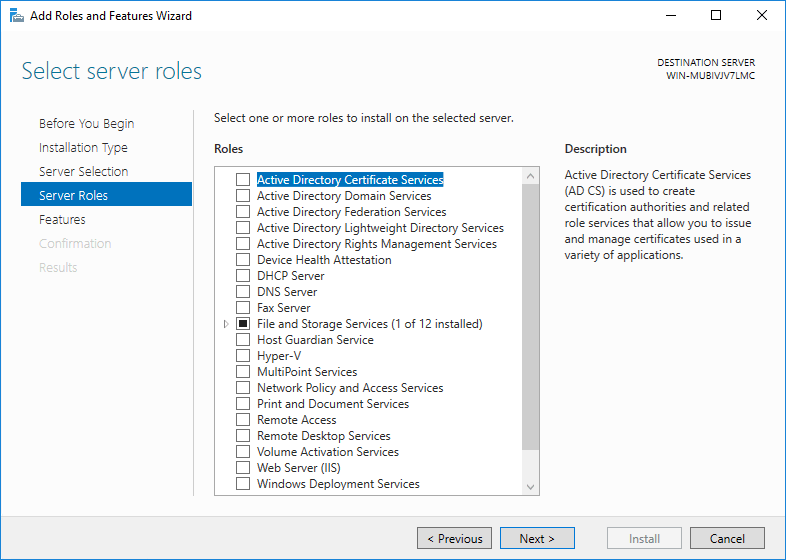
Step 4: Select server roles
You do not need to select any options at this stage, click Next.
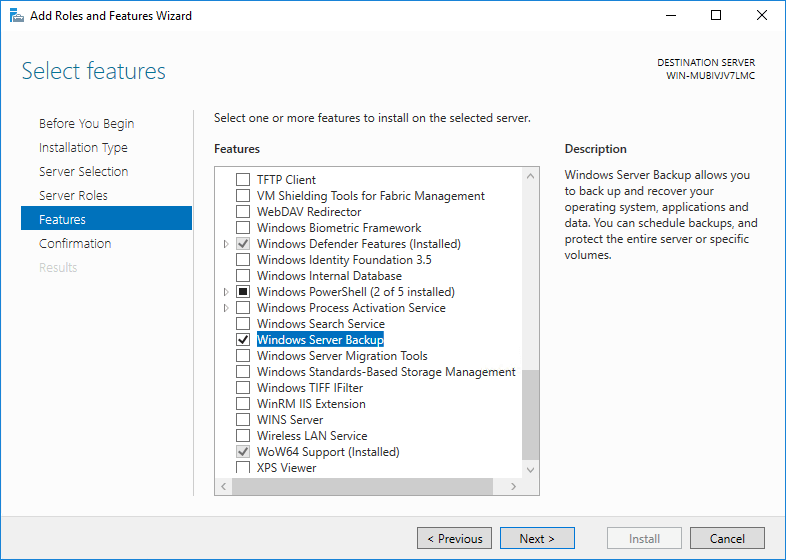
Step 5: Enable Windows Server Backup Features
Select features and check the Windows Server Backup box, click Next.
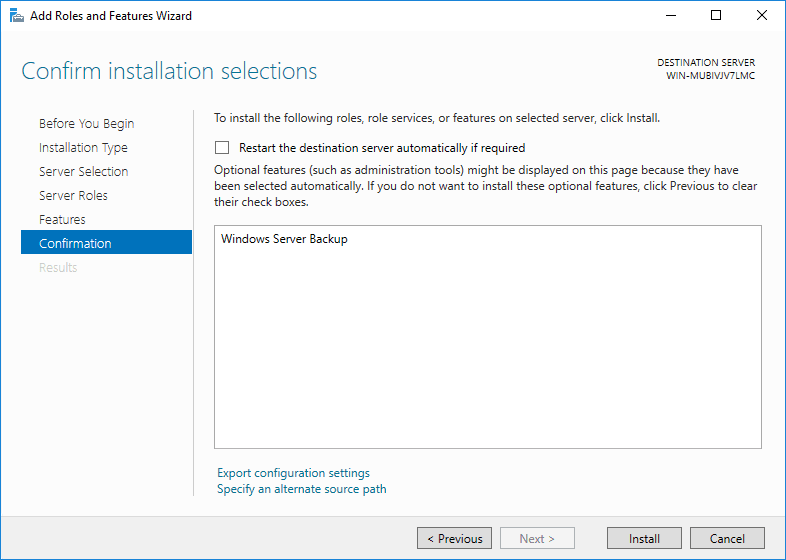
Step 6: Confirm for settings and installation
Confirm installation selections, click Install.
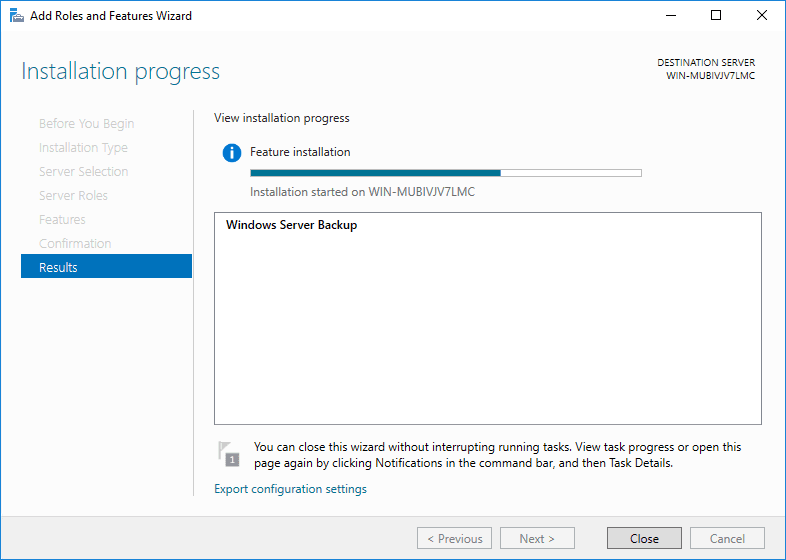
Step 7: Installation complete
When the backup feature installation is done, click Close.
How to setup Windows server backup automatically
After installing the Windows server backup features, you need to configure the Windows server to back up the VPS. A more efficient way to back up a Windows VPS is to use the built-in Windows Server Backup tool.
This method allows you to schedule regular backups, so you don’t have to worry about forgetting to do it manually. To do this, follow these steps:
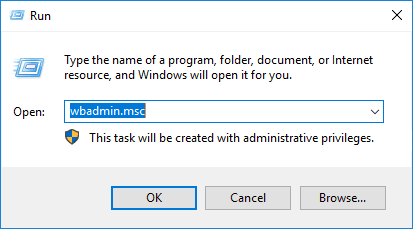
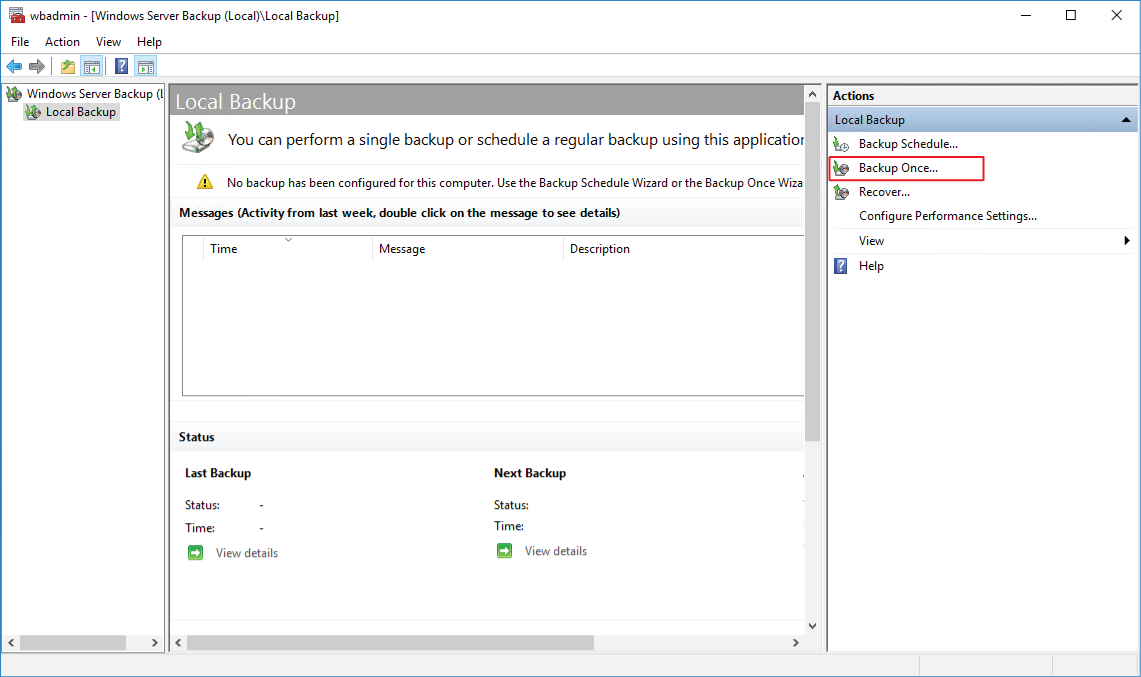
Step 1: Open the Windows Server Backup tool
Open Server Manager on your VPS. Then go to Tools and click on Windows Server Backup.
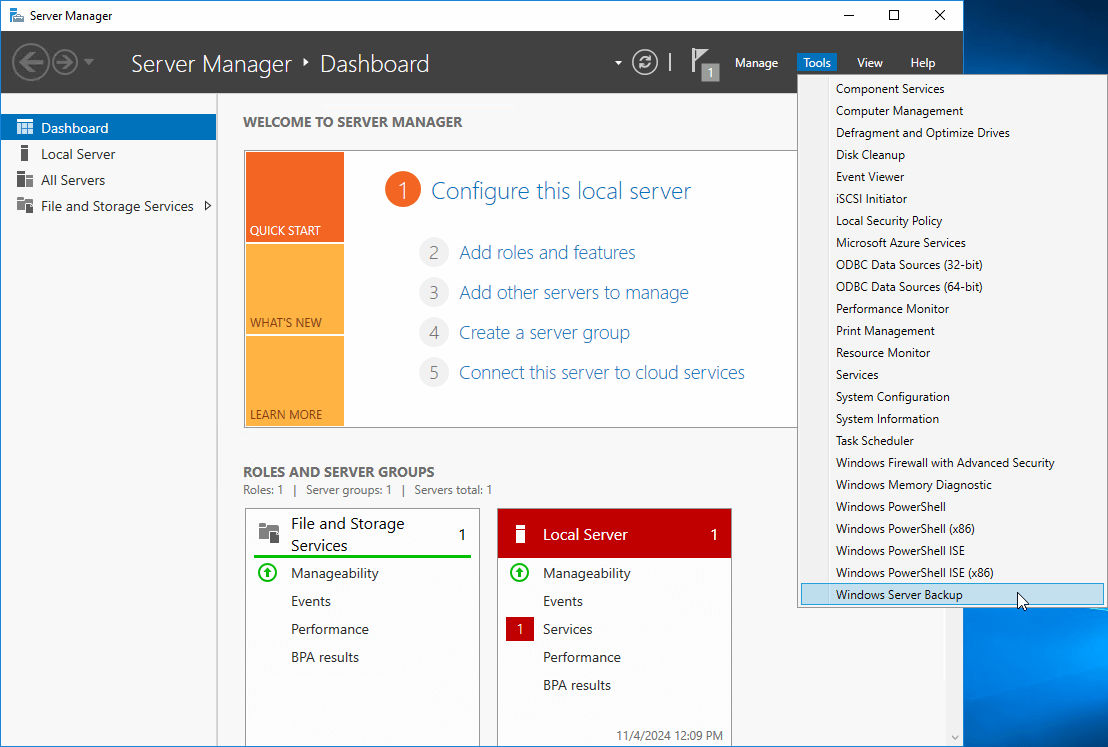
Another way is to type “wbadmin.msc” in the Run box and press Enter.
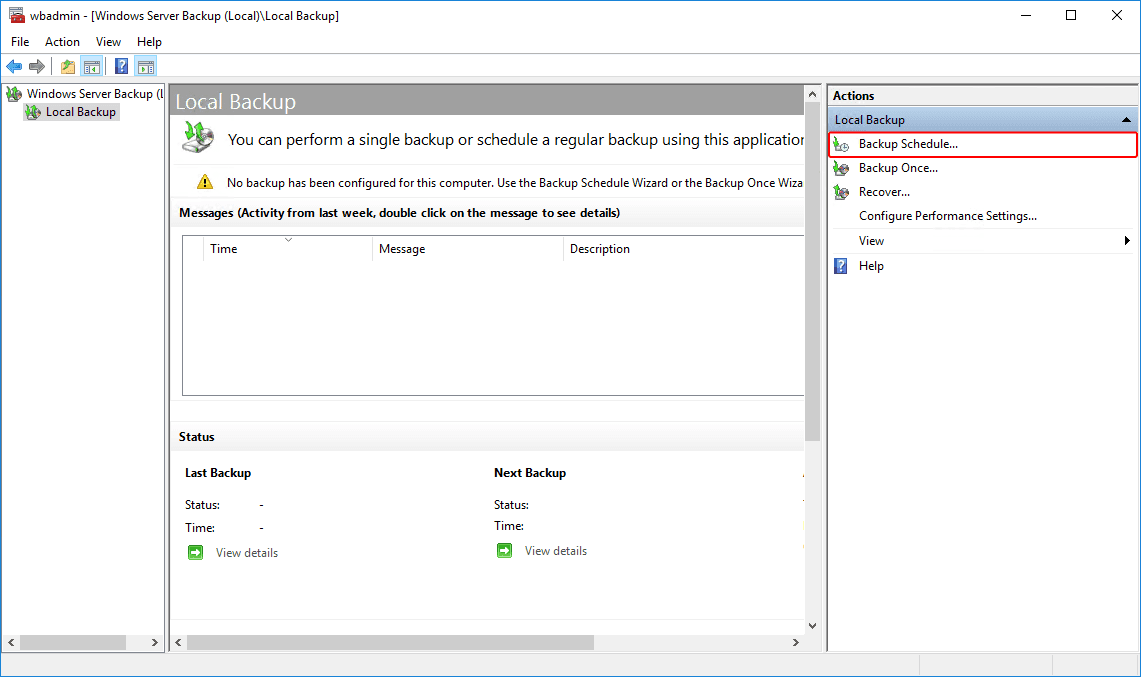
Step 2: Entering automatic backup settings
On the right side of the window, select “Backup Schedule“.
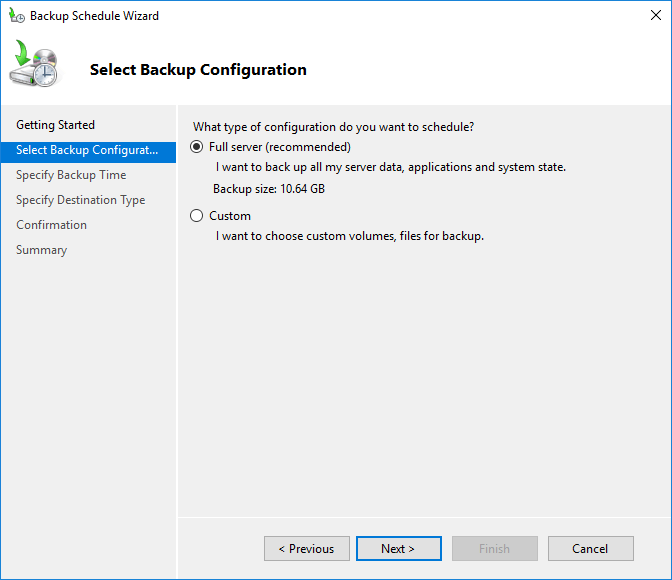
step 3: Full or partial backup
Select Full server from the Select Backup Configuration options, and then click Next.
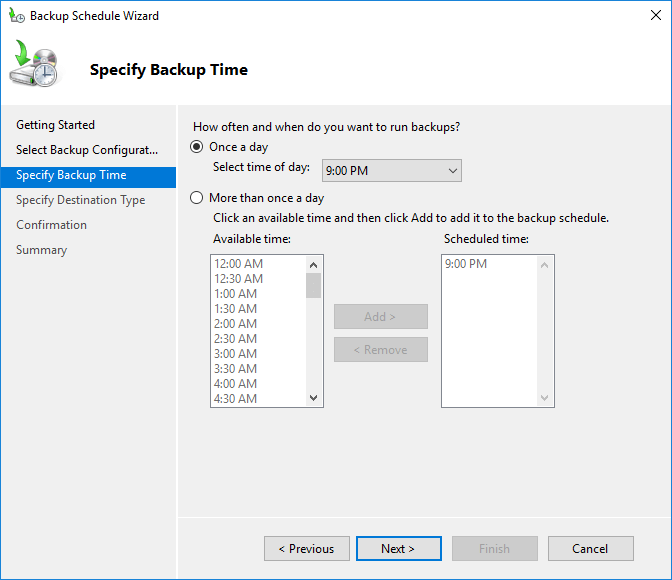
step 4: Setting the backup time
The “specify backup time” section allows you to customize the daily backup frequency and specific times of the day for automated backups based on your data generation rate. You can configure this process to run once a day or multiple times within a 24-hour period.
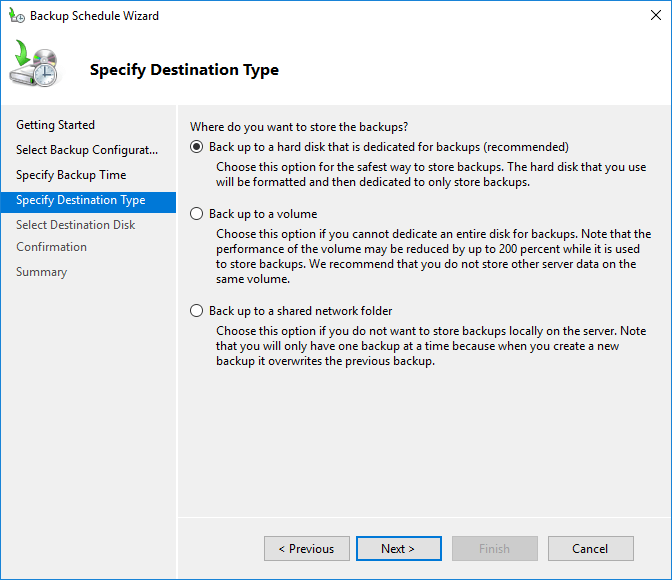
step 5: Specify the location to save the backup file.
The “Specify Destination Type” section allows you to customize where your VPS backup data is stored, including dedicated hard disk, local drives, or remote shared network folders. Select the option that aligns with your requirements and click Next.
Error when selecting hard disk: Either you only have one disk or all connected disks contain OS data.
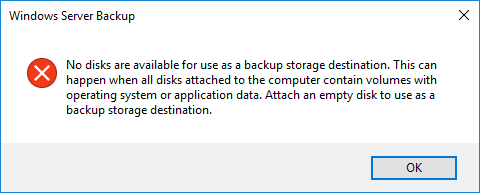
How to fix it: To solve this problem, if you have enough storage space, you can create a partition such as D:/ to separate the storage location from the main operating system files.
Error when selecting a backup to a volume: In the absence of a valid volume, the backup process will fail.
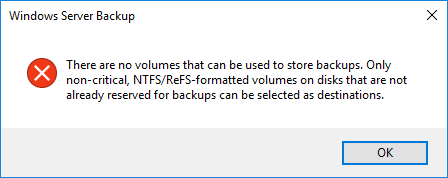
How to fix it: To solve this problem, you can want your virtual server provider to increase your server memory, which will incur a fee, or you can use a USB or external hard drive for storage space.
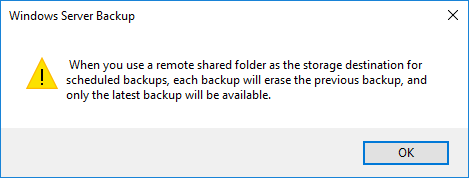
If you select back up to shared network folder for scheduled backups, all previous backups will be deleted each time and only the latest backup version will be available. Select Ok
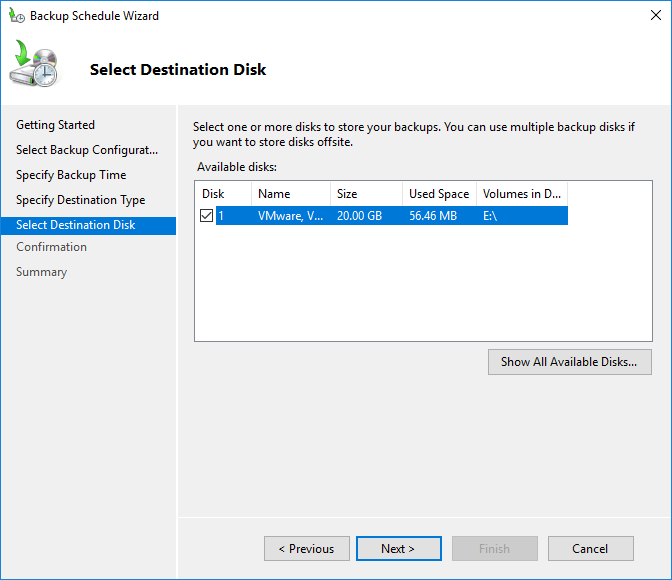
step 6: Select Destination Disk
In the Select Destination Disk section, you can choose one or more disks to save your backup. Then, click Next.
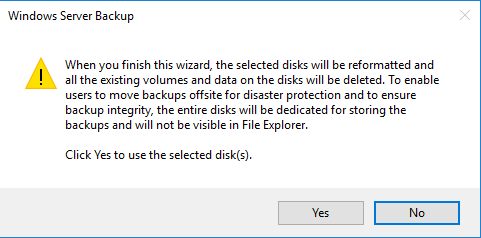
Warning message: a warning message appears stating that the hard disk selected for the backup will be formatted and all data on it will be deleted.
After formatting, the disk will only be used for backups and will no longer be visible in File Explorer. If the data carrier contains important data, please create a backup first. Otherwise, select “Yes” to continue.
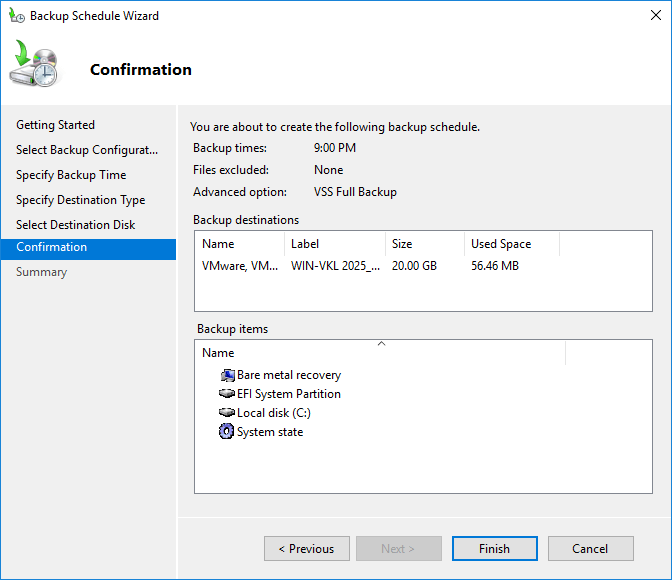
step 7: View and confirm the settings made.
Review the information and click Finish.
Step 8: Completion of the process
You will see a success message confirming that the backup has been completed.
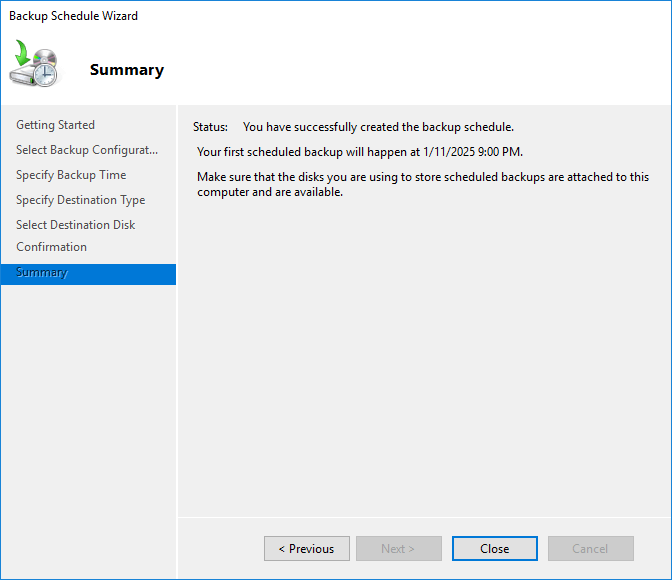
Congratulations! Your settings for creating a backup copy on Windows Server are complete and now the backup file will automatically perform its work at the specified time.
How to manually backup Windows Server?
Manual backups are suitable for users who need more control over certain files and folders. With this method, the user initiates the backup process manually without relying on automatic settings.
Manual backups can be performed with Windows Server Backup or by simply copying the desired files.
Simple windows server backup manually
Step1: To initiate this process, we need to navigate to the Windows Server Manager and then select the Windows Server Backup. ( Section Open the Windows Server Backup tool)
Step 2: Select the Backup Once option from the right column
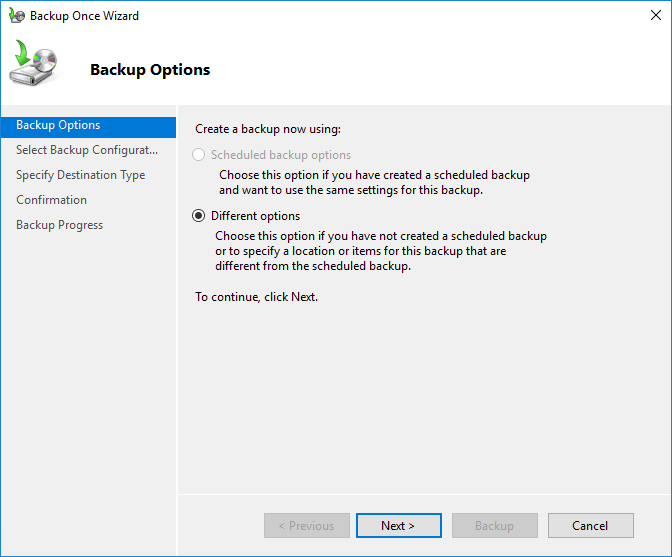
Step 3: In this section, select Different options and click Next.
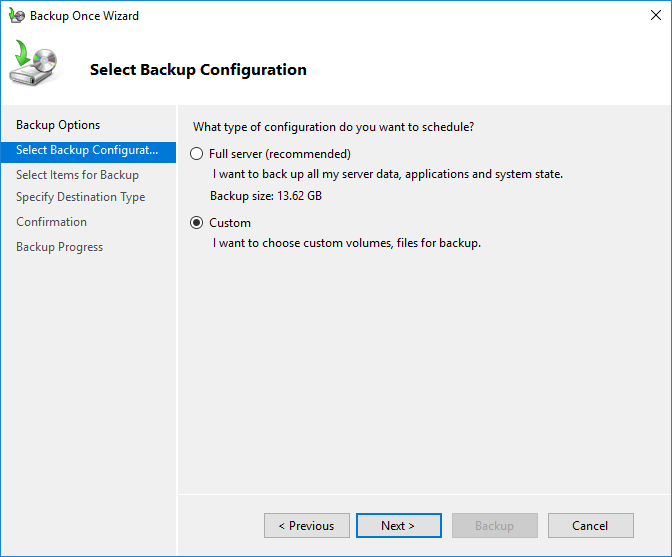
Step 4: In the Select Backup Configuration section, you can choose to back up the entire server or only specific files and data. After selecting your choice, click Next.
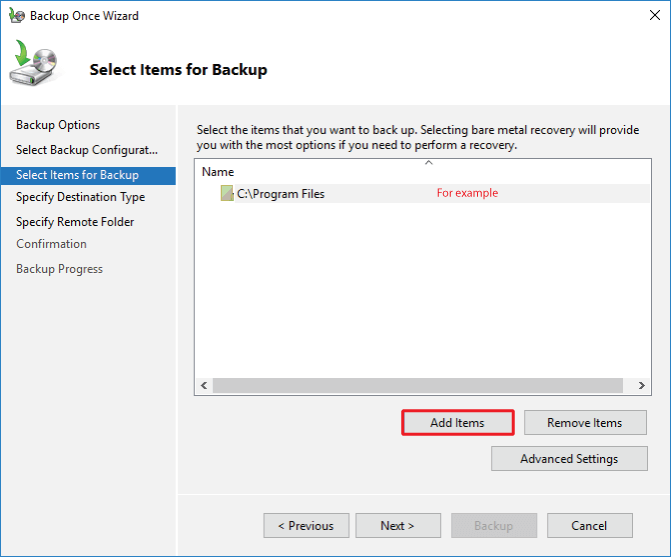
Step 5: Select the files and important folders to back up using the Add items option in the Select Items for Backup step. Then click Next.
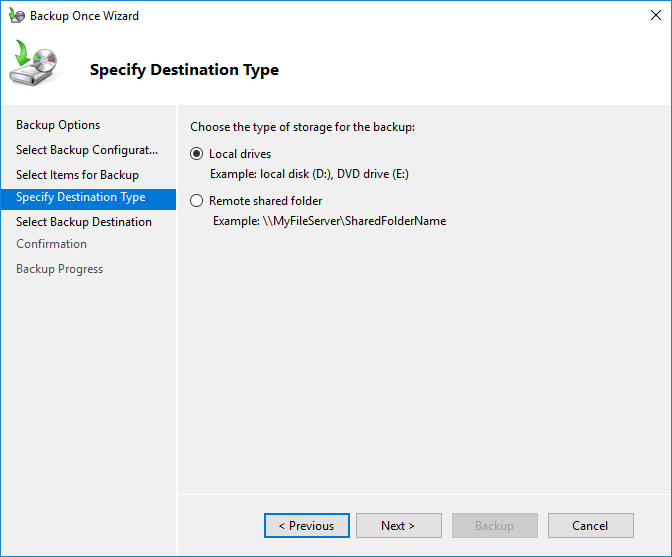
Step 6: In the Specify Destination Type step, you have two options: Local drives (for storing on the server) and Remote Shared Folder (for storing outside the server environment). Choose the backup storage location based on your needs. Then click Next
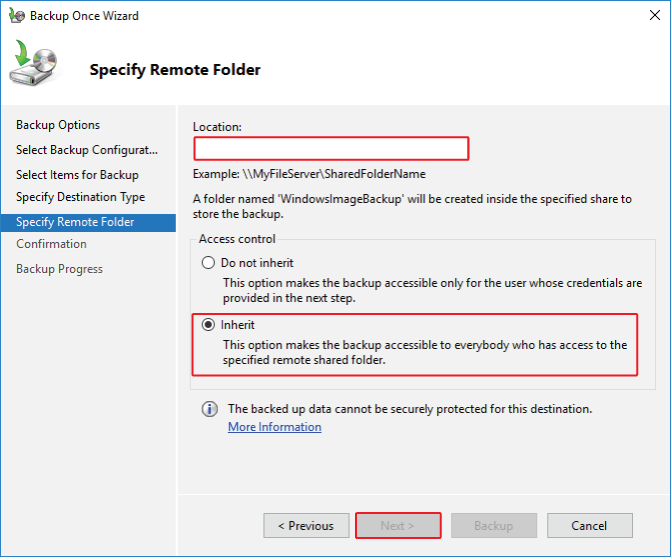
If you select the Remote Shared Folder option, you must have a storage environment (hard disk, server, Cloud storage environment) outside of your server. Enter the server information and the path to the backup storage folder in the “Location” field. Set the “Access Control” to “Inherit” and click next.
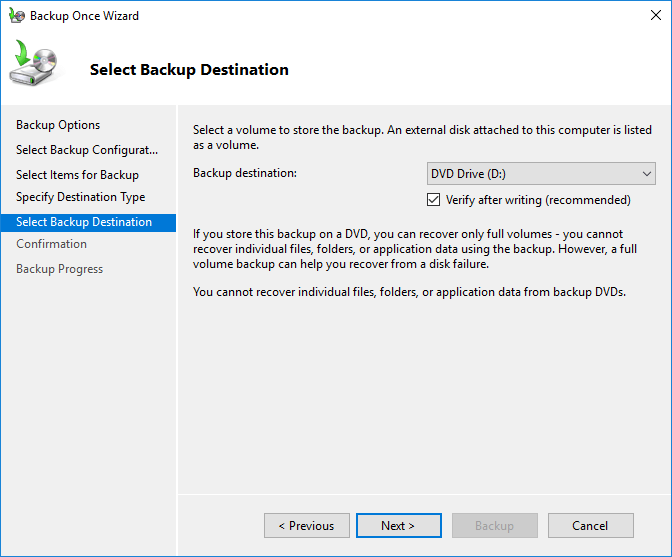
Step 7: After selecting Local Drives, choose the backup destination in the Select Backup Destination section and click next.
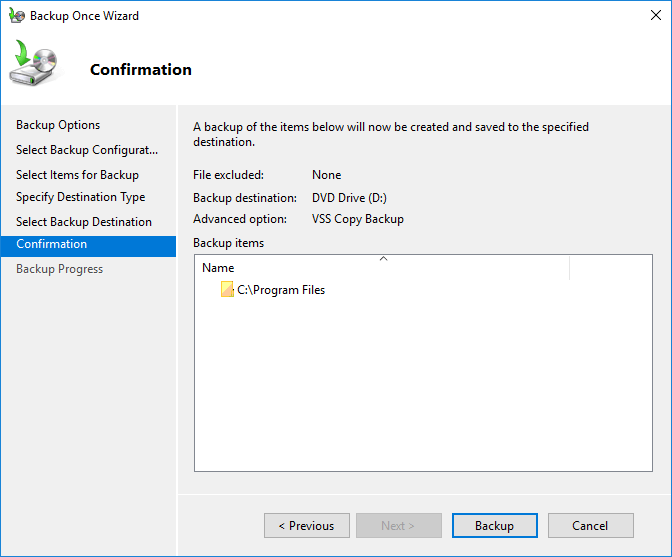
Step 8: The Confirmation section displays a summary of your backup settings. Click the Backup button to start the backup process from the Windows server.
Conclusion
Backing up your Windows VPS is an important task that you should not neglect. It ensures that your data is safe and can be restored in the event of a disaster. By following the steps outlined in this guide, you can set up a reliable backup strategy for your Windows VPS.
Remember to choose a backup method that suits your needs, schedule regular backups, and test your backups to make sure they are working correctly. With a well-implemented backup plan, you will have peace of mind that your Windows VPS data is protected.
FAQs
1. How often should I create a backup of my Windows VPS?
The frequency of backups depends on how often your data changes. For most organisations, daily backups are recommended. If your data changes frequently (e.g. e-commerce websites), you should consider incremental backups every few hours.
2. What is the difference between full, incremental and differential backups?
Full backup: Copies all data. It is comprehensive, but requires more time and storage space.
Incremental backup: Backs up only the data that has changed since the last backup. It is faster and uses less storage space.
Differential backup: Backs up all changes that have been made since the last full backup. It is a balance between full and incremental backups.
3. Where should I store my backups?
Store backups in multiple locations to ensure redundancy:
External drives: For quick access.
Cloud storage: For offsite security (e.g. Google Drive, AWS S3).
Network-attached storage (NAS): For local network storage.
4. How long should I keep my backups?
That depends on your needs. For most users, keeping backups for 30–90 days is sufficient. However, legal regulations or company policies may require longer retention periods.
The Author Robert Smite
Hello! I'm Robert, specializing in virtual servers and cloud technology. With expertise in managing and optimizing virtual servers, my focus is on delivering understandable and practical content in this field. My goal is to enhance knowledge and assist individuals in selecting the best virtual services for their needs.
More from Robert Smite