How To Install Wamp Server on Windows Server 2019
Wamp Server is one of the most well-known web servers, which provides Apache, PHP, and MySQL components in a single package on Windows Server, and is commonly used for development and testing environments.
This guide focuses only on how to install Wamp Server on Windows Server 2019 and covers the necessary prerequisites and detailed installation steps to run all the services properly.
Install WAMP Server on Windows Server 2019
Setting up WAMP Server on Windows Server 2019 is not difficult and provides developers with a powerful tool to develop and test local web applications offline, as well as troubleshoot them.
Following the tips provided in this step-by-step guide, you will be able to come up with a strong server environment on the Windows Server 2019 platform that you have in a matter of minutes.
If you want to deploy a real website over the internet, you need to have a well configured windows server that has access to the internet with a public IP. In this scenario, you can buy Windows VPS Server, which offers you all these options with on-demand support.
Download WAMP Server for Windows Server
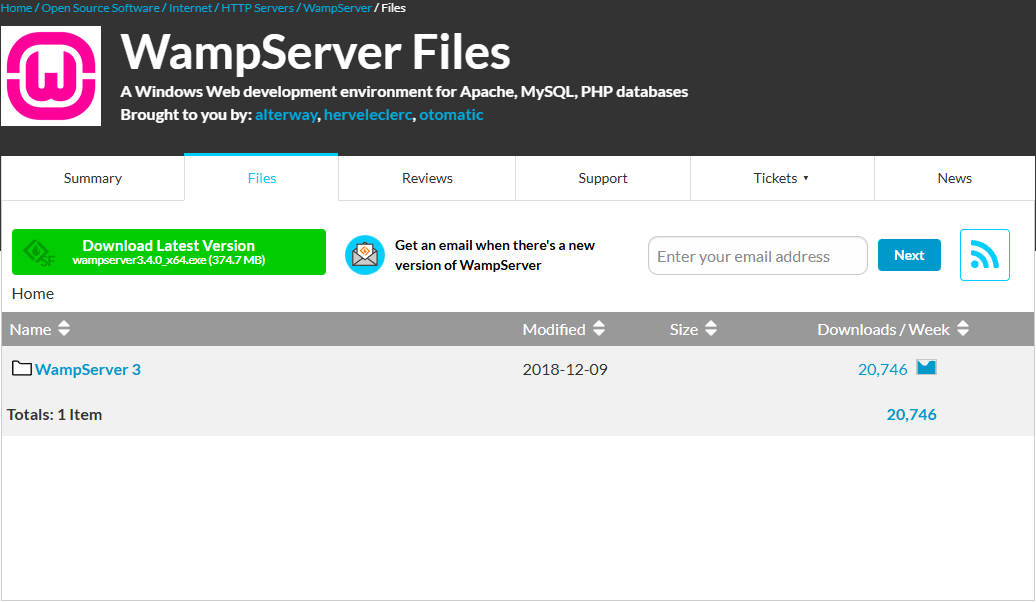
To start setting up the Wamp server on your Windows Server. First, you need to download the latest Wamp installation file.
Installing WAMP Server on Windows Server
When you install Wamp, it sets up Apache, MySQL, and PHP in a single package, making it easy to get started with a complete web development environment.
However, if you prefer more control over your settings, you can install each component individually.
For detailed instructions on installing PHP specifically on a Windows virtual server with IIS, see the article “How to Install PHP on IIS Windows VPS Server“.
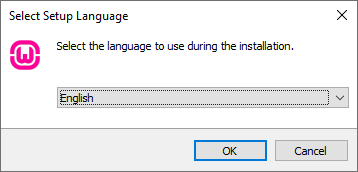
Step 1: After running the software, first select the desired language to continue and click OK.
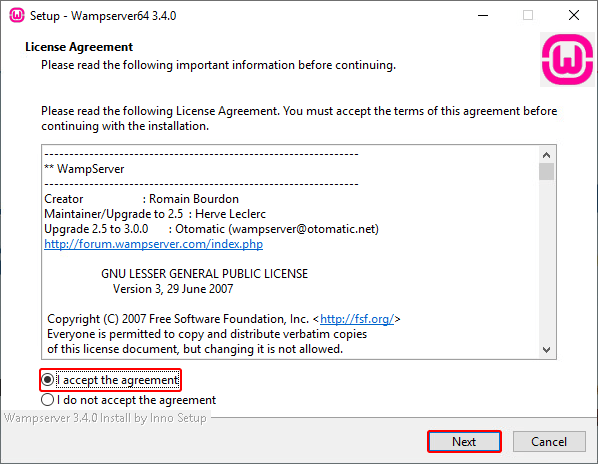
Step 2: Read through the terms, then check the option indicating that you accept the license agreement.
Once you confirm, click the Next button.
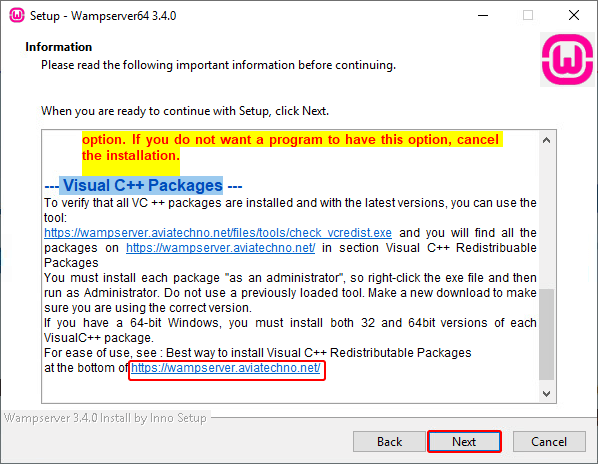
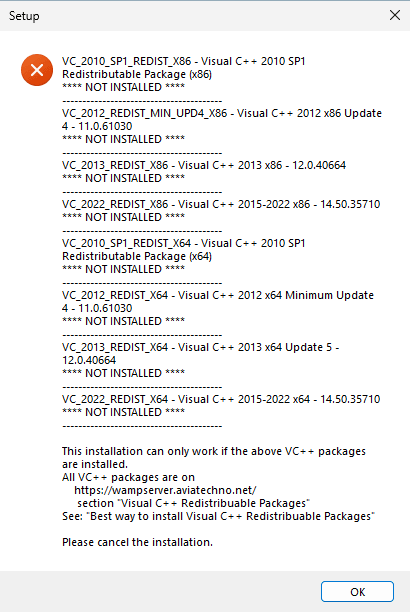
Step 3: The new window explains that WampServer requires specific Microsoft Visual C++ Redistributable packages to function properly. Installing them is essential—without them, the installation cannot continue.
You can follow this article to learn how to install the Visual C++ Redistributable on Windows Server using the All-in-One installation method.
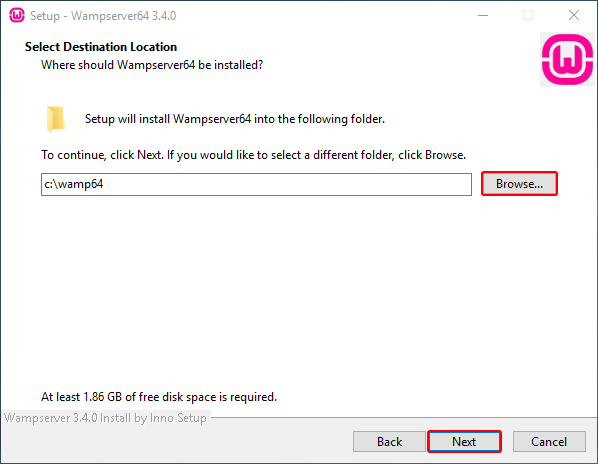
Step 4: After installing the Visual C++ packages, the installation will continue, and you will need to specify a directory for WampServer to get installed. It is suggested to use the default location and click Next.
Step 5: During the installation, WampServer asks which browser should be used as the default browser for opening its dashboard and tools.
By default, it selects Microsoft Edge.
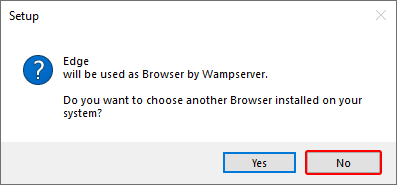
Click No to keep Edge as the default browser. Choosing No is the quickest option and avoids manually browsing for another browser executable. You can always change this later inside WampServer settings.
Step 6: This window provides you with essential information on how to use the Wamp Server effectively. Click Next.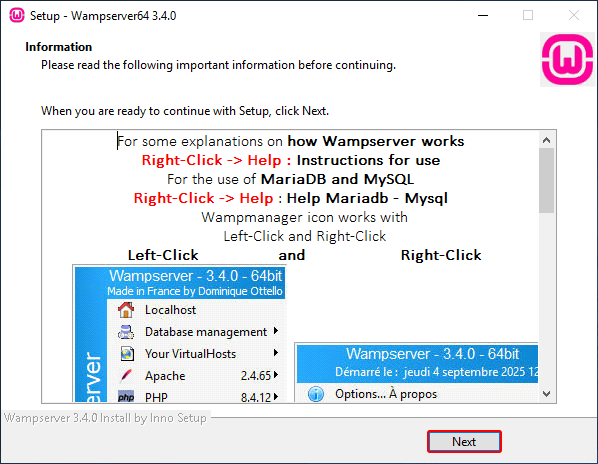 Step 7: Click Finish, then proceed to your Wamp Server and start using it.
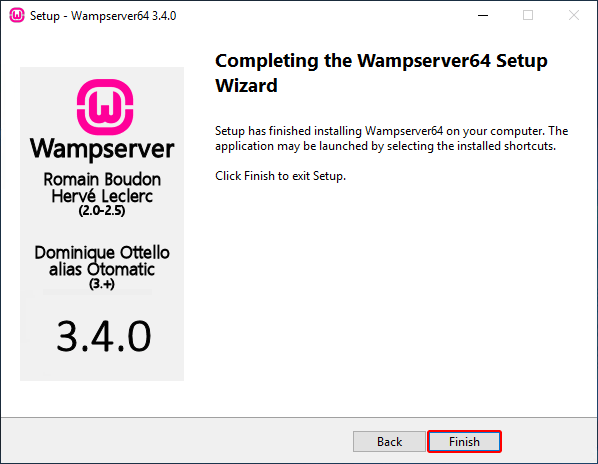
Testing WAMP Server
The next step would be to work on the WAMP server installation. It’s important, though, to use verification to make sure that the installation is done correctly. Follow these steps to launch and test WAMP Server:
Step 1: Find the WAMP Server icon on the desktop or in the Start Menu and double-click it twice to access the app.
Step 2: Look at the System Tray at the bottom right corner of the screen, which shows the WampServer icon.
Green Icon: All services running perfectly. Apache is serving pages. MySQL/MariaDB is accepting connections. You’re ready to develop.
Orange/Yellow Icon: Services are partially running. Usually means one service started, but another didn’t.
Most commonly: Apache started, but MySQL didn’t (or vice versa)
Could also mean services are still starting up (wait 30 seconds)
Red Icon: Services stopped or are not running. Something’s wrong. Apache or MySQL isn’t starting.
![]()
Step 3: Open your web browser and type “http://localhost in the address bar. The next step is to navigate to the WAMP Server homepage, which will show a successful installation on your computer.
Features of WAMP Server
WAMP Server offers a range of features tailored to the needs of developers working in Windows environments:
| Feature | Description |
|---|---|
| Ease of Installation | Zero-hassle installation process for a conducive web development environment. |
| Integration of Components | Apache manages web pages, MySQL handles databases, and LAPPE (PHP) manages server-side scripting, providing an all-purpose tool. |
| User-Friendly Interface | Designed for easy configuration and management of server components. |
| Multiple Module Support | Includes various modules like OpenSSL, phpMyAdmin, and MediaWiki for diverse developmental roles. |
| 64-bit and 32-bit Support | Supports both 64-bit and 32-bit systems, offering compatibility with a variety of Windows systems. |
| Convenient Management | Easily launch and manage web server and database components with simple commands. |
| Graphical Interface | Provides an interface for users to toggle server components on and off as desired. |
| Built-in Configuration | Pre-built tools simplify the process of creating the desired structure for users. |
XAMPP Server is one of the strong competitors of WampServer, offering a more feature-rich and cross-platform development environment. You can follow this article to learn
How to install XAMPP web server on a Windows server.
What ports wamp server use?
The Wamp server doesn’t have a fixed port for itself to run. It uses the default port of the services it runs, like 80 and 443 for HTTP and HTTPS, and 3306 for MySQL, which, if you want, you can change in the Wamp settings.
But if you face problems where the service is not running, it may be because your firewall configuration is blocking the port, which you can open by following this article:
How to open a port in Windows VPS
Conclusion
Congratulations! With this effort, you have a WAMP Server on your Windows machine to use as a web development platform for local or test environments. Through the WAMP Server, you can quickly develop and test your native web applications.
If you want a more powerful and user-friendly solution to manage your websites on a Windows Server, you can install Plesk on Windows Server. It provides a lightweight control panel for managing web hosting services, including web and mail server configurations.
FAQs
Is It Possible to Customize the Installation Parameters of the Wamp Server?
Undoubtedly, during the installation process, you can set up different preferences by changing the installation location, default web browser, and even some other tasks to be completed.
Is Wamp Server the Ideal Choice for Production Environments?
To be clear, WAMP was contemplating the difference between the production and the local environment. For production cases, consider the managed hosting solution with the security measures in order.
Is it possible to modify the default login credentials for the WAMP Server?
It is not possible to alter the previously mentioned login credentials for the WAMP Server. On the other hand, it is also advisable to put in place more secure passwords for improved security.
Can we link to the WAMP Server when we use a different operating system?
WAMP Server was basically designed to create servers locally on Windows OS systems. However, the target systems can be remotely accessed if the same remote desktop software is employed and is compatible with a particular operating system.
The Author Robert Smite
Hello! I'm Robert, specializing in virtual servers and cloud technology. With expertise in managing and optimizing virtual servers, my focus is on delivering understandable and practical content in this field. My goal is to enhance knowledge and assist individuals in selecting the best virtual services for their needs.
More from Robert Smite