
Remote Desktop Services (RDS) is a built-in Windows Server role that allows users to access a Windows desktop or applications remotely through a network connection. It provides the components needed to host and manage remote desktop sessions, control user access, and handle licensing.
Installing Remote Desktop Services involves adding the required server roles and configuring their settings. Depending on your setup, this may include Remote Desktop Session Host, which manages user sessions, and Remote Desktop Licensing, which handles Remote Desktop Services Client Access Licenses (CALs).
Windows Server also provides an RDS Grace Period, generally 120 days, allowing you to test Remote Desktop Services before configuring a licensing server and installing CALs. This period is separate from the Windows Server Evaluation period.
In this guide, we’ll cover how to install Remote Desktop Services on a Windows VPS Server, configure the required roles, set up licensing, and verify that the RDS environment is working correctly.
Requirements for Installing Remote Desktop Services
Before installing Remote Desktop Services (RDS) on Windows Server, make sure your server meets the basic installation requirements. You need a supported Windows Server version. Based on Microsoft’s official documentation, Windows Server 2016 to Windows Server 2025 is supported; however, you can set RDS up on Windows Server 2012, but its official support ended in 2023.
You should also use a high-end VPS or local server setup because each user connection consumes CPU and RAM resources separately, so if you are going to have more than 2 connections, you should consider using a high-end server.
Also, you should consider RDS licensing. You have a 120-day free Grace period, but after it ends, you should purchase a license for every user separately on your Windows server.
Install Remote Desktop Services on Windows Server
You can install Remote Desktop Services through Server Manager using the Add Roles and Features Wizard. Windows Server provides different deployment options depending on whether you want to host desktop sessions or virtual desktops. Follow the steps below to configure a session-based RDS deployment.
Open the Add Roles and Features Wizard
First, open Server Manager by searching for it in the Windows Start Menu, click on Manage, and select Add roles and features. The first page is the introduction page about the wizard; click Next to continue.
Select Role-based Installation
On the installation type page, select Role-based or feature-based installation, then click Next to continue.
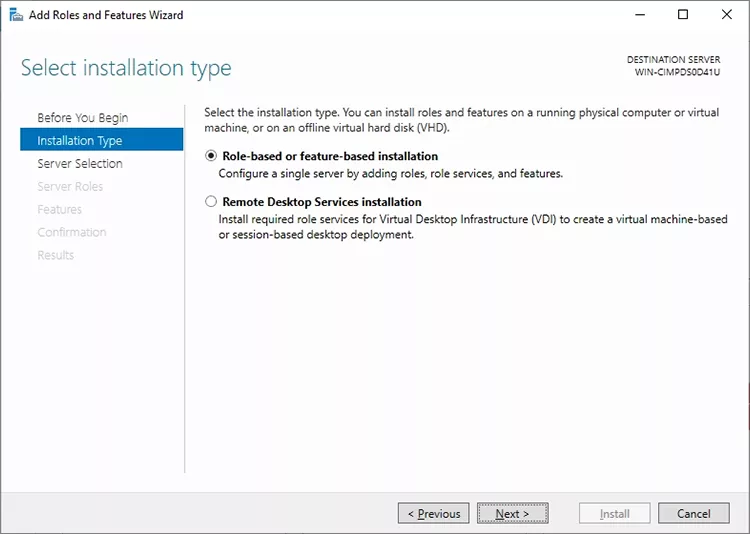
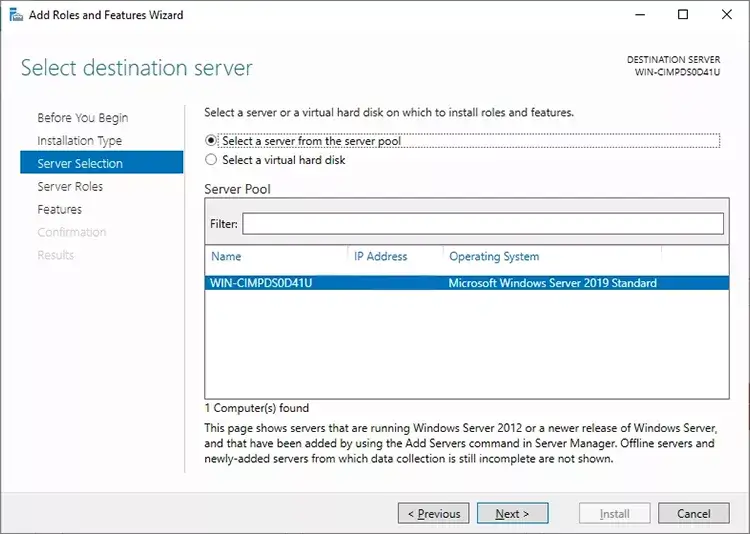
On the next step, select your server from the server pool and click Next; there will be only one server in the list.
Select Remote Desktop Services (RDS) Role
On the roles page, select the Remote Desktop Services (RDS) role, enable it, and then click Next. On the next page, you will see the Features page which you can select your required features and components you want to install with RDS just click next to skip.
Remote Desktop Services Roles
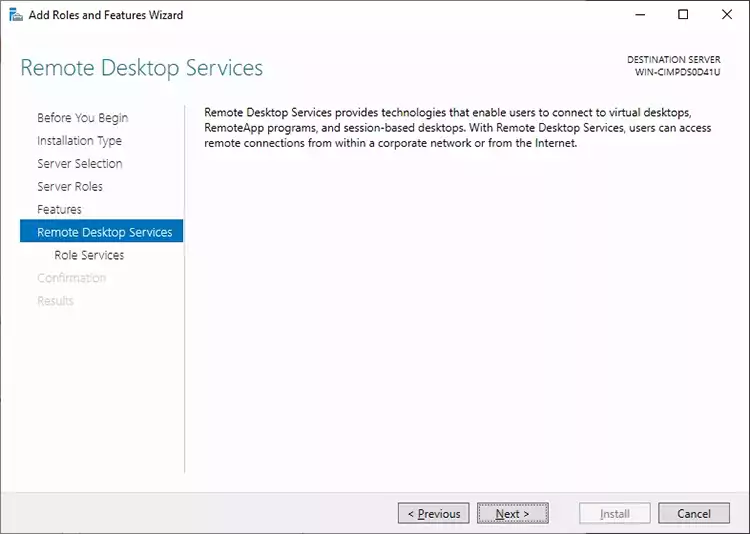
After the Features page, you will see an introduction page about Remote Desktop Services, which introduces enabling it and gives you these options. Click Next to continue.
Then, on the Role Services page, select Remote Desktop Session Host and Remote Desktop Licensing. If a pop-up appears asking you to add the required features, click Add Features. Once both roles are selected, click Next to continue.
Confirm RDS Installation on Windows Server
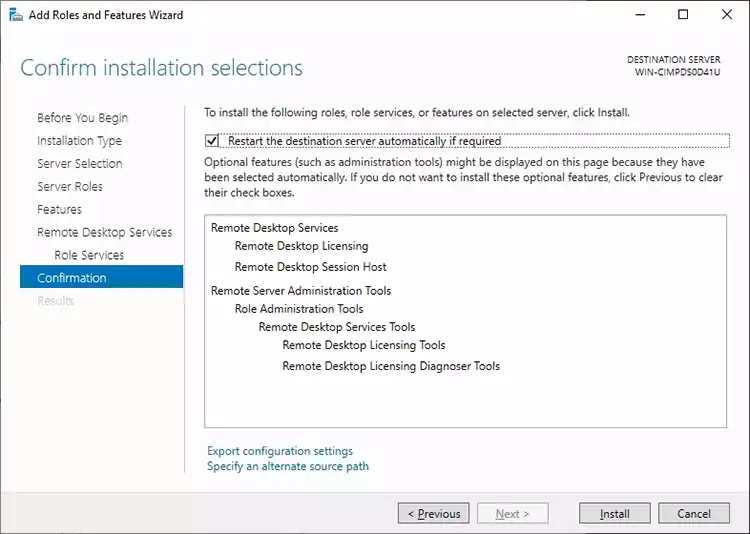
This page displays all the roles and features you’ve selected for installation. Review your selections, and if everything is correct, click Install to begin the installation process. Make sure the Restart the destination server automatically if required option is enabled so the server can restart automatically if necessary.
Note:
Once the installation is complete, your server will restart automatically if required. Log in to your Windows Server again after the restart. Remote Desktop Services is now successfully installed.
Configure Remote Desktop Users
After installing Remote Desktop Services, you need to create user accounts and grant them permissions to connect to the server remotely. Each user should have a separate Windows account so they can access their own desktop session without interrupting other users.
By default, members of the Administrators and Remote Desktop Users groups can connect through Remote Desktop. You can add existing accounts to the Remote Desktop Users group or create new accounts specifically for remote access.
In the following steps, we’ll show you how to create Windows user accounts and grant them Remote Desktop access.
Create Windows Server User Accounts
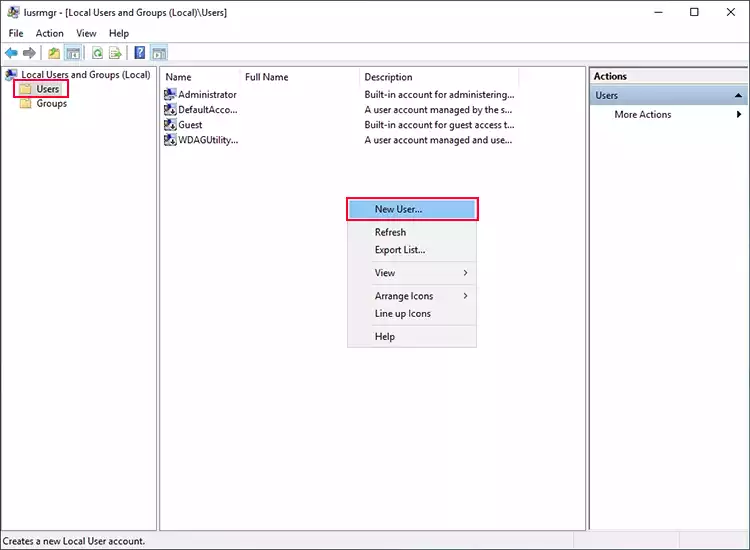
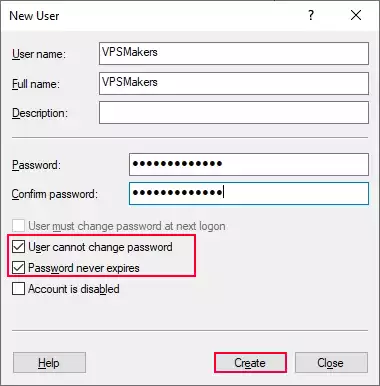
Press Win + R and type lusrmgr.msc and press Enter to open user and group management settings. Open the Users folder, and right-click on whitespace and select New User.
On the opening page, fill in the fields with your desired name and username, then set a strong password for the new account. Disable the User must change password at next logon option and enable Password never expires. If you don’t want the user to be able to change their password, also enable the additional option shown in the image below.
Note:
The password you are setting for the new user should meet the Windows Server minimum password requirements, which it requires to use a combination of uppercase and lowercase letters, symbols, and numbers.
Add User To Remote Desktop Users Group
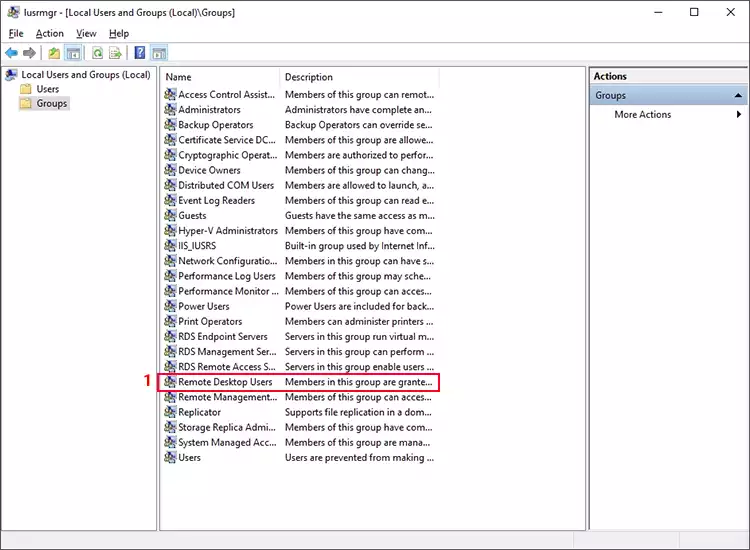
After creating a new user, you need to make this user an administrator or add them to the Remote Desktop Users group to be able to log in to Windows Server using an RDP connection.
1 – On the left sidebar, click on Groups and find the “Remote Desktop Users” group.
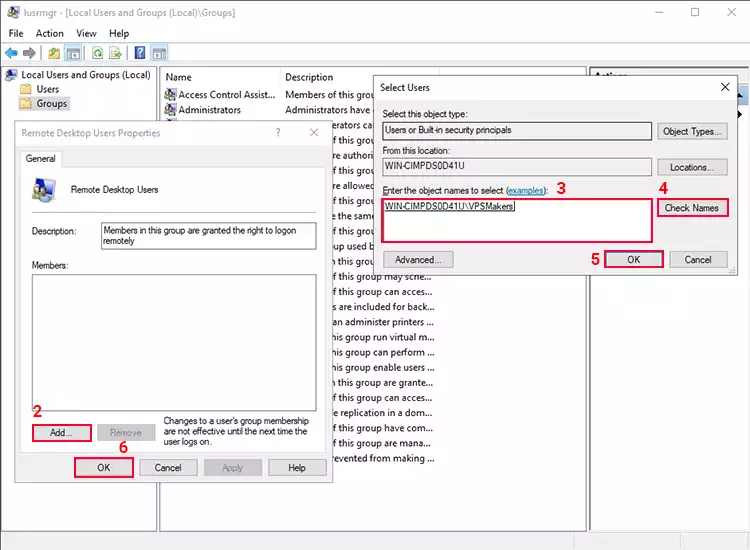
2 – On the opening page, click on Add to add the user to the group.
3 – On this page, in the Object names field, enter the username of the new user you’ve created previously.
4 – Click on Check Names to check for this name on Windows.
5 – Then click Ok to confirm this page.
6 – You will be shown on the members list on the Remote Desktop user properties page; click OK to add the user to this group.
Note:
Instead of the Remote Desktop Users group, you can add your user to the Administrators group too, following the same steps.
You can now use this account to connect to your RDP Server through Remote Desktop. By default, Windows Server allows up to two simultaneous Remote Desktop connections for administrative purposes. After setting up Remote Desktop Services, follow this guide to learn how you can allow multiple users to connect simultaneously to Windows Server.
Discover how to allow multiple users to connect to a Windows VPS simultaneously using Remote Desktop (RDP).
Read the full articleVerify the RDS Installation
After installing and configuring Remote Desktop Services, you should verify that the required roles are installed correctly and that users can establish remote desktop connections. You can check the installed roles through Server Manager and test the setup by connecting to the server with a separate user account.
Test Remote Desktop Connections
To test the Remote Desktop connection, use one of the new user accounts to connect to your Windows Server. Repeat the process with another account to verify that multiple users can connect simultaneously.
Try connecting with more than two user accounts simultaneously to verify that your VPS remains stable and its performance doesn’t noticeably decrease.
Remote Desktop Services Licensing
Remote Desktop Services (RDS) requires appropriate licensing to allow users or devices to access a Remote Desktop Session Host. These licenses are called Remote Desktop Services Client Access Licenses (RDS CALs) and are separate from the standard Windows Server license.
Windows Server provides a built-in 120-day grace period for testing an RDS deployment. After this period expires, users need valid RDS CALs to continue accessing the Session Host. To manage these licenses, you must install and activate the Remote Desktop Licensing role, then configure the Session Host to use the licensing server.
RDS has two licensing modes (Per user and Per device):
- Per user: Each user needs an RDS CAL, regardless of how many devices they use to connect.
- Per Device: Each device connecting to the server needs an RDS CAL, regardless of how many users share that device.
Summary
To allow more than two users to connect to Windows Server simultaneously, you need to configure Remote Desktop Services (RDS). RDS provides the components required to host multiple remote desktop sessions and requires valid RDS Client Access Licenses (CALs) for regular use.
To install Remote Desktop Services, add the required roles through Server Manager, select the necessary role services, and complete the installation. Your server may restart to apply the changes. For a more advanced deployment, you can also install Active Directory Domain Services (AD DS) and configure a domain-based environment instead of using a workgroup. However, this setup requires additional configuration and server resources on your Windows VPS.