
How to Install ADFS on Windows Server?
Active Directory Federation Service (AD FS) is used for Single Sign-On (SSO). AD FS requires an SSL certificate and an Active Directory Domain environment.
To install AD FS (Active Directory Federation Service), you need Administrator access to the Windows Server, a static IP, and good network configuration.
If you don’t have a Windows Server online, you can buy a pre-configured Windows VPS server to run your AD FS on it.
In this guide, you’ll learn how to install and configure AD FS on Windows Server step-by-step. The table below summarizes the installation process.
| Phase | Windows Server Module |
|---|---|
| 1. Install AD DS | Active Directory Domain Services |
| 2. Install AD FS role | Server Manager - Roles |
| 3. Get SSL Certificate | Certificate Authority / SSL |
| 4. Configure Federation Services on Windows Server | AD FS Configuration Wizard |
| 5. Test AD FS Sign-In | —- |
Install AD FS Role on Windows Server
Installing AD FS requires adding the AD FS role to your server. But before installing its roles, you should have Active Directory installed on your Windows server too. Because AD FS runs on the domain created in Active Directory, if you don’t have it installed, follow the article below:
Install Active Directory on Windows Server
Add AD FS Role in Windows Server
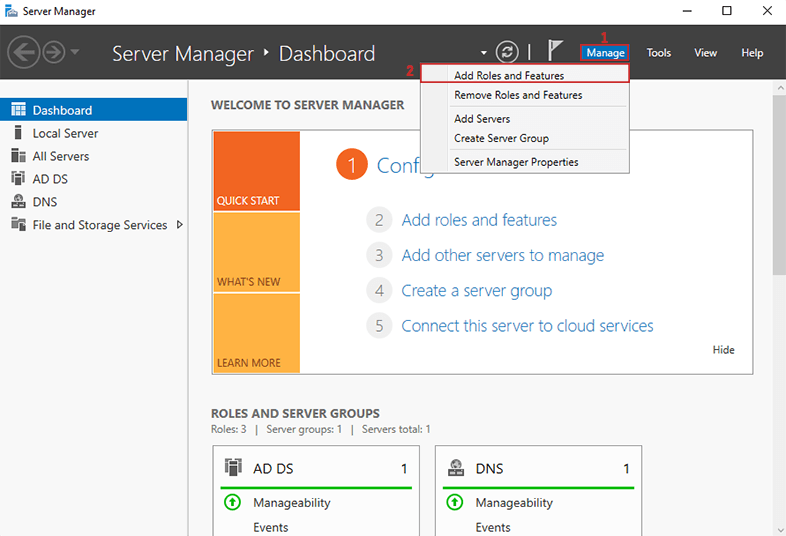
After logging in to Windows Server, open Server Manager by searching for it in the Start menu and open it. In Server Manager, go to Add Roles and Features on your server by following the instructions below.
Server Manager > 1. Manage > 2. Add Roles and Features:
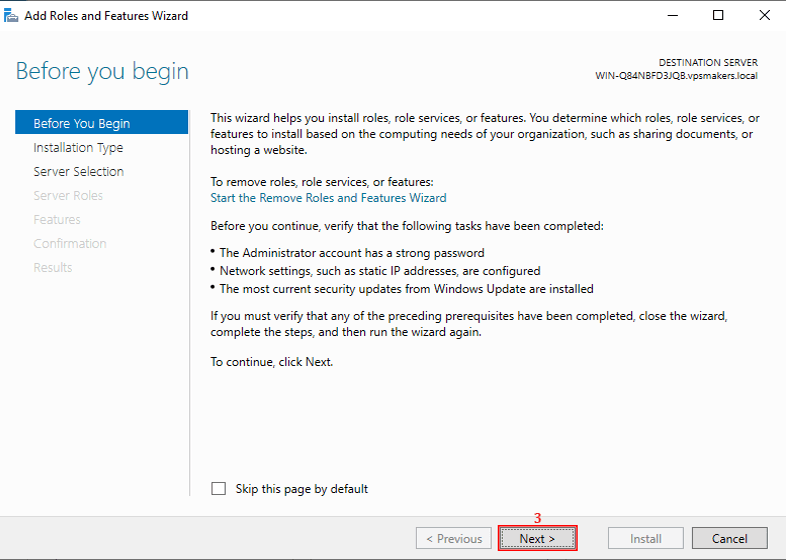
3. Then you will see the window for adding new roles or features. The first page is an introduction about add role and Features wizard; just click Next to continue.
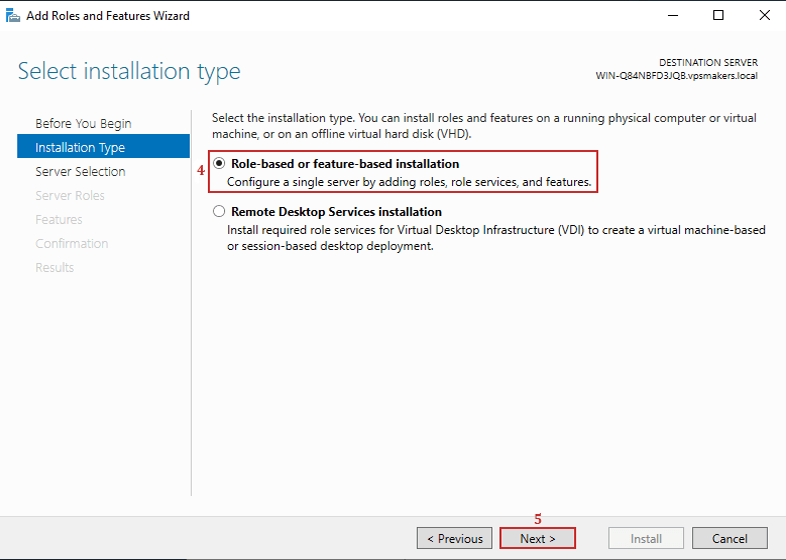
Select Installation Type on Windows Server
In this step, it will ask you to choose the role-based installation to install it on the actual server.
4. Select the Role-based or feature-based installation
5. Click Next:
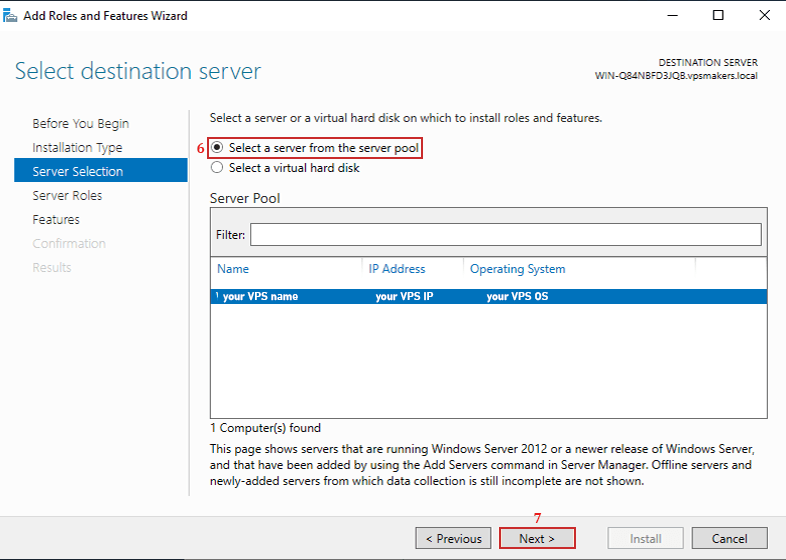
Select Destination Server To Install AD FS on Windows Server
After selecting the installation type, you will see a page that shows the available servers in a list; you need to select the destination server you want to add the AD FS role to.
6. Select The Actual destination server
7. Click Next:
Select Active Directory Federation Services Roles
In this step, you will see all roles and features you can install on Windows Server.
8. From the roles list choose Active Directory Federation Services
9. Click Next:
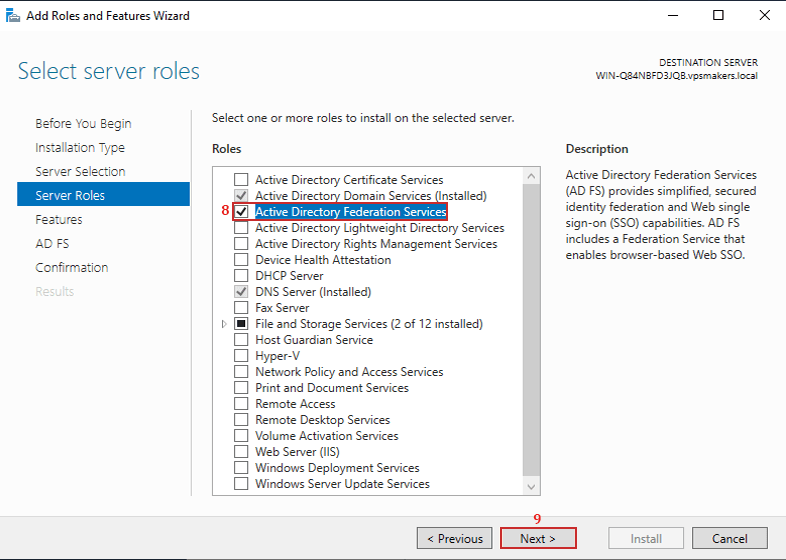
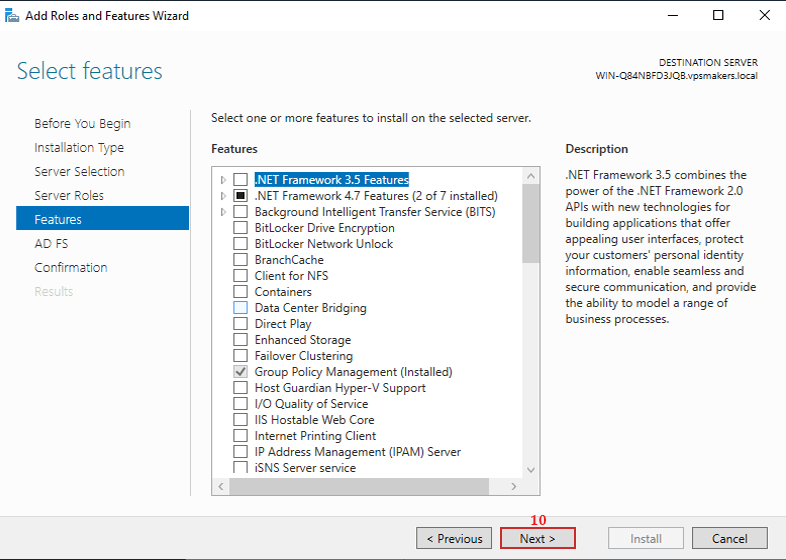
10. Click Next:
AD FS Instructions
11. Here on this page, you will see an introduction about Active Directory Federation Services (AD FS). If you can read it, then click Next to continue.
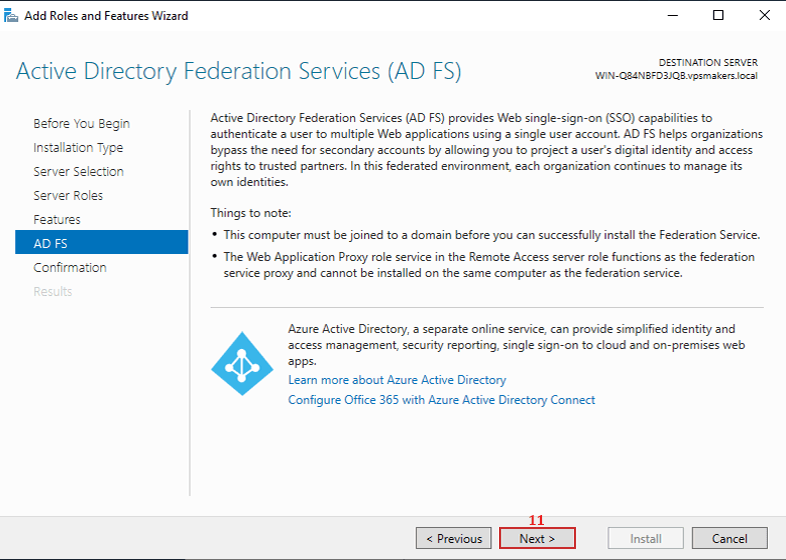
Here in the image above, it mentions Azure Active Directory, which is an online active directory service that, if you want to access your AD DS and AD FS, you can install Azure AD to connect your domain network safely.
AD FS Roles Installation On Windows Server
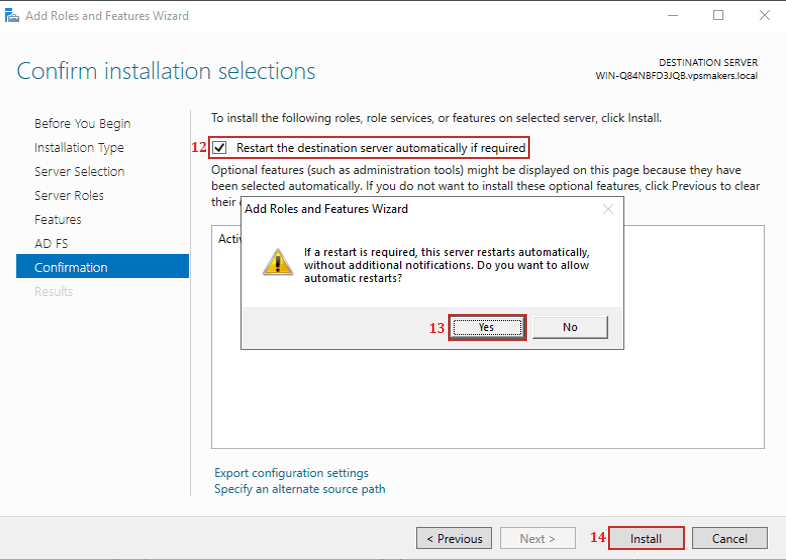
In this step, you should confirm the choices you made in previous steps to continue installation.
12. Check Restart the destination server automatically if required
13. Click Yes
14. Click Install
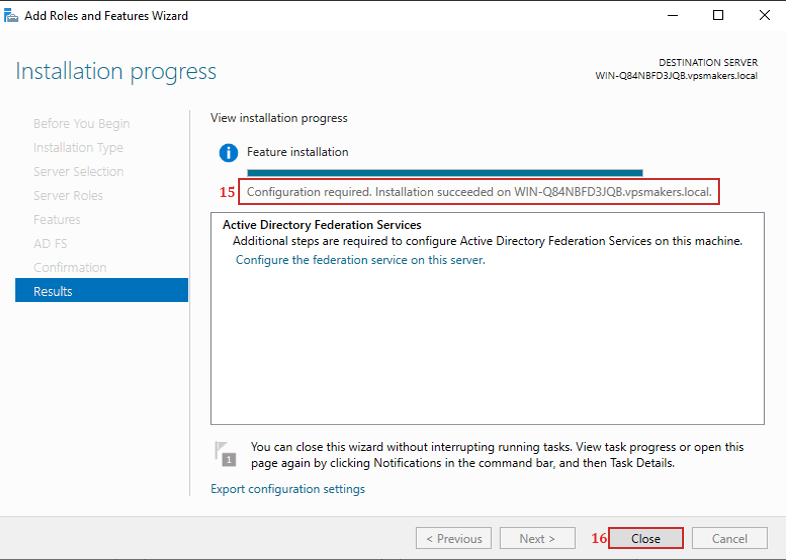
Finally, you’ll see the success message of AD FS installation; close the window.
15. It shows that installation is completed but needs configuration, which you will learn how to configure in the next steps.
16. Click Close to continue.
Generate SSL Certificate on Windows for AD FS
For AD FS to work, it needs an SSL certificate bound to its federation service name. You can use AD CS or self-signed for issuing a certificate.
For a self-signed certificate, you have to use PowerShell to generate it. Still, for production environments, this is not recommended because you have to insert the certificate on every user’s browser.
If you want the full walkthrough on setting up AD CS and issuing trusted certificates, check out How to Generate SSL certificate in Windows Server.
With the certificate sorted and issued, your AD FS server is ready to move into the Configuration Wizard. You have to export the certificate as a .pfx file.
Note: Remember that if you use a self-signed certificate, make sure you import that certificate on every browser that connects to the AD FS Server.
Configure Federation Services on Windows Server
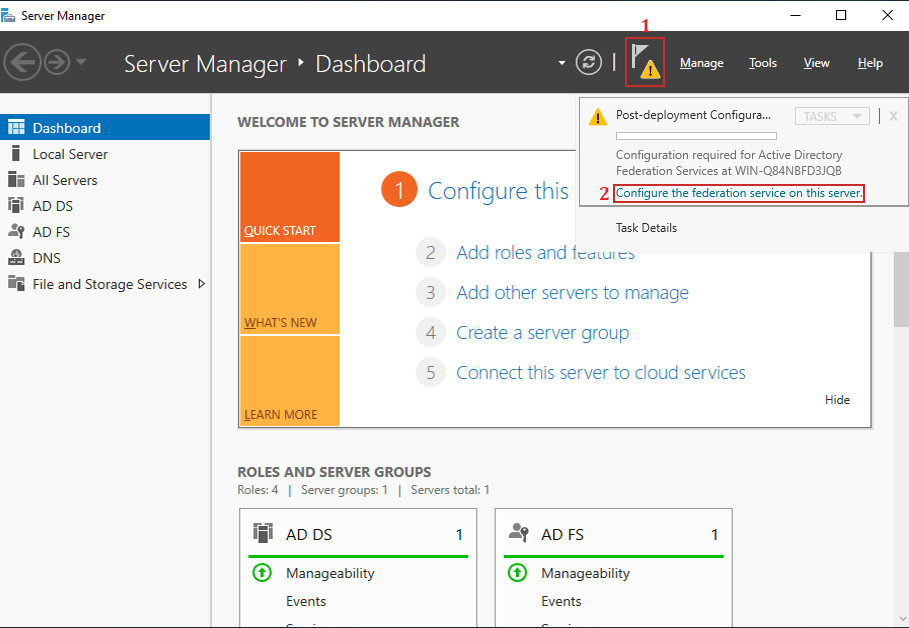
Once the certificate generation is completed, you can configure AD FS from the Post-deployment Configuration section in Server Manager.
1. Click the Flag icon on the top navbar
2. Click on Configure the federation service on this server
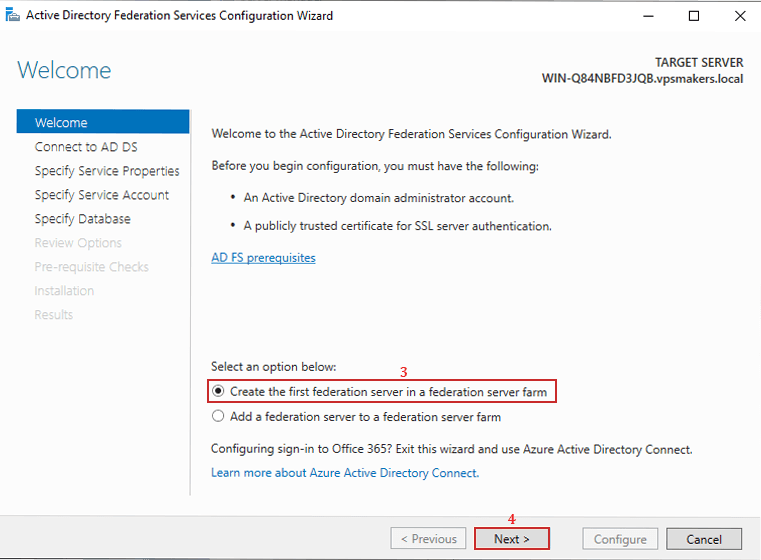
You’ll see the federation configuration wizard window, and it explains the AD FS prerequisites. You have to create a federation service.
3. Choose Create the first federation server
4. Click Next
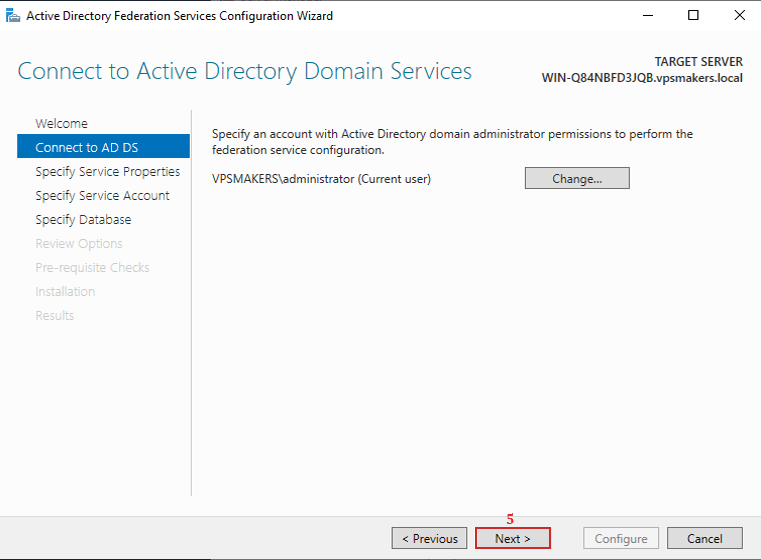
Connect to AD DS in Federation Services Configuration Wizard
In this step, the Federation Service must be connected to an AD DS using an account with administrator privileges. You must be logged in with that account.
5. Click Next
Specify SSL Certificate for Federation Services
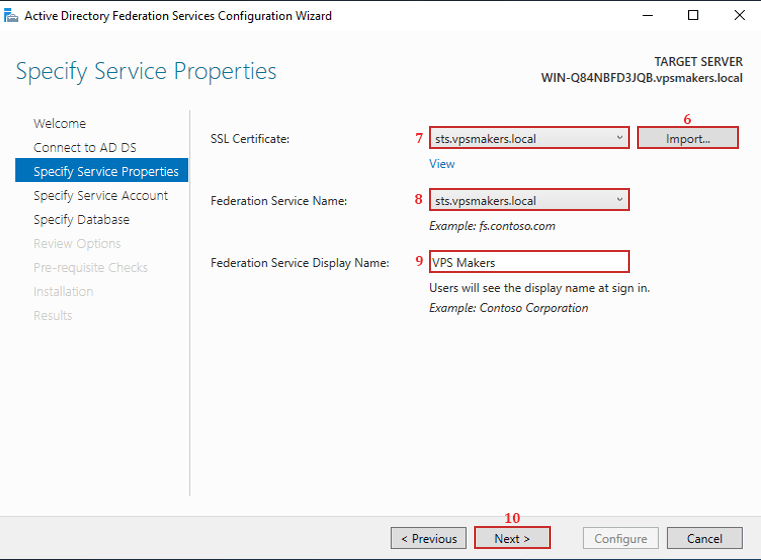
You have to specify the SSL certificate. First, you need to import the .pfx file that you generated in the previous step, whether with AD CS or a self-signed certificate. Next, change the SSL certificate and give a display name to your Federation Service.
6. Import SSL certificate
7. Choose Imported certificate
8. Select the subdomain of the current Domain for the Federation Service
9. Provide a display name for the Federation Service
10. Select Next
Specify AD FS Service Account
In this step, you have to specify a service account for AD FS by installing GMSA on a Windows server or a domain user account. In this guide, a domain user account is used.
11. Click Select to provide the user
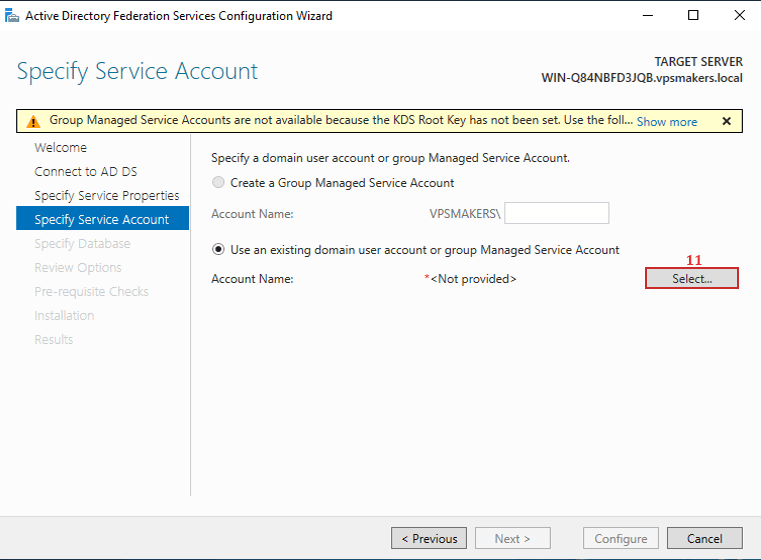
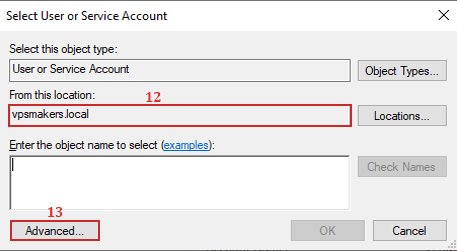
Select the Domain and click on Advanced to see the users on the current Domain
12. Select Domain
13. Click Advanced
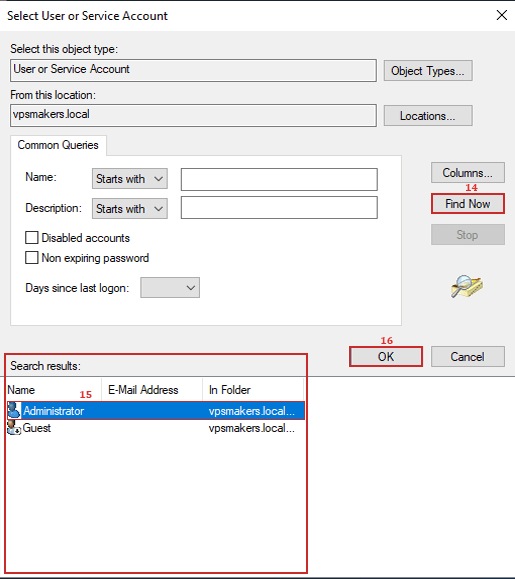
You have to search for users. After searching, in the results, select the user you want. We choose Administrator.
14. Click Find Now
15. Select the user you want
16. Click OK
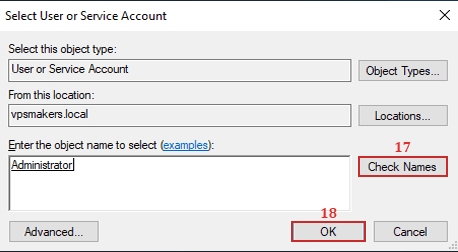
Check the name of the user to ensure the username is given correctly.
17. Click Check Names
18. Click OK
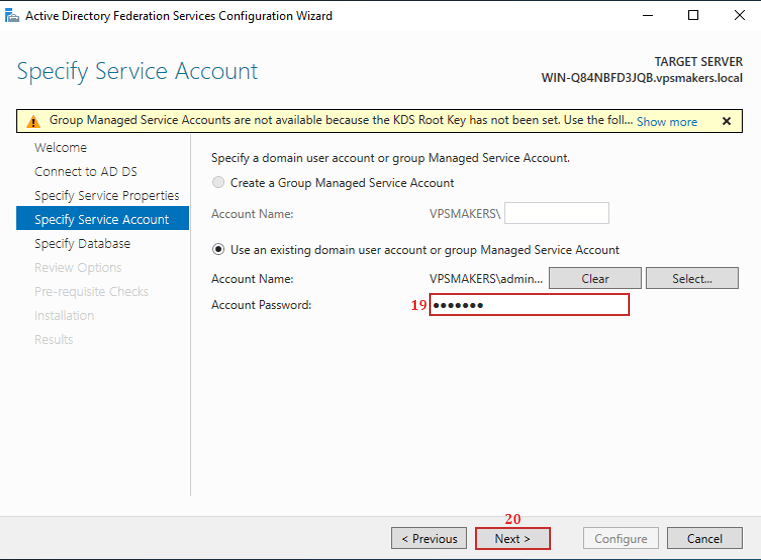
Provide the account passwords, and then click Next to continue.
19. Insert the selected Account Password
20. Click Next
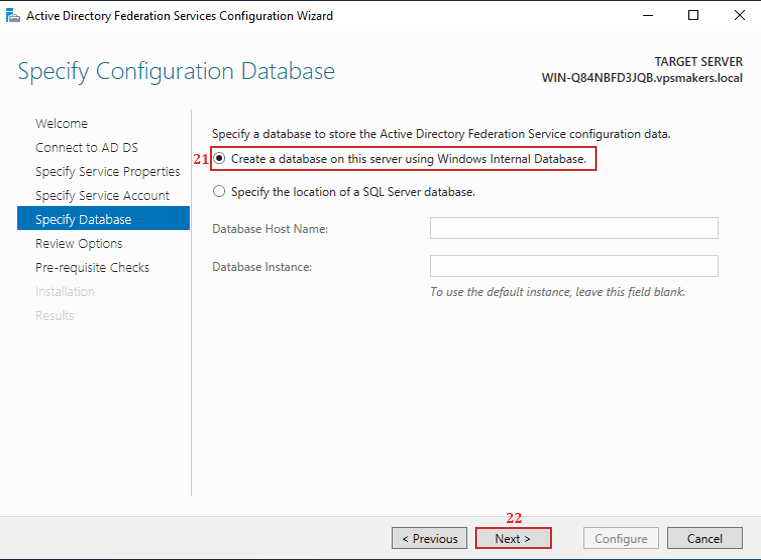
Specify Database Server for AD FS on Windows Server
AD FS needs a database to store configuration data. You can either create an internal database using option 1 or specify your SQL Server Database; make sure that it is an MSSQL Server.
21. Choose Option 1 for Create a database using current server
22. Click Next
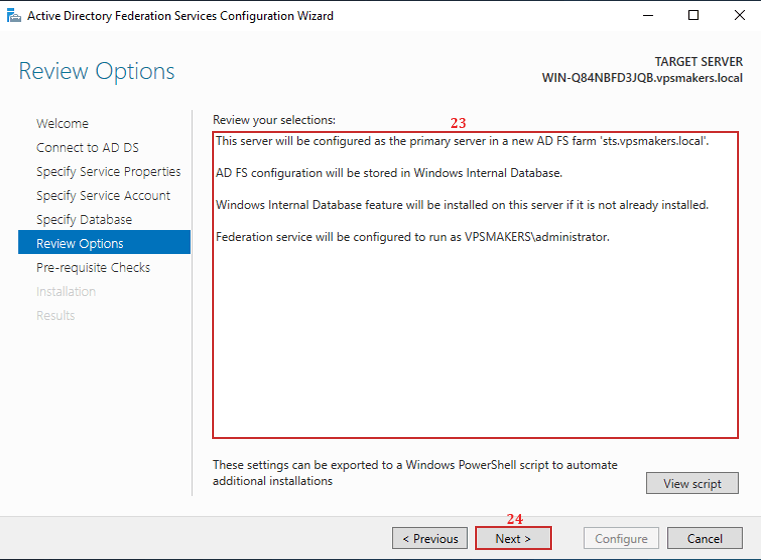
Review of AD FS Installation
Review what you chose during the installation, compare your selection with the review of our selection.
23. Compare the selection
24. Click Next
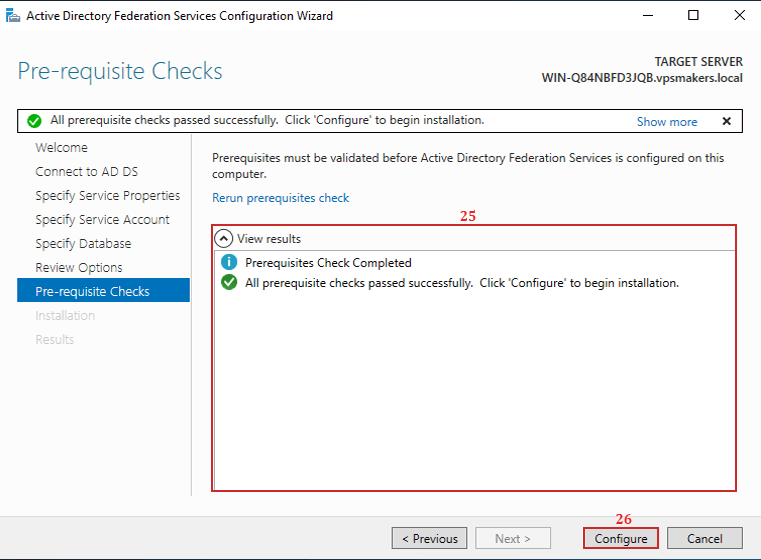
AD FS checks for prerequisites and shows an error if any selection or configuration is wrong.
25. Output of Checks
26. Click Configure
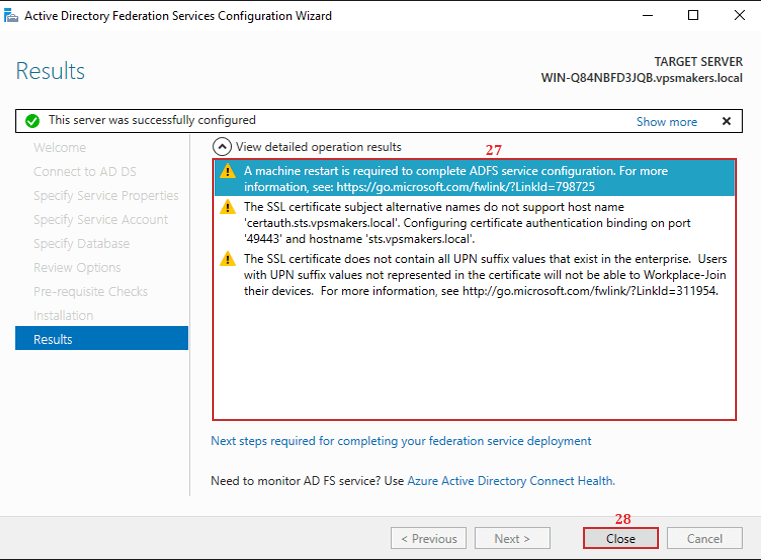
AD FS Installation Results
When installing AD FS with a self-signed certificate, you may encounter the warnings from Windows Server.
These warnings are informational and are expected when using a basic self-signed certificate.
They do not prevent AD FS from functioning in a lab or testing environment, but indicate that the certificate is missing some of the attributes recommended for production deployments.
If you issue the AD FS SSL certificate from Active Directory Certificate Services (AD CS) using an appropriate certificate template, these warnings typically do not appear because the certificate includes the required Subject Alternative Names (SANs), enterprise UPN-related information, and other attributes expected by AD FS.
27. Review the Warning section
28. Click Close
Note: You need to create an A record on the DNS server: the hostname must be [your AD FS subdomain: sts.vpsmakers.local], and the IP is your server’s public IP. With the provided settings, the domain can be accessed via a web browser.
Test ADFS Sign-In
After you successfully install AD FS, you can test it on a computer or in a browser connected to the domain, or on a server.
Normally, if Forms Authentication is enabled, but on newer Windows Server versions, the IdP-initiated sign-on page is disabled by default. So first check its status in PowerShell with the command below:
Get-AdfsProperties | Select EnableIdPInitiatedSignonPage
If the output is False, enable it with the following command:
Set-AdfsProperties -EnableIdPInitiatedSignonPage $true
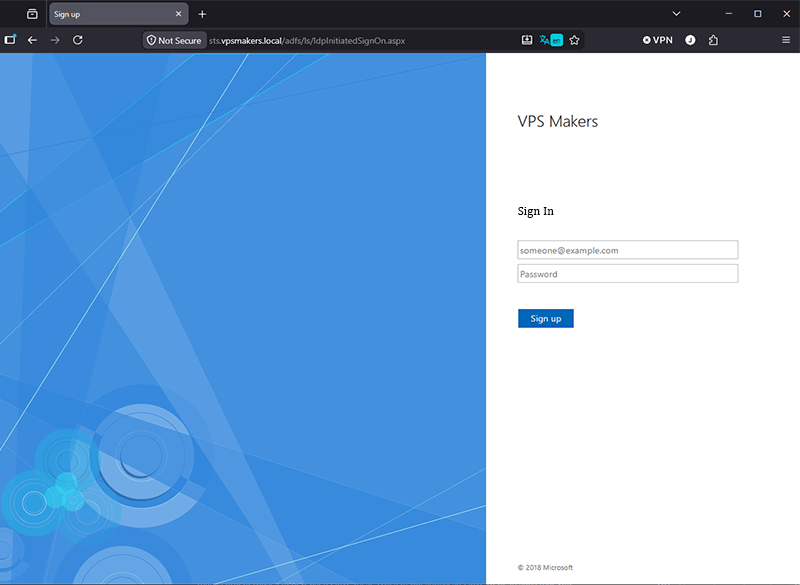
Then open your browser and go to:
https://sts.vpsmakers.local/adfs/ls/IdpInitiatedSignOn.aspx
You should see the login page:
Troubleshooting AD FS Installation
How to Fix MSIS7065 in AD FS
The MSIS7065 error does not necessarily indicate a problem with the AD FS service itself. If the /adfs/ls/ endpoint is enabled and the IdP-Initiated Sign-on page loads successfully, AD FS is working correctly.
This error often occurs when a request reaches the /adfs/ls/ endpoint without enough information for AD FS to know which passive authentication protocol (WS-Federation or SAML 2.0) should handle it.
AD FS Hostname DNS Configuration
The DNS_PROBE_FINISHED_NXDOMAIN error shows that the client cannot resolve the AD FS federation service name (e.g., sts.contoso.local) to an IP address. This is a DNS configuration error. Make sure that the federation service name has a valid A record in your internal DNS zone pointing to the AD FS server’s IP address.
Summary
You completed the installation and configuration process of AD FS on Windows Server. Now that the AD FS role is installed, the federation service is configured, an SSL certificate is assigned, and the sign-in page has been tested, your server is ready to provide Single Sign-On (SSO).
FAQ
Does ADFS Require SQL Server Database?
Yes, AD FS provides a Windows Internal Database (WID) that supports up to 30 AD FS nodes, but if you want to deploy a massive AD FS farm with more than 30 nodes or you need advanced features, you have to use a dedicated Microsoft SQL Server.
Can I install AD FS on Domain Controller?
You can install it on one server, Microsoft strongly advises against installing AD FS on a Domain Controller in a production deployment. For performance and security, AD FS should always be installed on a dedicated domain-joined member server.
Which Windows Server Versions Support AD FS?
AD FS is supported starting from Windows Server 2003 R2 up to Windows Server 2025.
What is a gMSA Account and Why is it used with AD FS?
A Group Managed Service Account (gMSA) is a managed Active Directory account that automatically handles password changes. AD FS can use a gMSA to securely run the Federation Service without requiring administrators to manually manage service account passwords.
What Ports Does AD FS Use?
443 TCP/HTTPS primary port used for Federation Service communication. Additional ports may be required depending on your environment.
What is Replacing AD FS?
AD FS is still supported in current Windows Server, but Microsoft recommends using Microsoft Entra ID (formerly Azure Active Directory).

The Author Robert Smite
Hello! I'm Robert, specializing in virtual servers and cloud technology. With expertise in managing and optimizing virtual servers, my focus is on delivering understandable and practical content in this field. My goal is to enhance knowledge and assist individuals in selecting the best virtual services for their needs.
More from Robert Smite