Reconfiguring Mikrotik VPS’s port-number
As a network administrator, you may need to change the port number of a service on your Mikrotik VPS (Virtual Private Server) from time to time. This can be necessary for security reasons or to avoid conflicts with other services running on the same port.
Reconfiguring Mikrotik VPS’s port-number
In this post, we will walk you through the steps to change the port number of service on your Mikrotik VPS, using both the Winbox (GUI) and the command-line interface (CLI).
1 – Reconfiguring Mikrotik VPS’s port number using the Winbox GUI:
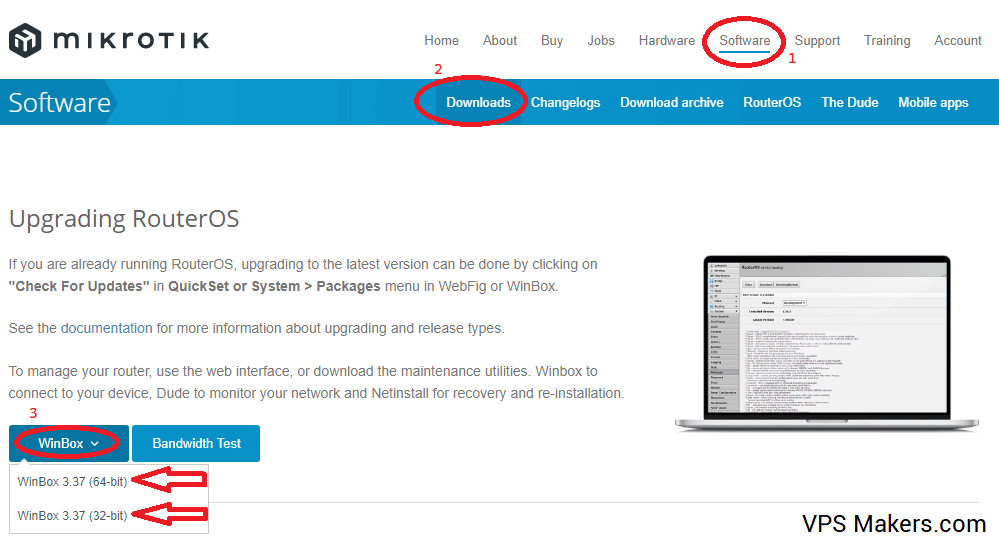
You can Download the Winbox from the official website on your Device and follow these steps to do:
Step 1 – Open Winbox
Open the Winbox software on your local computer.
Step 2 – Connect to your Mikrotik VPS
Connect to your Mikrotik VPS by entering the IP address, username, and password.
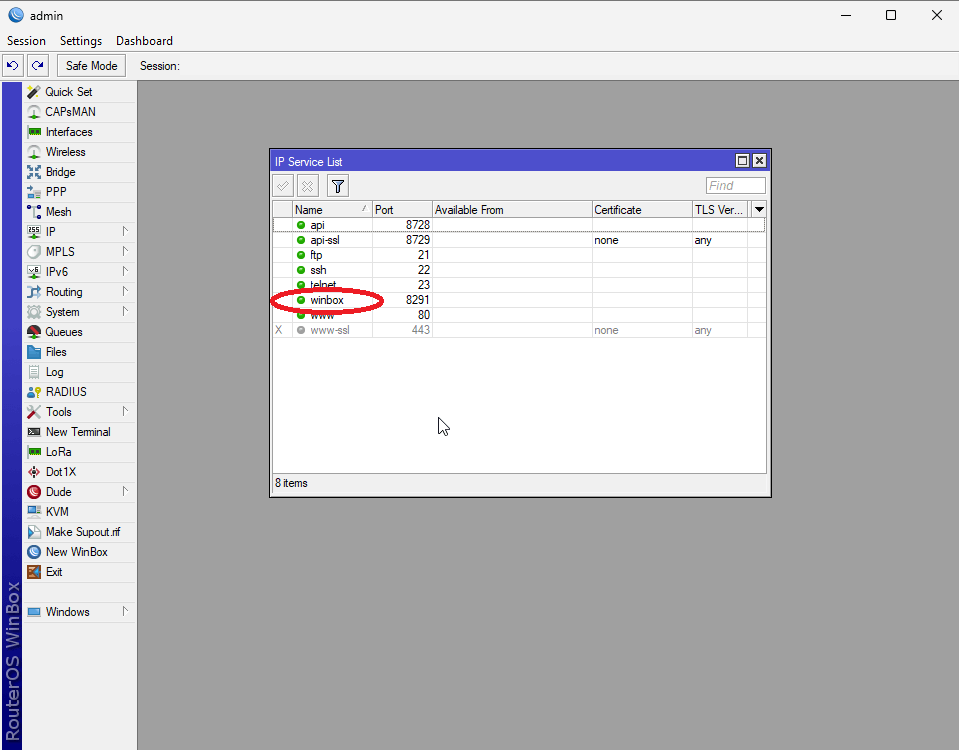
Step 3 – Click on the IP Menu
Once you have logged in, click on the “IP” menu on the left-hand side, and select “Services” from the dropdown.

Step 4 – Display List
This will display a list of services running on your Mikrotik VPS, along with their current port numbers.
Step 5 – Double-Click on Service
To change the port number of a service, simply double-click on the service you wish to modify. This will open a new window with the service details, including the current port number.
Step 6 – Enter the New port Number
To change the port number, enter the new port number in the “Port” field. Once you have entered the new port number, click on the “Apply” button to save the changes.

Note: The service will now use the new port number you specified.
2 – Reconfiguring Mikrotik VPS’s port number using the command-line interface (CLI):
Step 1 – Open Terminal
Open a terminal or SSH client on your local computer.
Step 2 – Connect To Mikrotik VPS
Connect to your Mikrotik VPS using the following command:
ssh username@ipaddress
Step 3 – Change Username
Replace “username” with your Mikrotik username and “IP address” with the IP address of your Mikrotik VPS.
Step 4 – Enter the Password
Enter your password when prompted.
Step 5 – Log in
Once you have logged in, type the following command to view the list of services and their default port numbers:
/ip service print
This will display a table with the name of each service, the port number it is currently using, and its status (enabled or disabled).
Step 6 – Type your New name and number
To change the port number of a service, type the following command, replacing “service-name” with the name of the service you want to modify and “new-port-number” with the new port number you want to use:
/ip service set service-name port=new-port-number
Step 7 – Press Enter
After you have entered the command, press Enter to apply the changes.
Step 8 – Verify the service
Finally, you can verify that the service is now using the new port number by typing the following command:
/ip service print
This will display the updated table with the new port number for the service you modified.
Note: Before making any changes to your Mikrotik VPS configuration, always make sure to have a backup of your current settings. This will allow you to easily revert to the previous configuration in case something goes wrong during the reconfiguration process. Additionally, thoroughly test the new configuration in a controlled environment to ensure that it is stable and does not cause any disruption to your network. Following these steps will help ensure a smooth and successful reconfiguration of your Mikrotik VPS.
conclusion
changing(Reconfiguring) the port number of a service on a Mikrotik VPS is a simple process that can be done through either the Winbox GUI or the command-line interface. Both methods have their advantages, with the GUI being more user-friendly and the CLI being faster and more efficient for advanced users. Regardless of the method used, it’s important to be careful when making changes to your VPS, as any mistakes can potentially disrupt your network. Always double-check your commands and settings before applying any changes.
The Author Emily.J
Emily started working as a member of the sales team, and because of his strong passion for providing solutions to the problems of users, he has become a successful person in the field of content creation, and so far he has been able to solve many problems. Also, Emily is trying to increase his expertise and experience with serious challenges.
More from Emily.J