How to Install Active Directory on Windows Server 2025
Active Directory Domain Service (AD DS) provides an integrated, centralized user and computer management system. By installing and configuring this service properly on your device, you can manage users, computers, and their permissions on a network.
Installing and activating it on a Windows server is very simple. You can easily learn by following the steps below.
Before starting to set up Active Directory, you have to complete the prerequisites.
1- Windows Server (2012 – 2025)
2- Administrator access
3- Static IP on your server
4- Correct network configuration
If you don’t have a Windows server, you can buy a pre-configured Windows VPS server with a static and public IP.
Install Active Directory on Windows Server 2025
Windows Server has offered the Active Directory service since Windows Server 2000 up to the latest version, Windows Server 2025, and the installation process has remained largely the same.
So, by following this instruction, you can install Active Directory Domain Service on any version of Windows Server you want.
Step 1- Access to Windows Server Manager
First you need to connect to Windows Server.
Click the Start menu button on your taskbar or press the Windows key on your keyboard to open the Start menu, then search for “server manager” and open it.
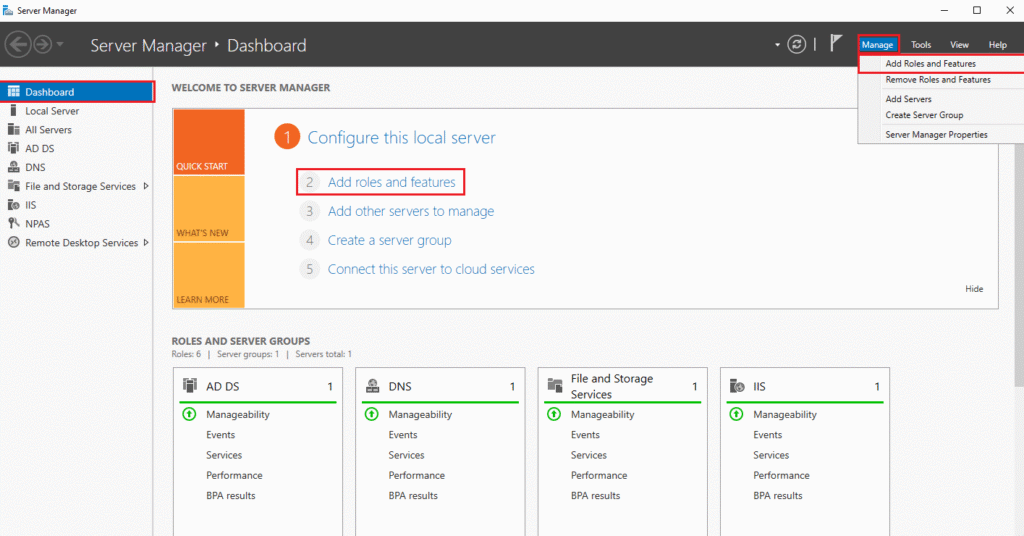
Step 2- Add ADDS Role in Windows Server
Select “Dashboard” from the left sidebar in Quick Start, and click “Add roles and features” or click on Manage > Add role and features
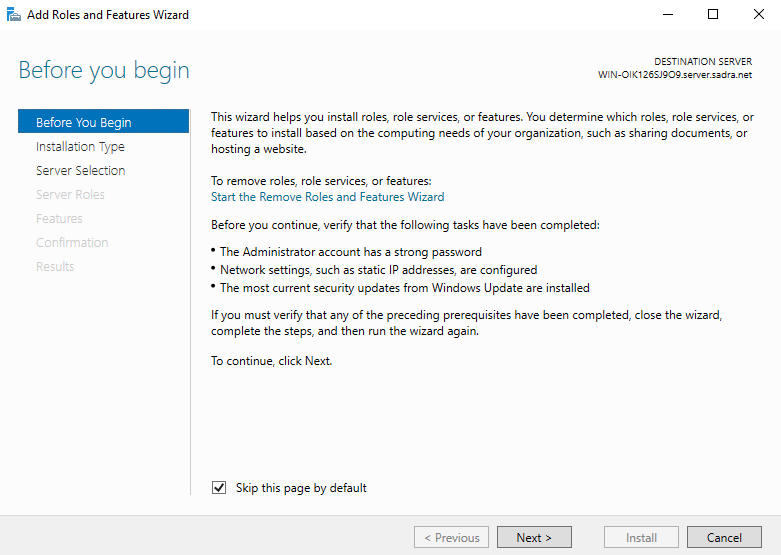
It will open the Add Role and Features wizard. The first page is an introduction to what the wizard does. Just click Next to continue.
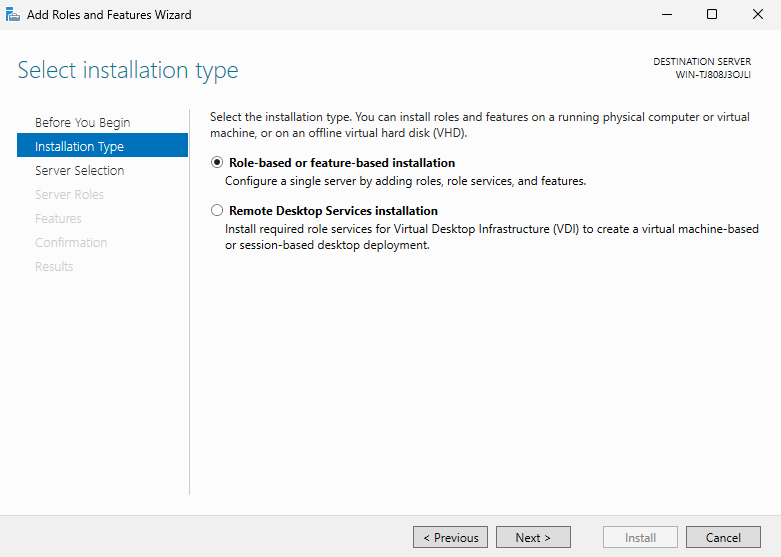
Step 3- Select installation type
Select “Role-based or feature-based installation” as the installation type. This option informs the server that you are installing a role, such as Active Directory, and automatically includes the necessary features required for it.
Step 4- Select Destination Server To Install Active Directory
In this step, you should select the destination server where you want to install AD DS. Here you will see the available servers. Select your server and click Next.

Step 5- Select server role
In this step, you will see a list of the roles and features you can install on your server. Select the “Active Directory Domain Services” role to install.
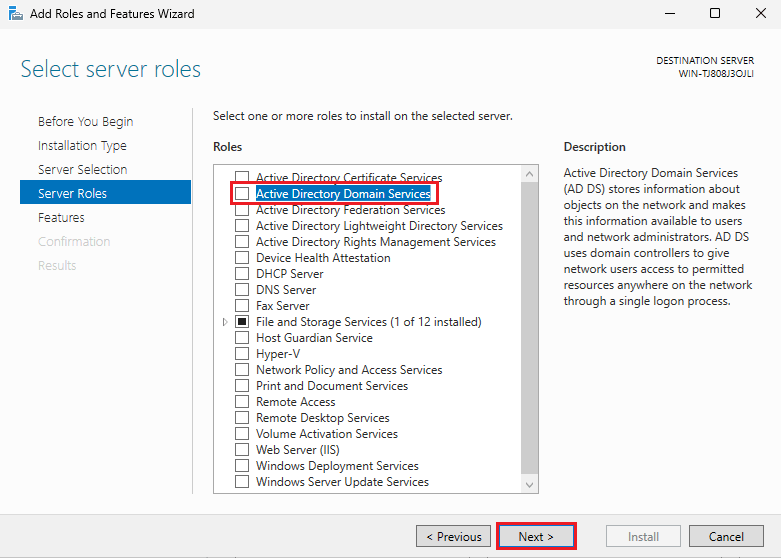
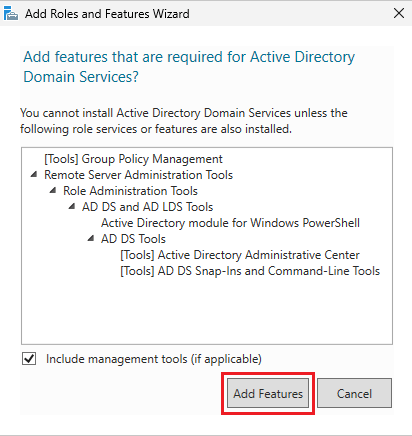
After selecting the role, you will be prompted to add the required features for Active Directory, such as group policy management and other AD DS tools. Click the Add Features button. Then click Next.
Step 6- Install AD DS On Windows Server Roles
1- You will see an introduction to Active Directory Domain Services, read it, and then click on Next to start the installation process.
2- Enable “Restart the destination server automatically if required” > click on OK > then click on Install. It will restart your Windows after installation.
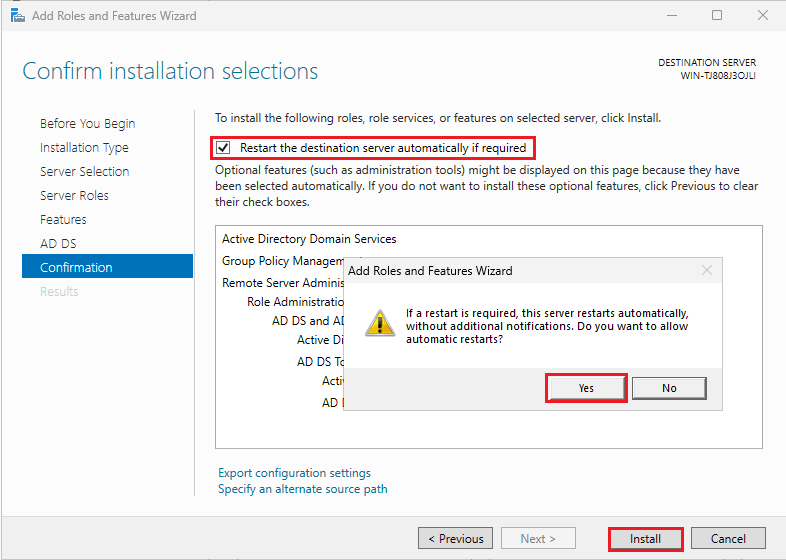
The installation process will start now; it won’t take much time. Wait until it ends.
Promote the AD DS Server to a Domain Controller
Now you will need to promote the AD DS to the domain controller, which will turn a normal Windows Server into a central domain authority of the domain.
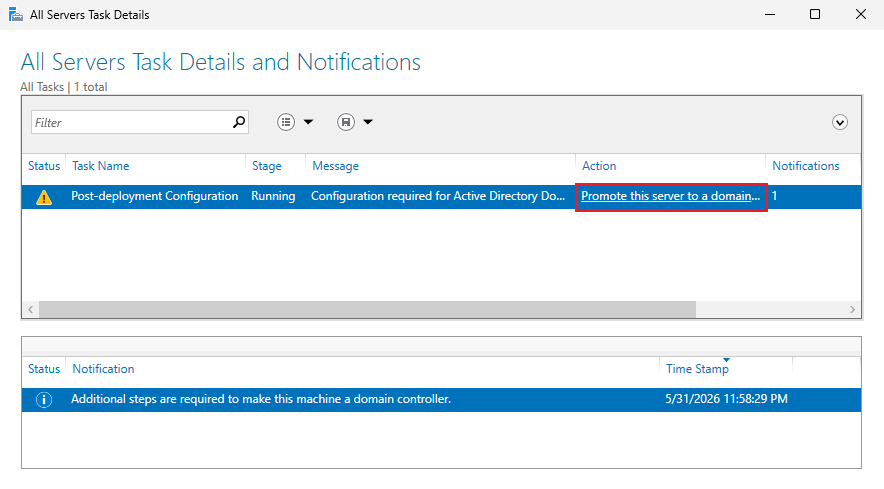
Click on AD DS on the left sidebar you will see a warning “configuration required“. Click on More to start configuration
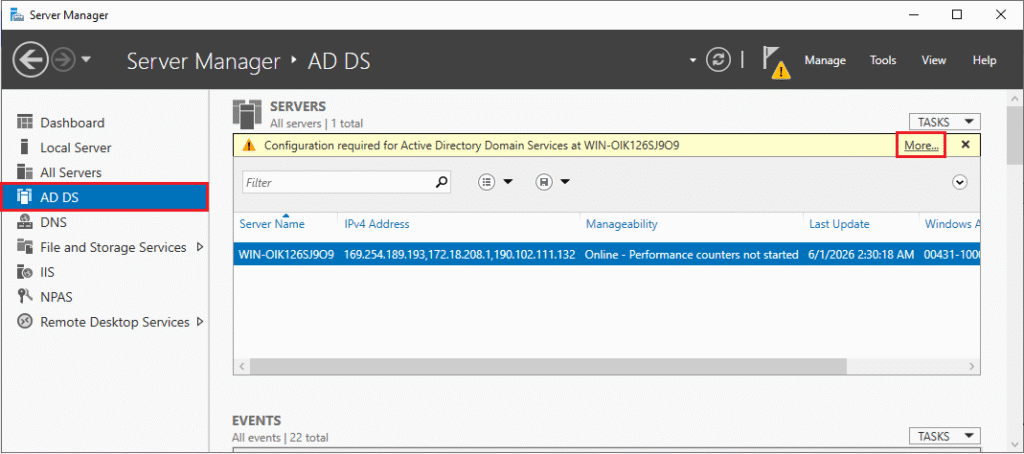
Click on “Promote this server to the Domain Controller”
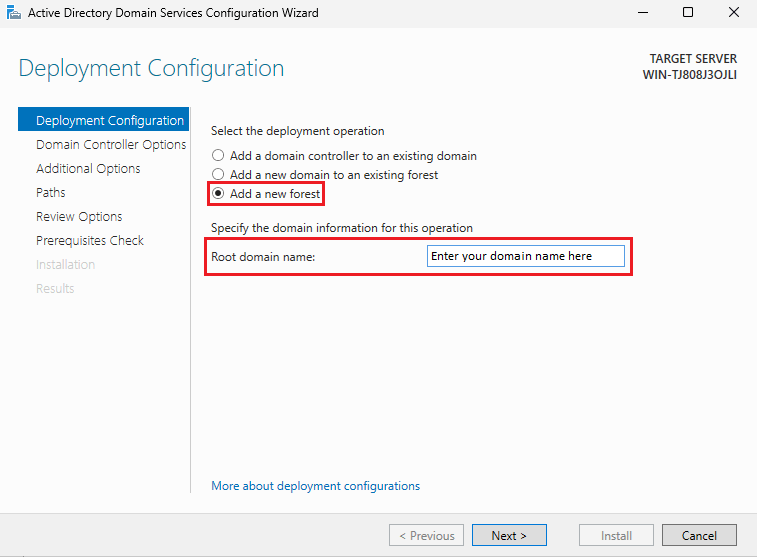
Step 1- Create Domain Forest for Active Directory in Windows Server
A forest is a top-level container in Active Directory. It’s like the outermost boundary to hold everything together.
Select “Add a new forest“, specify a domain for your AD DS server, make sure it’s unique, and that it does not exist on the internet. You can check its existence by searching on the internet. And click on Next.
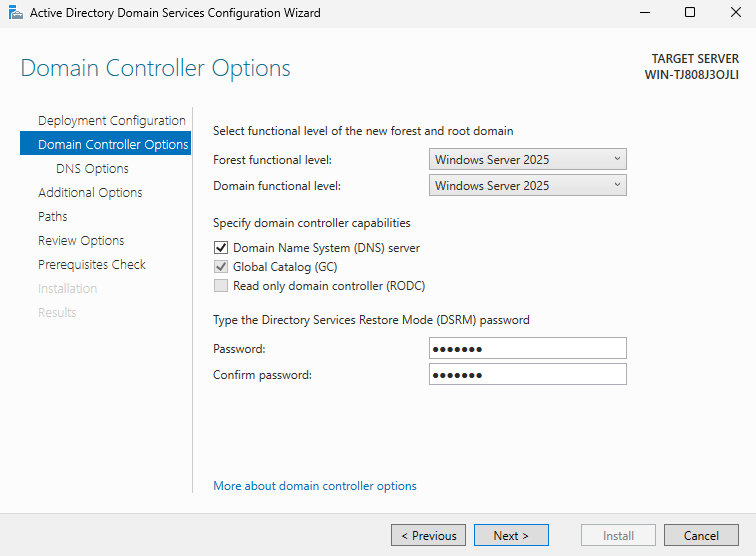
Step 2- Domain Controller Options in Windows Server
In the Domain Controller options, you must specify the Forest and Domain Functional Levels. These levels define the minimum Windows Server version that “all Domain Controllers” in your network must be running.
Note: This option only includes Windows Server versions that act as domain controllers. Users can use any version of Windows.
In here, don’t change the default settings and just enter the DSRM password. Your password should meet the DSRM password minimum requirements:
- Minimum 8-character length
- Should contain Uppercase and lowercase letters
- Should contain Numbers
- Should contain Special characters
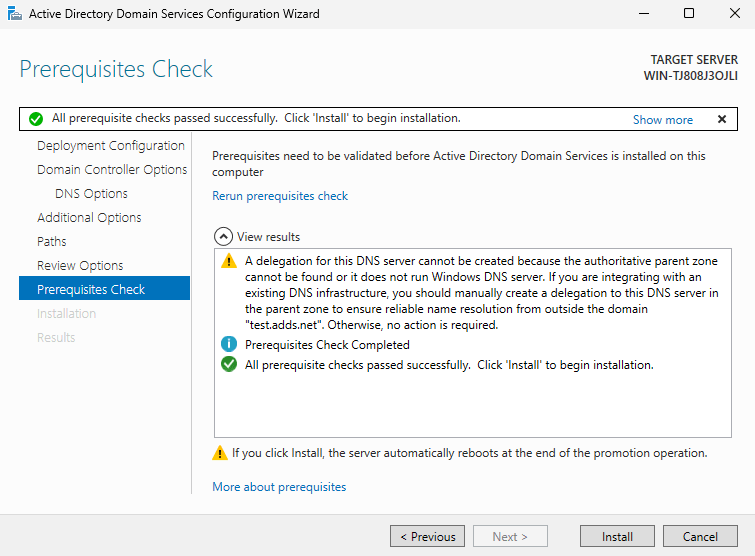
Step 3- DNS Delegation In Active Directory
In here, you will get an error “A delegation for DNS server can not be created because the authoritative parent zone nameserver can not be found“. Ignore this error and click on Next to continue.
DNS delegation is when a parent DNS server gives the responsibility of handling subdomains to a child DNS server, and for anything related to subdomains, it points to another DNS server.
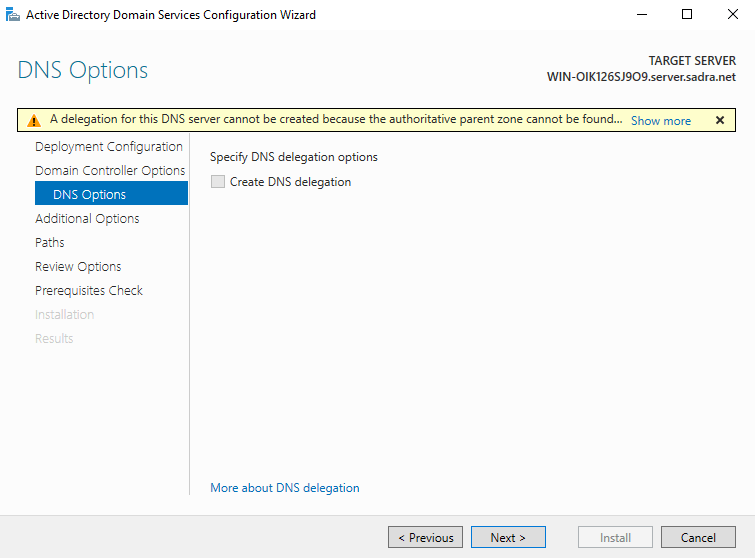
Note: The warning you are seeing here is that the parent DNS server is not updated to point to another server, that its fine for most setups.
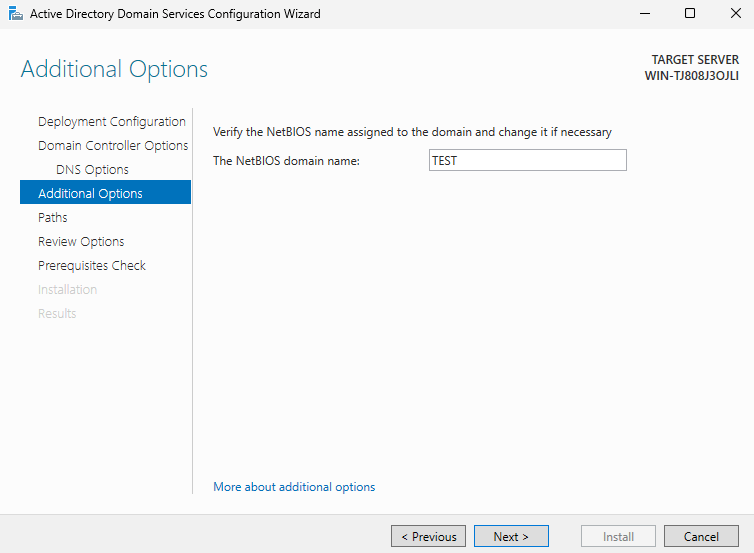
Step 4- Set NetBIOS Name in Windows Server
NetBIOS is an old protocol that allows computers to find and communicate with each other on a local network. It is getting used in Windows Server to identify each device and communicate with them, even if it is old, and even if you set the full domain name.
Verify that the NetBIOS that is automatically generated for you is correct, or if you want, you can change it and click Next.
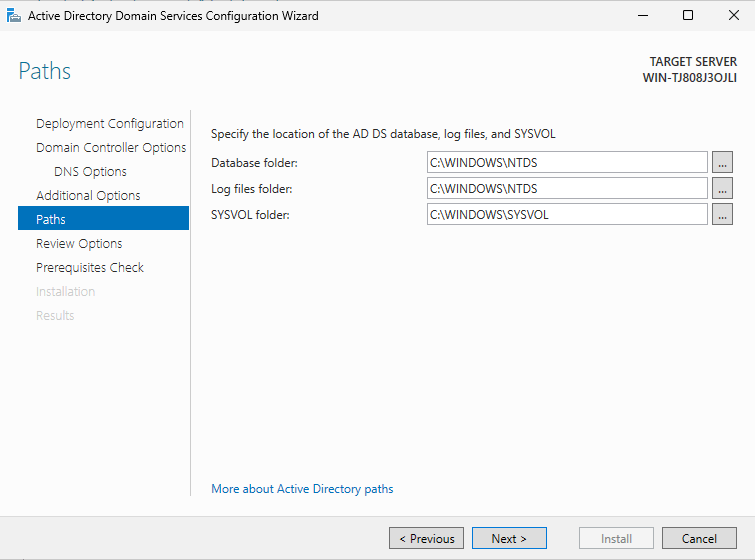
Step 4- Specify Path For Active Directory Files In Windows Server
In this part, you must specify the location of the Database folder, log folder, and SYSVOL folder. We prefer not to change the folders and let them be the default, and click Next to continue.
Step 5- Review Selected Options for Active Directory
This step is to check the options and choices you made during the configuration. Check them, and if you think you need to change, you can easily navigate through the sidebar on the left side, then click OK.
Step 6- Check Prerequisites for AD DS Promotion
We have talked about the prerequisites at the beginning of the guide; here, it will check all of the prerequisites and verify if they are correct or not. If all passes successfully, click on install to start the installation automatically, and then it will restart your device.
After restarting, you can log in with the Administrator user with the same password you had before.
You are all done with the installation of AD DS (Active Directory Domain Service), and now you can log in with your Administrator user as a Domain Controller and have access to AD DS management. From now on, you can create users on your server and log in to your domain from other devices.
Note: If you need to remove Active Directory from your Windows Server for any reason, make sure to back up your Windows Server first. This process can remove user profiles and desktop files stored on the server, including the Administrator profile.
Now you can install the Active Directory Federation Service to use single sign-on (SSO) on your Windows server to allow users to use their Windows user to access services on your server.
Azure AD Online Active Directory
Accessing Active Directory Domain Services (AD DS) over the internet requires a secure approach because domain controllers are not designed to be exposed publicly; they are mostly used within local networks.
Exposing a domain controller directly to the internet can be a serious security risk for your server, including brute-force attacks and full network compromise.
To safely access AD DS remotely, you should connect to your Windows server’s local network using secure methods such as a VPN (Virtual Private Network) service that makes a secure, encrypted tunnel between the two ends and allows the remote device to behave as if it were in the same internal network.
Or you can use Azure AD (Microsoft Entra ID), which is the same as AD DS but over the internet and across applications and services and offers SSO and multi-factor authentication and integration with thousands of SaSS apps.
If you have created Active Directory on a local Windows server, you can enable Remote Desktop Services on your Windows server to connect via the RDP protocol.
Summery
To install Active Directory Domain Service (AD DS), we’ve discussed that you need Administrator access to the Windows VPS Server with a static IP and proper network configurations.
Then you need to add the AD DS role from Server Manager and promote it to Domain Controller.
Once the setup is complete, your Active Directory environment is ready, and you can begin managing users, groups, and network resources centrally.
Hope this article helped you to set up Active Directory Domain Service on your Windows server. If you have any questions or problems, you can contact us in the comments section.
The Author Robert Smite
Hello! I'm Robert, specializing in virtual servers and cloud technology. With expertise in managing and optimizing virtual servers, my focus is on delivering understandable and practical content in this field. My goal is to enhance knowledge and assist individuals in selecting the best virtual services for their needs.
More from Robert Smite