How to Setup L2TP VPN Server on MikroTik Router?
L2TP is a VPN protocol that MikroTik offers as a built-in option, and it is supported across various operating systems such as Windows, Linux, and Android.
In this guide, you’ll learn how to set up an L2TP server with an IPsec encryption tunnel on your MikroTik RouterOS using Winbox.
You can set up L2TP either on your physical MikroTik or on a MikroTik VPS, which can be more useful for VPN setup.
Setup L2TP Server on MikroTik
Setting up an L2TP server involves 4 phases. The table below summarizes these phases and the specific MikroTik modules required. You’ll walk through each phase with details in the following sections.
| Phase | MikroTik Module |
|---|---|
| 1. Define IP range | IP Pool |
| 2. Establish encryption and user rules. | PPP Profile |
| 3. Enable the tunneling engine to accept inbound connections | L2TP Server |
| 4. Open needed ports | Firewall Rules |
Create IP Pool on MikroTik
An IP pool is used to define a range of IP addresses for various RouterOS utilities; you’ll use it for a private network between the L2TP Server and Clients.
VPN clients receive an IP from the pool and route their traffic through the MikroTik router.
Follow the instructions below on WinBox:
1- Navigate to IP > Pool > New to create a new IP Pool
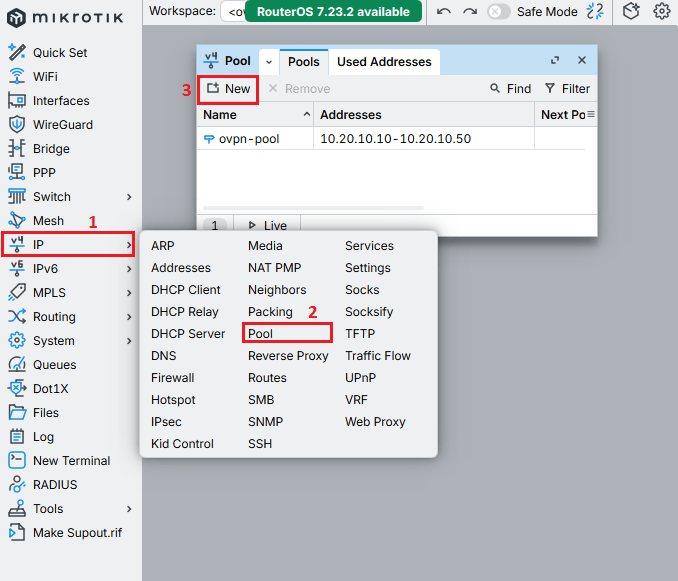
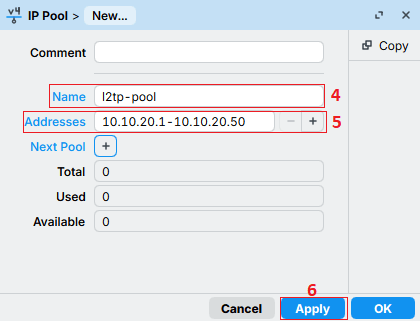
Then you will see the window for Create New pool:
4. Give a Name to the pool
5. Set a private IP range for the pool
6. Click on Apply to save settings
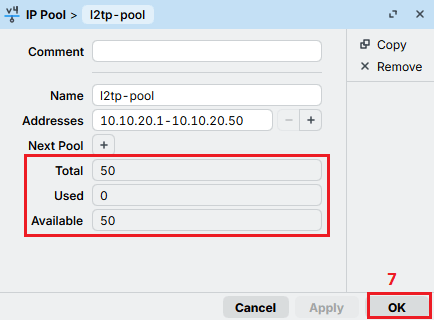
Finally, you should see 50 total IPs in the created pool within the range that you provided.
7- Click on OK to go back to the homepage:
Create PPP Profile for L2TP VPN on MikroTik
PPP profile handles the user authentication phase. It specifies which authentication protocols are allowed(PAP, CHAP, or MS-CHAPv2), also, PPP can control user bandwidth.
If you want to have an integrated user manager on your MikroTik, read about Install user manager package on MikroTik.
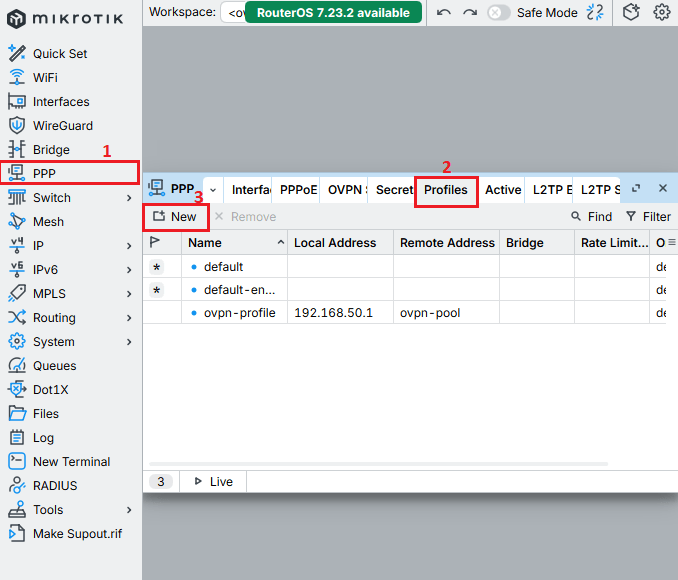
Follow the diagram below to create a PPP profile on MikroTik:
1- Go to PPP > Profiles tab > New
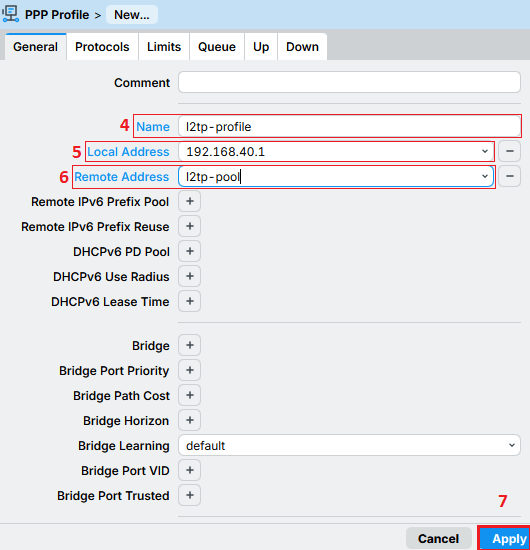
You’ll see profile creation.
4- Set a Name for the profile
5- Click on Local Address and enter a local Address like 192.168.40.1.
6- Click on Remote Address and select the pool that you created in the previous step.
7- Press Apply to add the PPP profile
Create PPP Secret on MikroTik
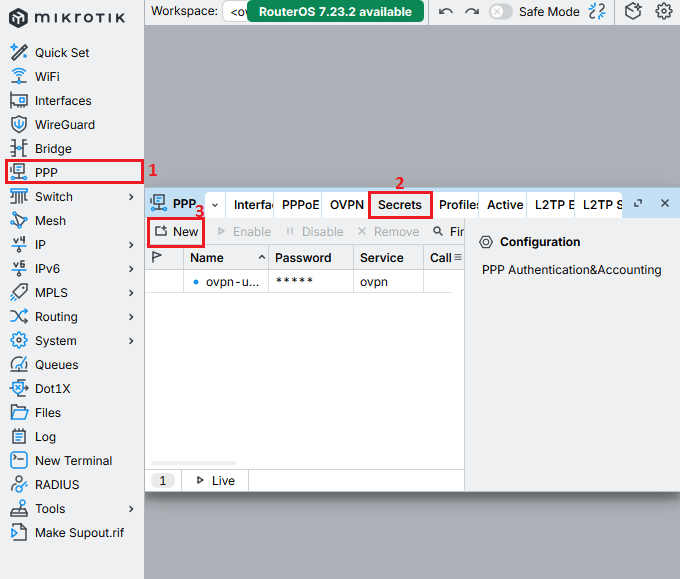
Every client needs a PPP Secret (User) so they can connect to the L2TP server because the PPP Secrets store the usernames, passwords, and profiles used for authentication. Create PPP users by following the instructions below:
1- Navigate to PPP > Secrets Tab> New
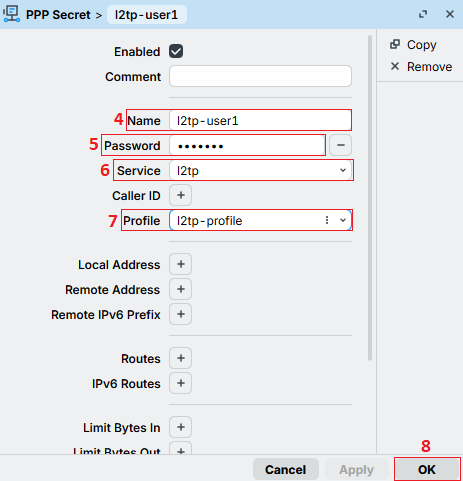
4- Set a Name (username)
5- Enter a Password
6- Change Service to L2TP
7- Set Profile to l2tp-profile that you created in the previous step
8- Click OK to create the user
Enable L2TP/IPSec VPN Server on MikroTik
Finally, enable the L2TP server and configure IPSec. Enabling it will allow connections with the current users to the L2TP Server.
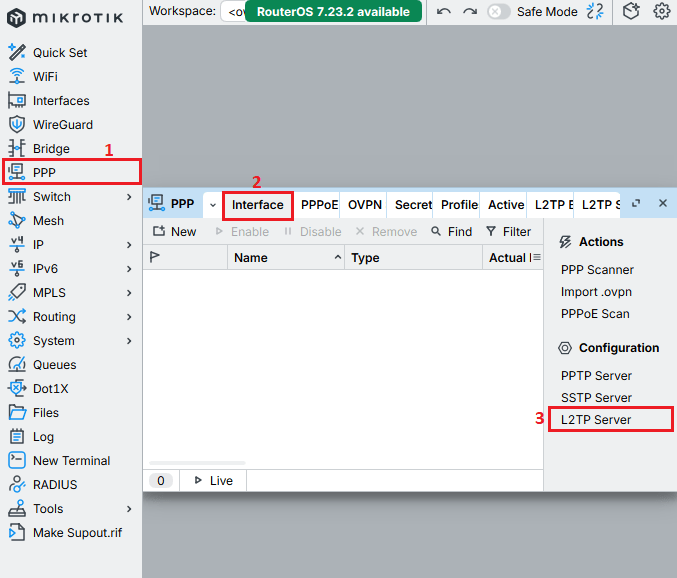
Walk through the diagram below:
1- Go to PPP > Interface Tab > L2TP Server
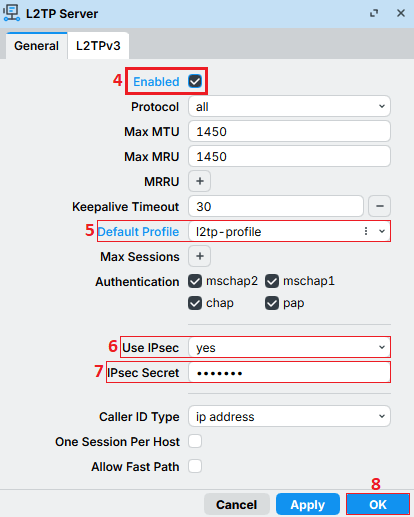
4- Check and ensure the Enable box is marked
5- Change Default Profile to l2tp-profile that you created in 2 previous steps
6 & 7- It’s recommended to use IPSec for encrypting the connection, so set Use IPSec to yes and set a strong password for IPSec Secret.
Passwords must not be in a dictionary, predictable patterns, or keyboard patterns like (qwerty).
For a standard user password, 12-16 characters is good, but for an IPSec Secret, you should aim for 20 to 64 characters.
Strong passwords are a mix of all available character types:
- Uppercase letters (A–Z)
- Lowercase letters (a–z)
- Numbers (0–9)
- Special characters (!, @, #, $, %, ^, &, *, etc.)
8- Click OK to create the L2TP server configuration
Set Firewall Rules to Accept L2TP Connection on MikroTik
L2TP uses 3 ports: 500(IKE)|1701(L2TP)|4500(NAT-T), so you need to open them on MikroTik to establish the tunnel connection between the L2TP Server and Client. The firewall on MikroTik has many options if you want to know, take a look at How to Open Ports in MikroTik.
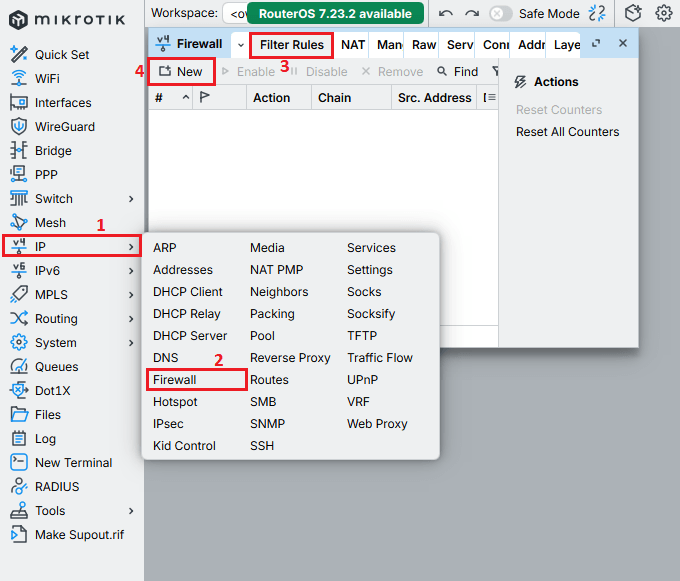
1- Navigate to IP > Firewall > Filter Rules Tab > New to add new Firewall rules
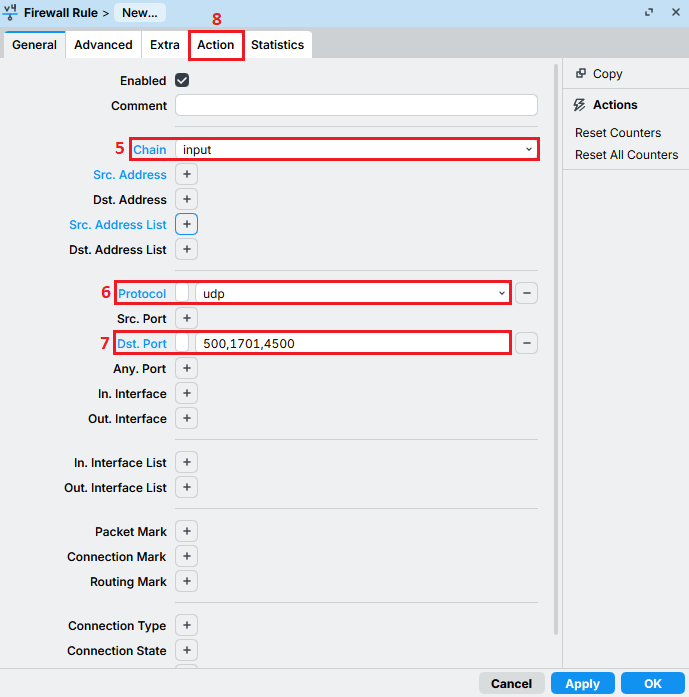
5- Set Chain to input
6- Select UDP in the Protocol list
7- Provide L2TP needed port(500,1701,4500) in DST. Port
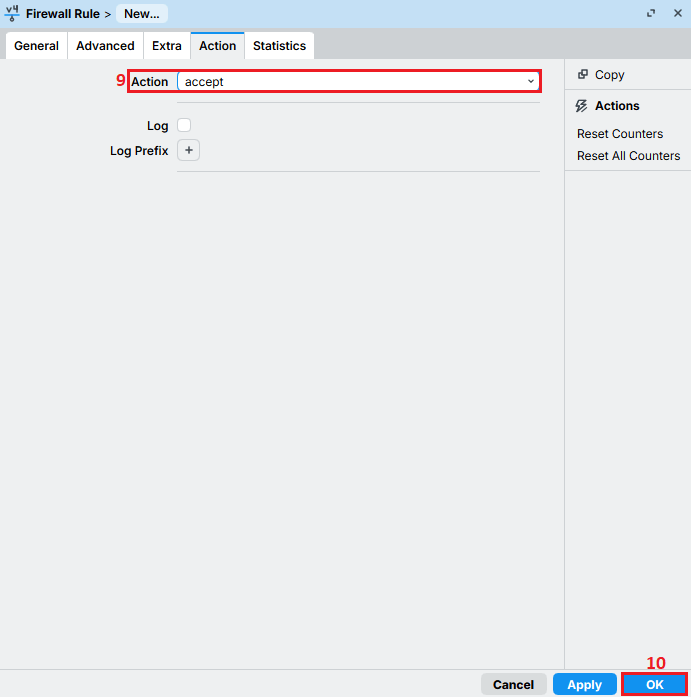
8- Go to Action Tab
9- Set Action to accept
10- Click on OK to add the new rules
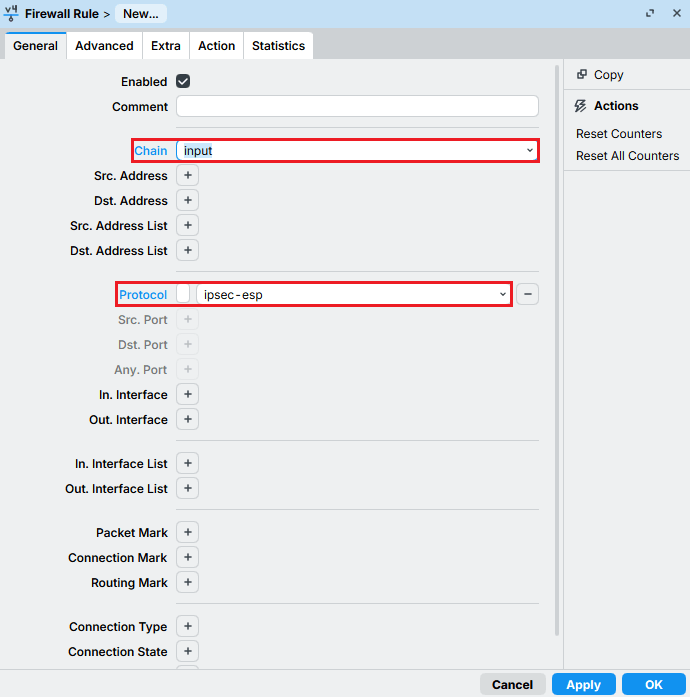
Like you open L2TP ports, you need to open IPSec ports too in the same way.
1- Navigate to IP
2- Select Firewall
3- Select Filter Rules Tab
4- Click on New to add a new Firewall rule
5- Set Chain to input
6- Select ipsec-esp in the Protocol list
7- Go to Action Tab
8- Set Action to accept
9- Click on OK to add the new rules
Add NAT Rules on MikroTik
By default, you can now connect to your L2TP server, but you won’t have Internet access because your private IP pool on the MikroTik router needs to be connected to your Ethernet interface.
You should add a NAT rule so the private pool can route traffic through the interface that has Internet access. After that, your L2TP private interface will have Internet.
1- Navigate to IP > Firewall > NAT Tab > New
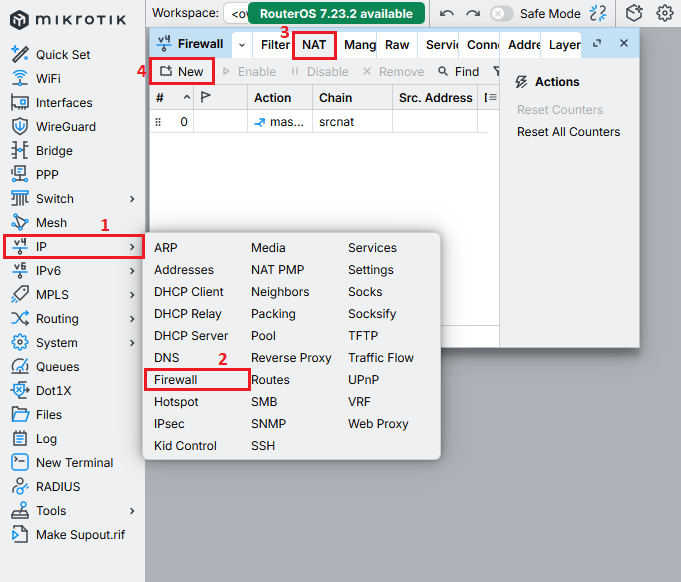
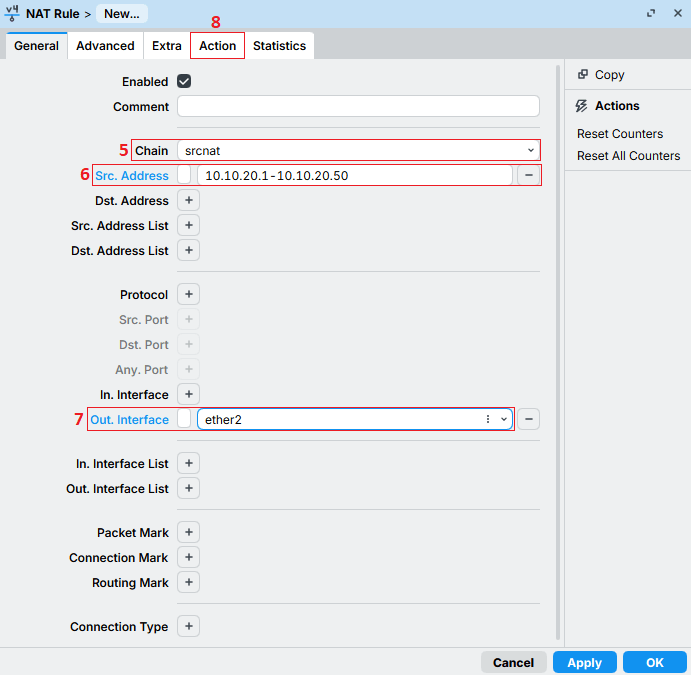
5- Set Chain to srcnat
6- Provide your IP Pool ranges(10.10.20.1–10.10.20.50) in Src. Address
7- Select the Interface that you have Internet on
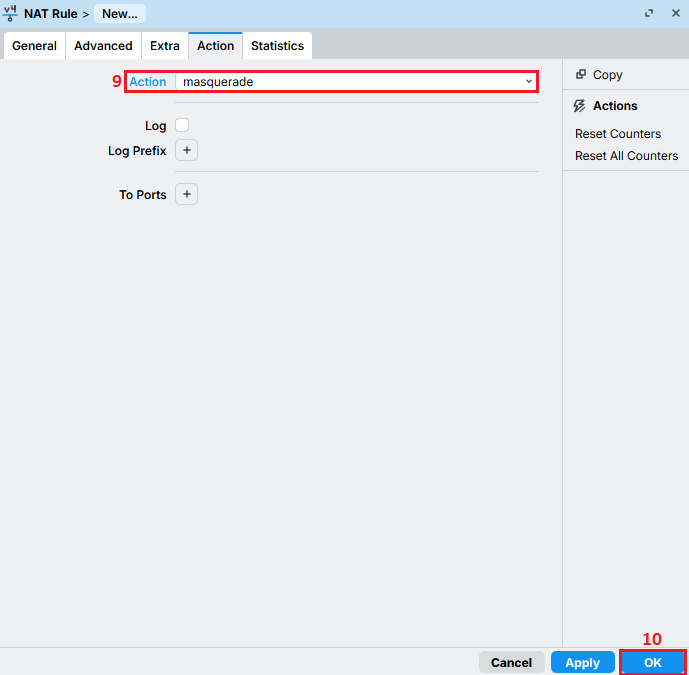
8- Go to Action Tab
9- Change Action to masquerade
10- Click OK so your NAT rules are created.
Connect to L2TP VPN on Windows
Test your l2tp by connecting with Windows or any other devices you have. In this guide, we connected with Windows to L2TP VPN.
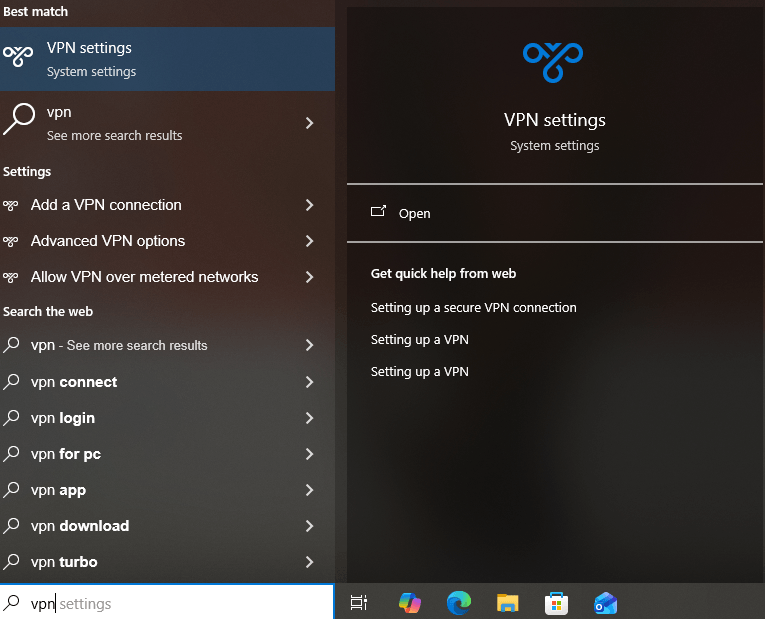
Open the taskbar > search for VPN > Select VPN Settings
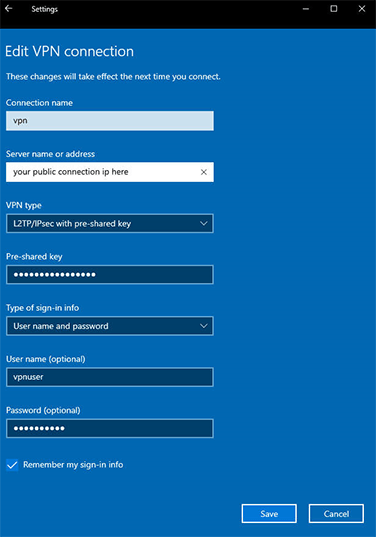
Connection name = set a name for VPN; it can be any characters
Server name or address = set your public IP or Domain name of your MikroTik
VPN type = L2TP/IPsec with pre-shared key
Pre-shared key = the key that you gave to L2TP’s IPSec on Step 4
Type of sign-in info = username and password
Username = give the username of the user that you’ve created on Step 3
Password = write the password of the user that you’ve created on Step 3
Click on Save to save your VPN profile.
Common Issues in Setting Up L2TP VPN on MikroTik
Here are the main issues that you can face when setting up L2TP or any other VPN server like OpenVPN on MikroTik. The main one is that all configurations are correct and you can connect to the VPN, but there is no internet connection.
This issue can occur because of a lack of NAT rules or wrong NAT configurations. The main setup that routes your incoming connection to the internet is NAT, so it should be configured correctly.
Or it can be related to firewall rules too, where the ports (500, 1701, 4500, ipsec-esp) can be blocked, so you should open these ports in the MikroTik firewall.
Advantages and Disadvantages of Using L2TP
L2TP, like every other VPN protocol, has some advantages and disadvantages, which in table below you can get to know whit these pros and cons more detail in the table below.
| Advantages | Disadvantages |
|---|---|
| Widely supported: It is supported on most of devices and operating systems | No encryption alone: L2TP itself doesn't have an enctyption method |
| Secure with IPsec: Provides encrypted VPN connections when combined with IPsec. | Older technology: Newer VPN protocols can offer better performance and security. |
| Stable and reliable: Well-established and dependable for remote access. | Extra overhead: IPsec can reduce performance on some devices. |
| Easy to configure: Supported directly by MikroTik and many VPN clients. | May be blocked: Some networks or countries restrict L2TP/IPsec traffic. |
| Good for remote access: Suitable for connecting securely to private networks. | NAT compatibility issues: L2TP/IPsec can sometimes have problems behind restrictive NAT. |
Summary
To set up an L2TP VPN server on a MikroTik VPS, you need to create an IP pool and PPP profile, configure user credentials, and enable the L2TP server with IPsec.
You then need to configure the required NAT and firewall rules to allow VPN traffic. Once the configuration is complete, users can connect to the VPN from Windows, Android, iOS, and other supported devices.

The Author Jacob R
i am Jacob a developer and cybersecurity enthusiast with strong skills in web development and a passion for building practical digital solutions,Working on web development for 4 years. Hope my guides be helpful
More from Jacob R