How to Install FTP Server in Windows Server 2019?
Setting up an FTP server on Windows Server 2019 is not complicated, but it does require a few settings to be done correctly. In many cases, users install the FTP role successfully, but the connection still fails because the firewall, folder permissions, or IIS authorization rules are not configured properly.
In this guide, we will install and configure an FTP server on Windows VPS Server using the Web Server IIS.
The process includes installing the FTP service, creating an FTP site, assigning a folder path, setting user permissions, allowing FTP traffic through Windows Firewall, and finally testing the connection from an FTP client.
This guide is focused on Windows Server 2019, especially for VPS Server or dedicated server environments where you need a simple way to upload, download, and manage files remotely.
Install FTP Server on Windows Server 2019
To install the FTP Server, we need to add it as part of the Web Server IIS role. IIS is Microsoft’s built-in web server, and FTP is one of the services that can be installed under it.
FTP Server Requirements on Windows Server
Before you begin, make sure you have administrator access to your Windows Server. You also need to decide which folder will be used as the FTP directory.
For example, you can create a folder like this:
C:\FTP
This folder will be the main location where FTP users can upload or download files.
Note: You should also have a Windows user account ready for FTP access. It is better not to use the Administrator account for FTP login. Creating a separate FTP user is safer and makes access management easier.
Access Windows Server Remotely
Connect to your Windows Server using Remote Desktop (RDP). If you are working directly on the server, simply log in locally.
Step 1 – After logging in, open Server Manager. From the top-right menu, click Manage, then select Add Roles and Features.
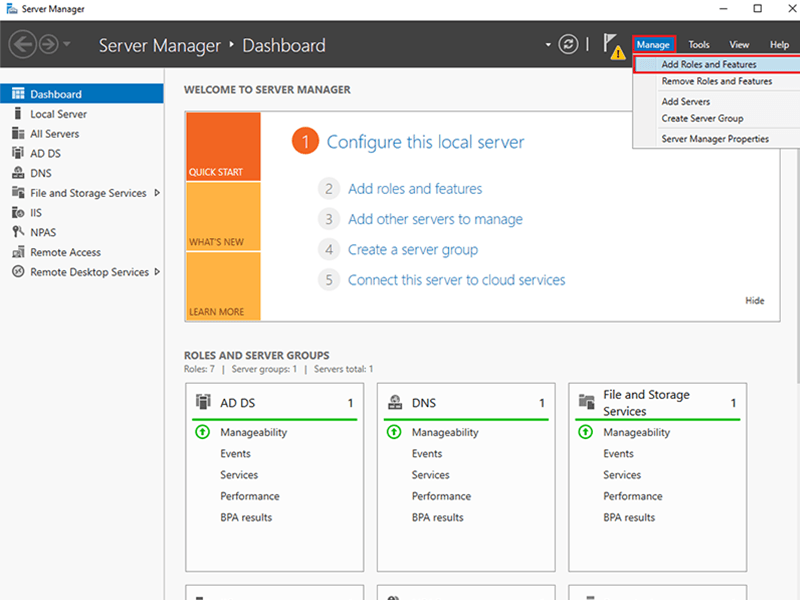
On the first page of the wizard, click Next.
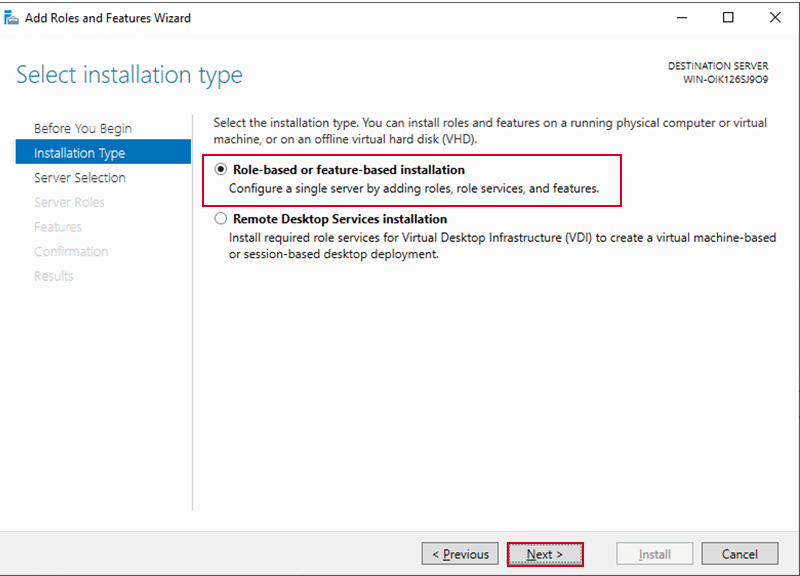
Step 2 – Select the Role-based or feature-based installation, then click Next.
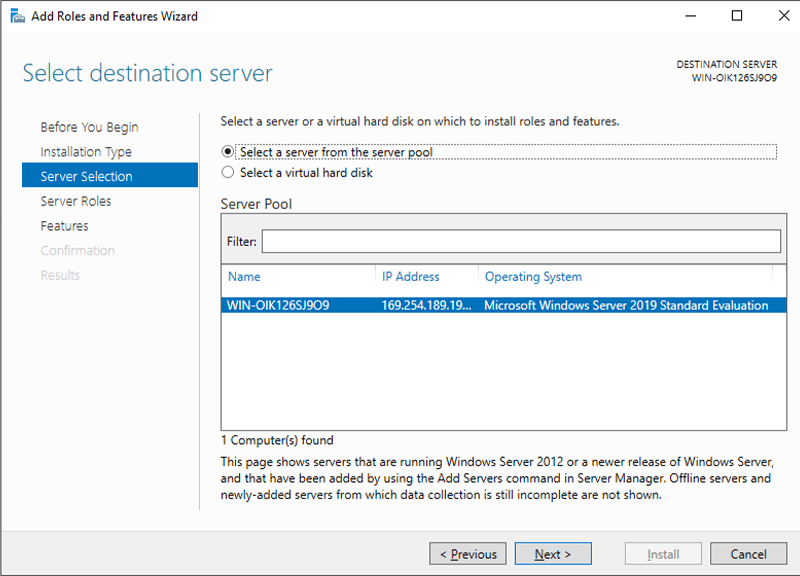
Step 3 – Select your server from the server pool and click Next.
Step 4 – In the Server Roles section, find and select Web Server (IIS).
When you enable this option, Windows will ask you to add the required features. Click Add Features and continue.
Step 5 – Now scroll down to the Role Services section. In this section, expand Web Server > FTP Server.
Then select:
FTP Service

FTP Extensibility
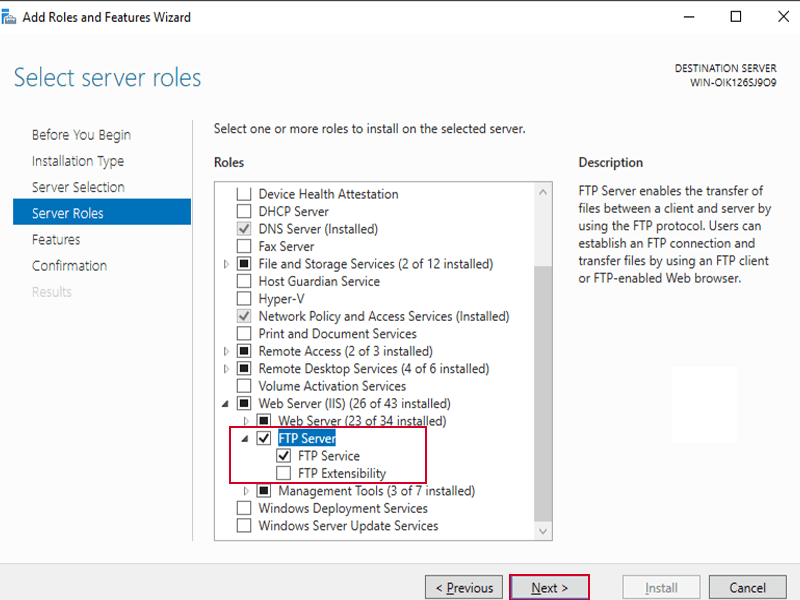
The FTP Service is the main component needed to run FTP on the server. FTP Extensibility is also useful because it adds more flexibility for FTP management inside IIS.
Step 6 – If you want to install other features, select the features in the Add Features tab; otherwise, click Next to continue.
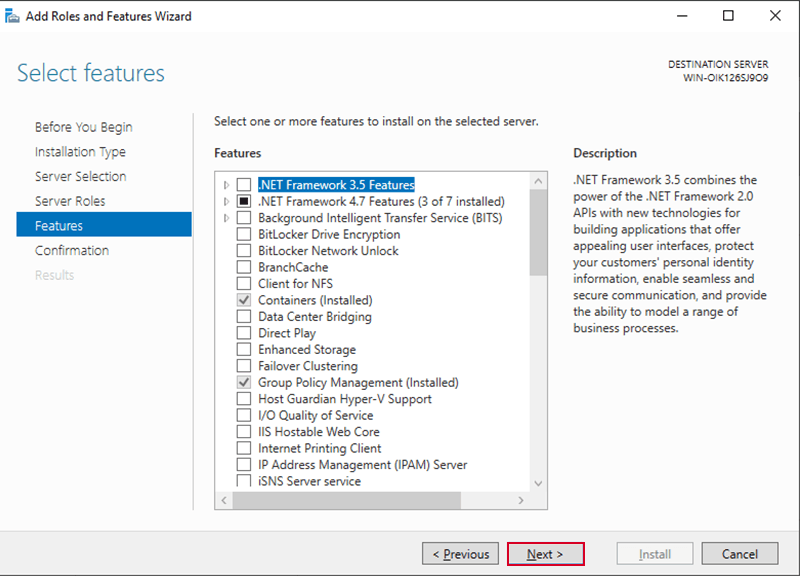
Step 7 – After selecting these options, enable ” Restart server automatically” to restart your server after installation.
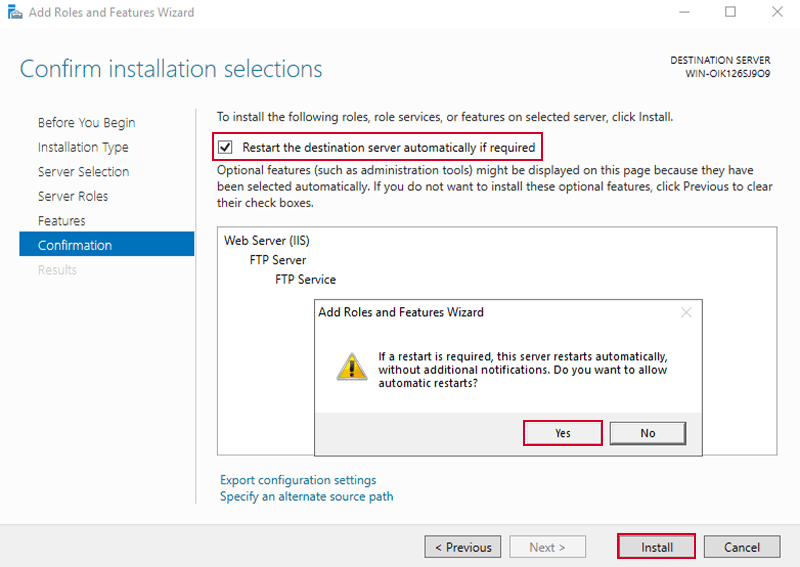
Wait until the installation is completed. Once it finishes, it will automatically restart your server.
At this point, FTP is installed on the server, but it is not ready to use yet. You still need to create an FTP site in IIS and configure access permissions.
Setup FTP Site in IIS
After installing the FTP service, the next step is to create an FTP site in IIS. This is where you define the FTP folder, IP address, port, SSL behavior, authentication method, and user access.
Step 1 – Open IIS Manager from the Start menu. You can search for Internet Information Services (IIS) Manager in the Start Menu.
Step 2 – Once IIS Manager opens, look at the left-side panel. Expand your server name, then right-click on Sites and select Add FTP Site.
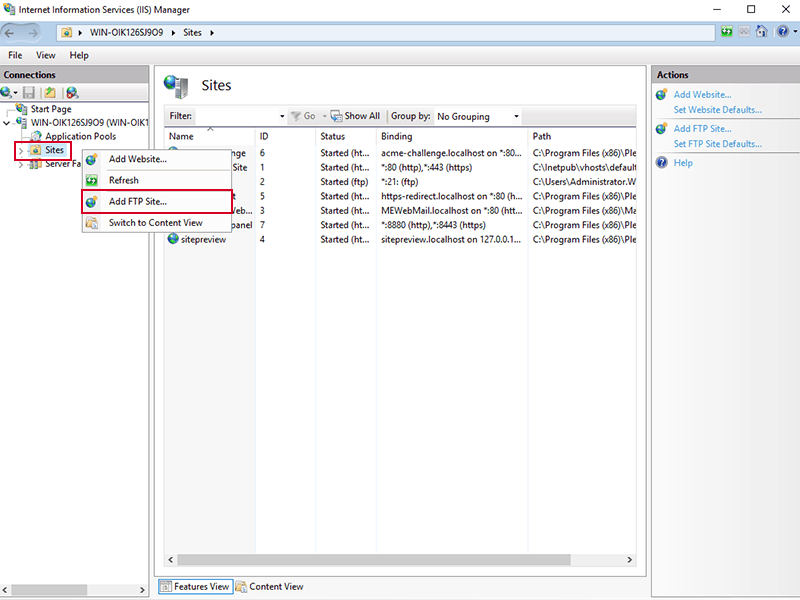
Step 3 – Now you need to enter a name for your FTP site. This name is only used inside IIS, so you can choose something simple and clear.
For example: Main FTP Site
In the Physical path field, select the folder that you want to use for FTP access.
For example:C:/FTP
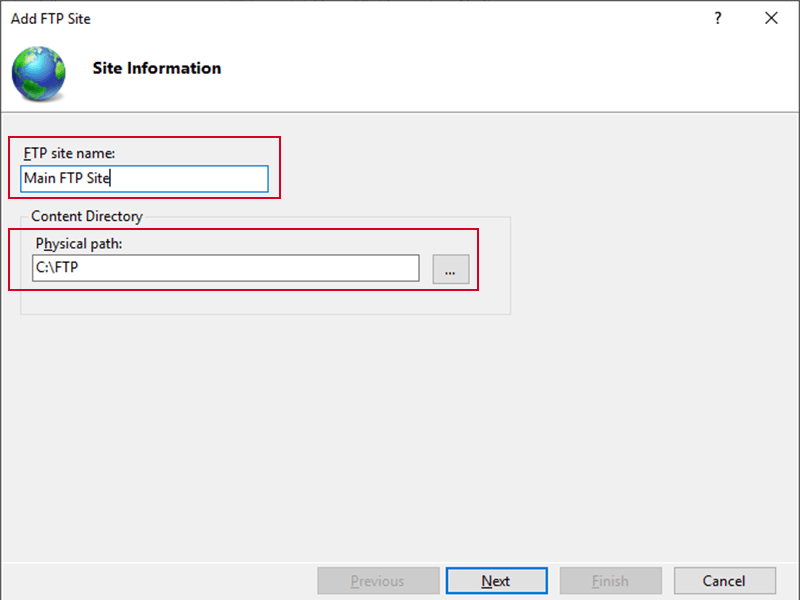
This is the folder where FTP users will upload or download files. If the folder does not exist yet, create it before selecting the path and Click Next to continue.
Configure FTP Binding and SSL Settings
In this step, IIS asks you to configure the binding settings for the FTP site.
For the IP Address, you can either select your server IP address or leave it as All Unassigned.
For the Port, use the default FTP port.
Port 21 is used for the FTP control connection. Most FTP clients use this port by default, so you usually do not need to change it unless you have a specific security or network reason.
Now you need to choose the SSL setting.
You will usually see these options:
No SSL

Allow SSL

Require SSL
For a simple internal or test setup, you can choose No SSL. But if your FTP server is going to be used over the internet, plain FTP is not the best option because it does not encrypt usernames, passwords, or transferred data.
A better option for real usage is FTPS, which uses SSL/TLS encryption. If you already have an SSL certificate installed on the server, you can choose Allow SSL or Require SSL based on your needs.
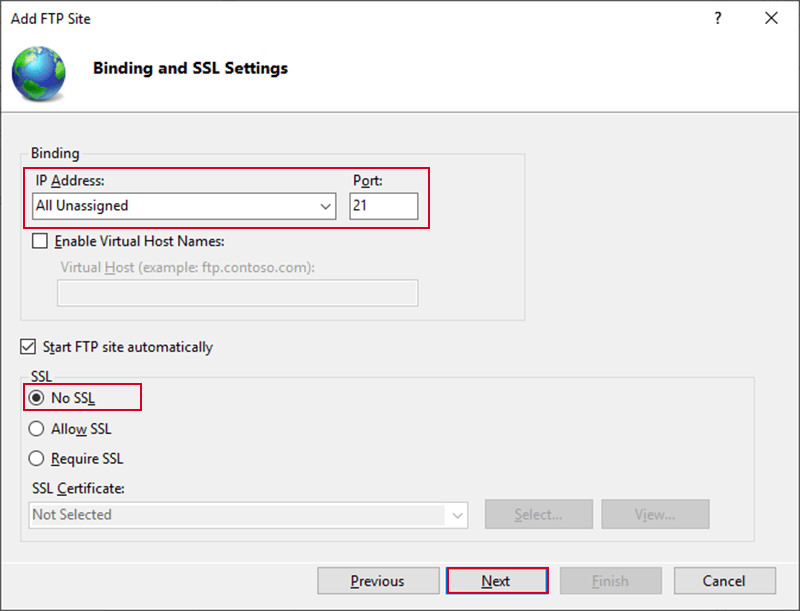
If you don’t have an SSL Certificate, you need to install SSL certificate on the Windows server first, or you can use it without SSL, which is not safe.
For this basic setup, we continue with No SSL and then click Next.
Configure FTP Authentication and Authorization
Now you need to define how users will log in and what they are allowed to do after logging in.
For Authentication, select Basic.
Then enter the username that should have FTP access.
For example: ftpuser
In the Permissions section, choose what this user can do: just read the data, or they can edit file content, or remove files.
If the user only needs to download and upload files, select Read and Write. And click finish.
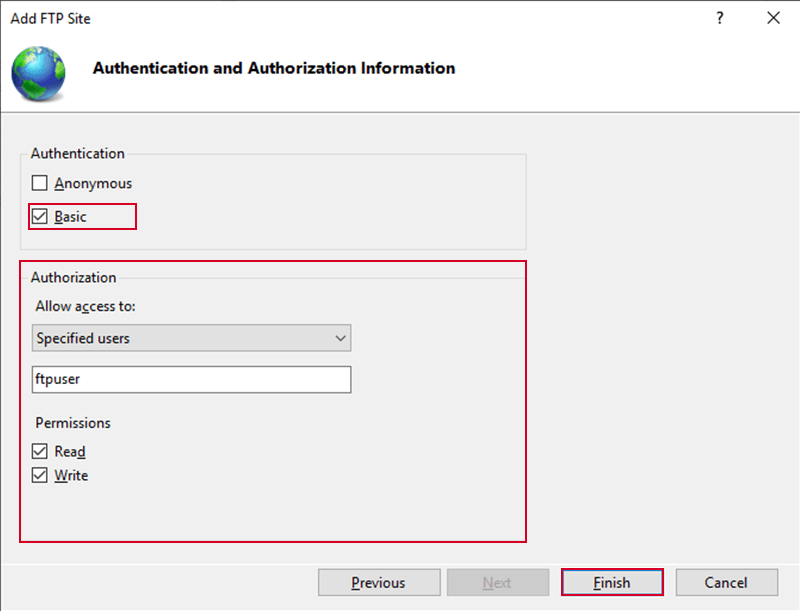
Your FTP site is now created, but the configuration is not fully complete yet. The user also needs permission on the actual Windows folder.
Create Dedicated FTP User in Windows Server
Although you can use an existing Windows user, it is better to create a dedicated user for FTP access. This makes the server easier to manage and reduces risk.
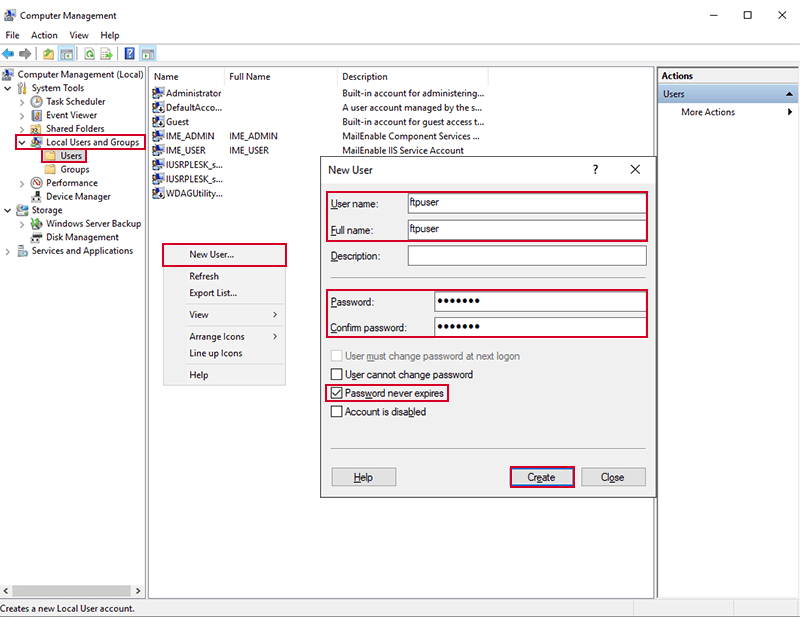
To create a new FTP user, right-click the Start menu and open Computer Management.
Then go to Local Users and Groups > Users
Right-click on Users and select New User
Enter a username such as ftpuser
Set a strong password. It should meet Windows Server minimum password requirements: at least 8 characters, and a mixture of uppercase, lowercase, and symbols.
And enable the password never expires so you don’t face problems later about changing the password.
Click Create, then Close.
Open FTP Port in Windows Firewall
At this point, the FTP site has been created, but the server still needs to allow FTP traffic through Windows Firewall. Otherwise, the FTP client may not be able to connect, even if all IIS settings are correct.
To set up FTP for the first time, you need to open TCP port 21 in Windows Firewall.
We have already explained the full process of opening ports in a Windows VPS in a separate guide. You can follow this article to allow the required FTP ports:
How to open port on Windows VPS?
For this FTP setup, make sure these ports are allowed:
TCP 21

TCP 50000-50100
Once the firewall rules are added, you can come back to this guide and test the FTP connection.
Restart FTP Service on Windows
After configuring FTP settings and firewall rules, restart the FTP service to make sure the changes are applied correctly.
Open Command Prompt(CMD) as Administrator and run:
net stop ftpsvc

net start ftpsvc
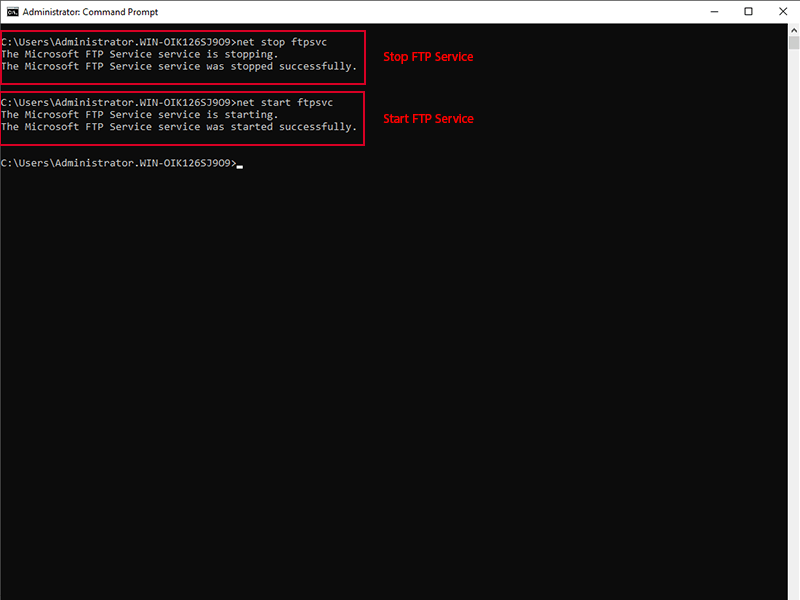
You can also restart IIS with:
iisreset
If you host active websites on the same server, be careful with IISReset, because it restarts IIS services and may briefly affect websites.
How To Connect To FTP Server in Windows
After setting FTP Server up in your Windows Server, you can test it using either Windows File Explorer or using FilleZilla application, which is much better and recommended.
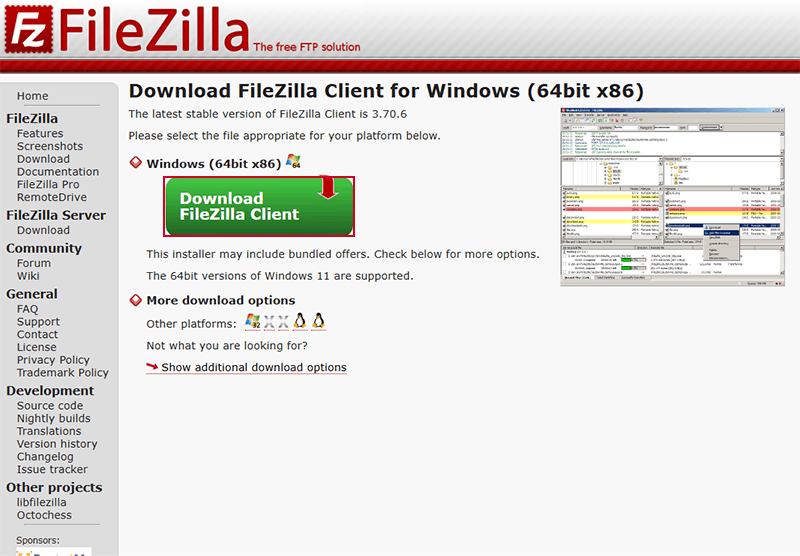
Download FileZilla
Start by downloading FileZilla from its official website if you don’t already have it installed. And then open it on your local device.
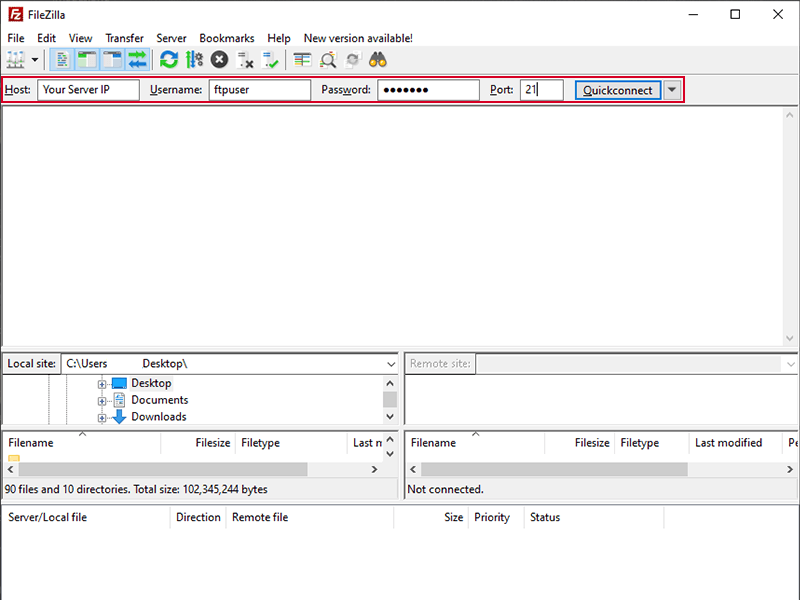
Connect To FTP Server With FileZilla
Here in FileZilla, Enter your FTP Server IP, the username, and the password of the user you’ve specified for the FTP Server, and the port 21 in port field.
What Is an FTP Server?
An FTP server allows users to transfer files between their local computer and a remote server. Once FTP is configured, you can connect to a Windows server using tools like FileZilla or even Windows File Explorer, and to a Linux VPS server using WinSCP.
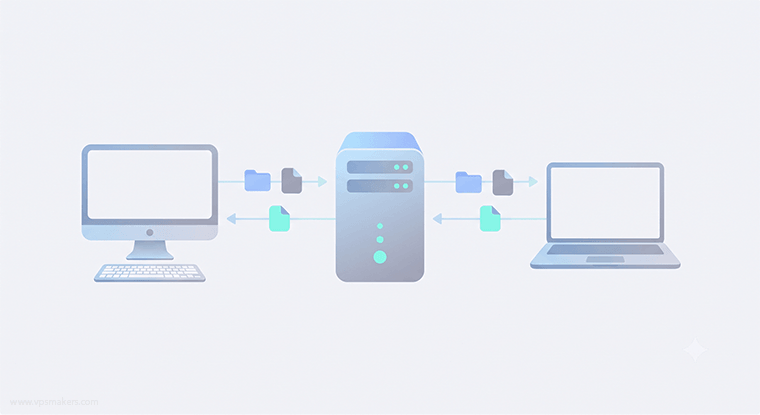
For example, if you have a Windows VPS and want to upload website files, move backups, share files with a developer, or manage server files without using Remote Desktop every time, FTP can be useful.
However, FTP should be configured carefully. By default, standard FTP does not encrypt data, so if the server is used over the internet, it is better to consider FTPS or restrict access to trusted users and IP addresses.
Summary
FTP Server in Windows Server is a built-in service that you can enable and handle using the IIS web management system.
You just need to add the FTP Service and FTP Extensibility role and feature, then you need to create a new FTP site in IIS Manager and specify the IP and its destination, and then you can use it to transfer files easily.
You can use normal FTP, which doesn’t offer encryption for connection tunnel or data transmissions, which can be used in test environments, but it’s recommended to use FTPS, which uses an SSL certificate to encrypt data and make your connection and file transfer secure.
Hope this article helps you to create a safe file-transferring tunnel. If you face any problems, you can contact us in the comments section.

The Author Robert Smite
Hello! I'm Robert, specializing in virtual servers and cloud technology. With expertise in managing and optimizing virtual servers, my focus is on delivering understandable and practical content in this field. My goal is to enhance knowledge and assist individuals in selecting the best virtual services for their needs.
More from Robert Smite