How to download and install Plesk on Linux server?
Plesk is designed to help IT specialists manage web, DNS, mail, and other services through a comprehensive and user-friendly GUI. Plesk is a hosting control panel, an intermediary between system services and users.
How Can download and install Plesk on Linux VPS?
Here 5 different ways to install and configure Plesk on Linux servers:
- Install Plesk in One Click
- Install Plesk via CLI
- Install Plesk via Web Installer
- Install Plesk Using ISO-images
- Install Plesk Using Browser
1 – Plesk On Linux VPS One-click installation :
One-click installation is a fast and hassle-free way of getting a Plesk server with default configuration up and running. Here is how to do it:
First, make sure that your server conforms to the installation requirements:
- A Linux server with root access.
- At least 1 GB of RAM and 10 GB of free disk space.
- A valid license key or a trial key for Plesk.
- Software Requirements for Plesk.
Then, log in to the server via SSH as the ‘root’ user and run the following command:
sudo apt-get update
then
sudo apt-get upgrade
after that write this command:
# sh <(curl https://autoinstall.plesk.com/one-click-installer || wget -O - https://autoinstall.plesk.com/one-click-installer)
The Plesk installation will proceed automatically. It takes, on average, around 15 minutes. The exact time can vary depending on the network bandwidth, the network speed, the server OS version, and so on.
The installer will download the latest stable Plesk release, install it with the default set of components and features designed to suit the needs of the majority of users and apply all available patches and updates for maximum security and performance.
2 – Install Plesk via CLI
If you want to select specific Plesk components for installation, install Plesk using the interactive console. Follow these steps to begin:
Download the installer script:
wget https://autoinstall.plesk.com/plesk-installer
Make the downloaded installer script executable:
chmod +x ./plesk-installer
(Optional) During the installation, Plesk configures the firewall, at which time runtime firewall rules are lost. To preserve the currently configured Firewalld runtime rules, run the following command:
env PLESK_INSTALLER_SKIP_FIREWALLD=1
However, in this case, you must manually open the ports required for Plesk to operate. You can do it via a firewall or the Plesk Firewall extension.
(Optional) When you install Plesk on a server with 512 MB of RAM or less, a 1 GB swap file is created to improve Plesk’s performance. If you do not want Plesk to create this file (for example, if you have an SSD drive and want to avoid the wear and tear caused by constant I/O operations), increase the amount of RAM on the server or run the following command:
env PLESK_SWAP=disable
Launch the Plesk interactive installer. Depending on the Plesk version you want to install, do one of the following:
To install the latest stable Plesk version, run the following command:
sh ./plesk-installer
To install another Plesk version, first view the list of all versions available for installation. Add the –all-versions option, and then run the command:
sh ./plesk-installer --all-versions
Select a Plesk version and type its sequential number:
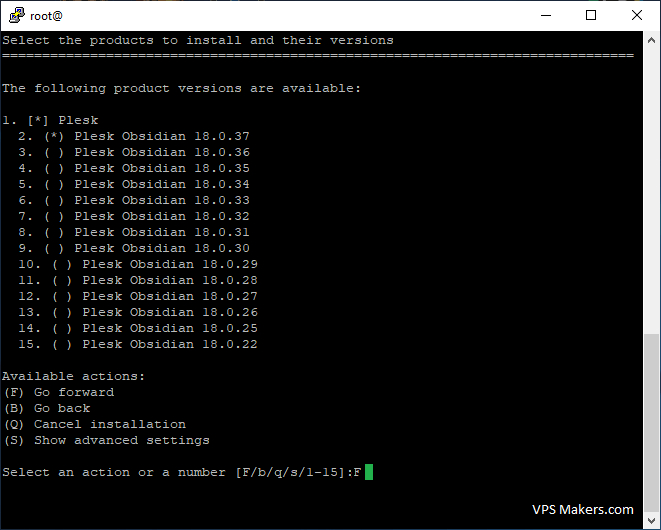
During the installation, you will be asked a series of questions. You can choose the appropriate options and go back to correct the previously selected options if necessary.

For more information about the installation script, run the following command:
./plesk-installer --help3 – Install Plesk via Web Installer
Only if your host or IP address is resolvable and port 8447 is open, You have a chance to launch the Plesk Onyx installer through a browser.
Step 1 – Download the installer:
wget https://autoinstall.plesk.com/plesk-installer
Step 2 – Add run permissions to the downloaded Plesk installer:
chmod +x plesk-installer
Step 3 – Start the Plesk installer with the following command:
./plesk-installer --web-interface
Step 4 – Access the Plesk installer via browser under port 8447 using IP address https://your-ip-address:8447 or host https://your-host-name:8447.
Step 5 – To access the web interface, use the “root” user and password
Step 6 – Select and click “Install or upgrade product”.
Step 7 – Select the latest stable product version and press “Continue“.
Step 8 – Select one of the installation types that specify the list of packages. Or you can just enable “Component Selection Preview” and select all the components you like. Click “Continue” to continue the installation.
Step 9 – You will see the console output within the web interface. Wait for the installation process to finish.
4 – Install Plesk Using ISO-images
Plesk offers ISO images for the CentOS and Ubuntu operating systems
Configured to install Plesk automatically. These ISO images can be
downloaded here:
5 – Install Plesk Using Browser
To install Plesk using Web Installer, please open your browser and go to Plesk Web installer
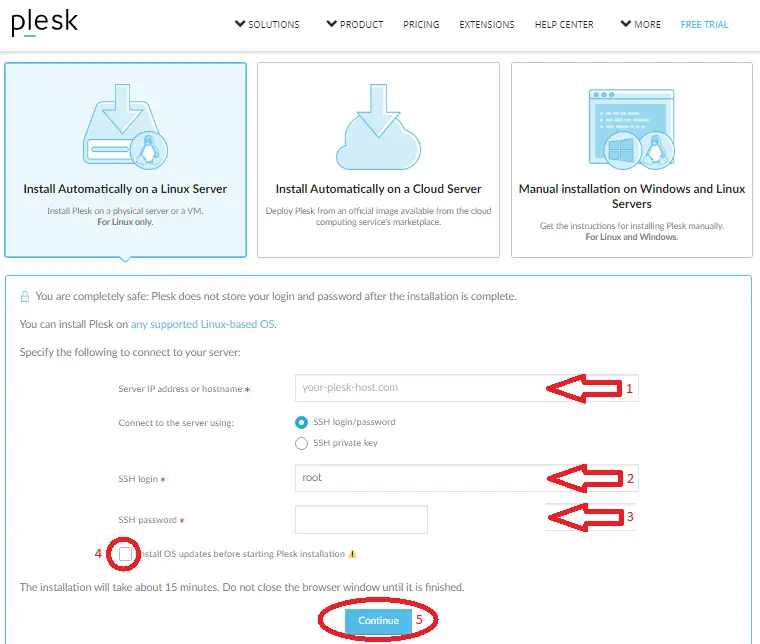
Enter your server’s IP address or hostname, enter your root password, or just add a private key.
Accept the terms of the End User License Agreement and click the Install button
Wait for a while until the installation is finished.
Click on the login link. Don’t worry about “secure connection warnings”,
Your installation has been completed successfully.
Conclusion
By using Plesk, you can simplify your web hosting management tasks and focus on growing your online presence. We hope this article has provided you with a useful guide on how to install Plesk on a Linux VPS.also you can read How to download and install Plesk on Windows Server with one click?
The Author Emily.J
Emily started working as a member of the sales team, and because of his strong passion for providing solutions to the problems of users, he has become a successful person in the field of content creation, and so far he has been able to solve many problems. Also, Emily is trying to increase his expertise and experience with serious challenges.
More from Emily.J