How to Set and Configure IPv6 Address in Linux VPS Server?
I put off configuring IPv6 on my servers for way too long. It seemed like one of those things I could deal with “later.” Then I started getting complaints from users who couldn’t access certain services, and I realized later had arrived.
If you’re reading this, you’re probably in the same boat. Maybe your hosting provider sent you an IPv6 address and you’re not sure what to do with it. Or maybe you’ve noticed some users can’t reach your server. Either way, let’s fix this.
This article guide will walk you through configuring IPv6 addresses on your Linux VPS, covering everything from basic setup to advanced configurations, troubleshooting, and security best practices..
Prerequisites
Before configuring IPv6:
Ensure your VPS provider supports IPv6
Verify that your Linux kernel supports IPv6 (most modern distributions do)
Have root or sudo access to your server
Know your assigned IPv6 address range from your hosting provider
Note: At VPSMakers, you can get cheap Linux VPS Hosting equipped with IPv6 functionality.
Checking IPv6 Support
IPv6 is enabled by default on most Linux operating systems. However, sometimes it’s necessary to check if this protocol is actually active or not. Here, we introduce 3 different methods to check the IPv6 status:
1. Checking System Parameters with sysctl
You can view all parameters related to disabling IPv6 using the following command:
sudo sysctl -a | grep ipv6.*disable
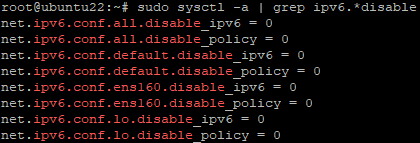
The output of this command includes parameters such as disable_ipv6 for various network interfaces. A value of 1 indicates that IPv6 is disabled, and a value of 0 indicates that it is enabled.
2.Checking the IPv6 Module in the Kernel with lsmod
To check whether the ipv6 module is loaded in the kernel, use the following command:
lsmod | grep ipv6i
If there is output, it means the module is active. Otherwise, IPv6 might be completely disabled.
3. Directly Checking IPv6 Status with /proc
For a quick and direct check of the IPv6 status on all interfaces:
cat /proc/sys/net/ipv6/conf/all/disable_ipv6
If the value is 0, IPv6 is enabled. If the value is 1, IPv6 is disabled.
How to Enable IPv6 in Linux VPS?
If IPv6 wasn’t enabled in your Linux VPS, run these commands to get it up and running:
ipv6.conf.default.disable_ipv6 = 0
This command sets the disable_ipv6 parameter to 0 for the default network interface configuration, meaning that IPv6 is enabled by default for new network interfaces.
ipv6.conf.all.disable_ipv6 = 0
This one sets the disable_ipv6 parameter to 0 for all network interfaces, meaning that IPv6 is enabled globally on the system.
Setting these commands to 0 enables IPv6, while setting them to 1 would disable IPv6. These changes can be made permanent by updating the system’s /etc/sysctl.conf file or through other configuration management tools.
Once you make sure IPv6 is enabled, use the following command to check the IPv6 addresses of your interfaces:
ip -6 addr
Full Instructions for Configuring IPv6 on Linux VPS
As we said earlier, IPv6 was developed to address the limitations of IPv4. Now, let’s explore how you can incorporate IPv6 into your Linux VPS server to benefit from enhanced routing capabilities, smoother data streams, simplified network configurations, great security features and beyond.
1.Access your Server
To begin, log in to the server through SSH (Secure Shell) or a GUI (Graphical User Interface) login session.
2.Confirm IPv6 Support
Before buying a VPS server, make sure that your VPS provider offers IPv6 support and it is enabled on your server itself. To do so, reach out to your VPS provider or check out their documentation because not all VPS providers offer IPv6 functionality.
3.Identify Network Interface
Use the ifconfig or ip addr command to list available interfaces for IPv6. Since a server can have multiple network interfaces, this will help it understand which physical or virtual network adapter it should assign the IPv6 address to. For specifying the correct interface for the IPv6 configuration, follow either of the following methods:
Method 1: Use ifconfig to assign IPv6 addresses manually
Open a terminal or SSH session on your Linux VPS and type the command ifconfig, then press Enter.
Now, you’re given a list of network interfaces along with their configurations, including IPv4 and IPv6 addresses, if available. Identify the interface you want to configure for IPv6. The interface names typically start with “eth” for Ethernet interfaces or “wlan” for Wi-Fi interfaces.
If your system cannot find the ifconfig command, it is because it is not installed by default in new Ubuntu and Debian distributions. It is located in a package called net-tools. To install ifconfig, simply enter this command:
sudo apt update

sudo apt install net-tools
Note: The ifconfig command is outdated and has been replaced by ip on modern systems.
Method 2: Use ip addr to assign IPv6 addresses manually
Alternatively, you can employ the ip addr command to determine the interface you want to configure for IPv6 based on its name and other details. Simply open a terminal or SSH session, enter the command ip addr and press Enter.
4. Find & Edit Configuration
IPv6 configuration on Linux VPS is usually managed via configuration files found in the /etc directory. The main configuration file for network interfaces is often /etc/network/interfaces or /etc/sysconfig/network-scripts/ifcfg-interfacename. However, the specific file and location might differ based on the Linux distribution in use.
Configuring IPv6 on Ubuntu VPS
Ubuntu VPS, a widely used Linux distribution, offers full IPv6 support, allowing users to configure IPv6 addresses manually (Static) or automatically (DHCP or SLAAC). In newer Ubuntu versions (e.g., 18.04 and later), Netplan has replaced older network configuration methods, making IPv6 setup straightforward via YAML files.
sudo nano /etc/netplan/Your file name.yaml
Add IPv6 Address
To assign an IPv6 address to the configuration file, use the following syntax. Remember depending on the Linux distribution and network configuration method, the syntax may vary slightly.
network:
  version: 2
  ethernets:
    eth0:
      dhcp4: true
      addresses:
        - "2001:db8:1234:5678::10/64"   # Your IPv6 address
      gateway6: "2001:db8:1234:5678::1"   # Your IPv6 gateway
      nameservers:
        addresses: [2001:4860:4860::8888, 2001:4860:4860::8844]   # Google DNS IPv6 addresses
Replace those IPv6 addresses with the ones your provider gave you. The DHCP4 line keeps your existing IPv4 setup working – you want both running.
To apply the changes, run:
sudo netplan apply
If you’re using older Ubuntu releases (such as Ubuntu 16.04 or earlier Debian-based distributions), or if your system doesn’t utilize Netplan or has Netplan deactivated, you’ll need to use the network configuration file provided below.
sudo nano /etc/network/interfaces
The process of configuring IPv6 with netplan is similar to what we described before.
auto eth0
iface eth0 inet6 static
    address 2001:db8:1234:5678::10
    netmask 64
    gateway 2001:db8:1234:5678::1
    dns-nameservers 2001:4860:4860::8888 2001:4860:4860::8844
After editing, restart networking:
sudo systemctl restart networking
CentOS VPS Configuration File
On CentOS VPS, you will usually find network configuration files in the /etc/sysconfig/network-scripts/ directory. In this directory, you will find separate files for each network interface named ifcfg-interfacename. To enable IPv6 configuration for a specific interface, open the following file in a text editor:
etc/sysconfig/network-scripts/ifcfg- interfacename
and modify this file by adding the following lines:
IPV6INIT=yes

IPV6_AUTOCONF=yes

IPV6ADDR=2001:db8:1234:5678::10/64    Your IPv6 address/ IPV6 PREFIX

IPV6_DEFAULTGW=2001:db8:1234:5678::1    Your IPv6 gateway
After making these changes, restart the network service to apply them.
In recent versions, CentOS 8 and 9, enter the following commands in the ifcfg- interfacename file:
TYPE="Ethernet"

DEVICE="interfacename"

ONBOOT="yes"

BOOTPROTO="dhcp"
To manage various aspects of the IPv6 system’s behavior and performance, you need to add or modify lines in sysctl.conf file to specify the desired parameters. The sysctl.conf file, located at /etc/sysctl.conf, is used to configure kernel parameters at runtime.
For example, if you want to enable IPv6 forwarding and allow the system to forward IPv6 packets between network interfaces, add or modify the following line in sysctl.conf:
ipv6.conf.all.forwarding = 1
After making changes to sysctl.conf, you need to apply new configuration using:
sudo sysctl -p /etc/sysctl.conf
Configuring IPv6 on Debian VPS
For Debian VPS, edit the network interfaces file:
sudo nano /etc/network/interfaces
Add IPv6 configuration:
iface eth0 inet6 static
    address 2001:db8:1234:5678::10
    netmask 64
    gateway 2001:db8:1234:5678::1
    dns-nameservers 2001:4860:4860::8888 2001:4860:4860::8844
Restart networking:
sudo systemctl restart networking
Note: In Debian 9 and later it is sometimes better to use ifdown eth0 && ifup eth0 , especially if systemd networking is not fully enabled.
5.Save and Exit
After the necessary changes are made, you need to save the configuration file and close the text editor. In nano, do it by pressing Ctrl + O buttons to write the changes and tap Ctrl + X to exit. But in vi, press Esc to exit insert mode, then type :wq and press Enter to save and quit.
6.Verify Configuration
Use the ip addr command to confirm the successful configuration of IPv6 address on the specified network interface:
ip -6 addr show interfacename
Conclusion
Here we have covered the complete tutorial on setting up IPv6 on a Linux virtual server. By following a few key steps, you can successfully add and configure IPv6 to your Linux server in different distributions. With proper configuration of IPv6 networking, you can ensure that your Linux VPS server is ready to use the benefits of IPv6 and communicate seamlessly with other IPv6-enabled devices on the internet.
The Author Richard.M
Richard started out as a member of the support team and is now a full-stack web developer and support team lead at VPS Makers. He is passionate about providing people with top-notch technical solutions based on his 5 years of experience in web hosting, but as much as he enjoys coding and creating new works, he secretly dreams of becoming a sports star.
More from Richard.M