How to Install SSL Certificate in Windows Server?
Installing an SSL certificate on Windows Server depends on the certificate format and the service where you plan to use it. You may generate a new certificate, use an existing certificate, or import a certificate provided by a certificate authority.
In this guide, you will learn how to import PFX and CER certificates, bind an SSL certificate to IIS, and trust AD CS certificates and self-signed certificates. This guide also covers how to verify the certificate, check its private key, and choose the correct Windows certificate store.
Before starting the installation process, you have to learn how you can generate an SSL certificate on Windows Server, either self-signed or with an external authority. Follow this guide:
Generate and Export SSL Certificate on Windows Server
Import pfx Certificate With Password
Some applications require a .pfx file because it bundles the private and public key in a single file and is also encrypted with a password. The certificate’s private key must be available to the server, especially when you import the self-signed certificate.
If you have an existing certificate file or have generated one, import it into the machine store and use it to install AD FS with an SSL certificate, or for any other feature or application you want.
Locate pfx Certificate
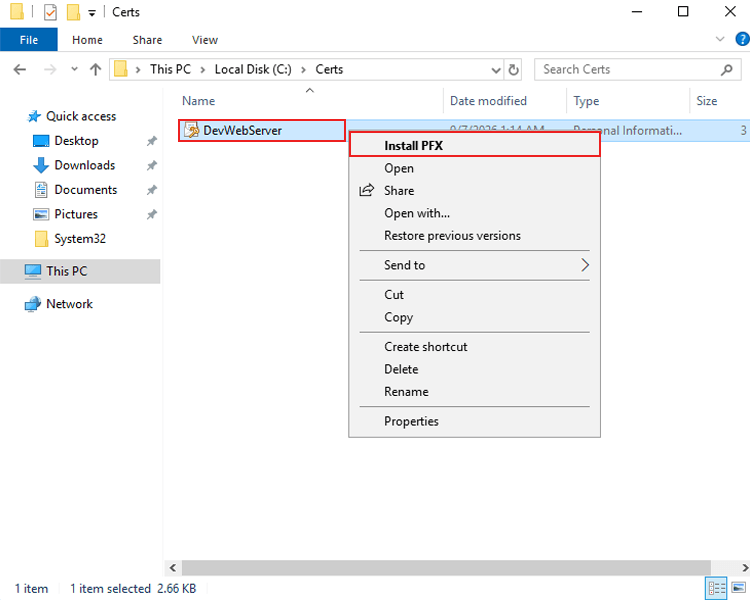
Copy the .pfx file to your Windows Server. Right-click the file and choose Install PFX or Install Certificate.
1. Right-click the file
2. Select Install PFX or Install Certificate
Choose Local Machine Store
Select Local Machine because server apps like IIS and AD FS need the certificate for all users and services.
1. Select Local Machine
2. Click Next
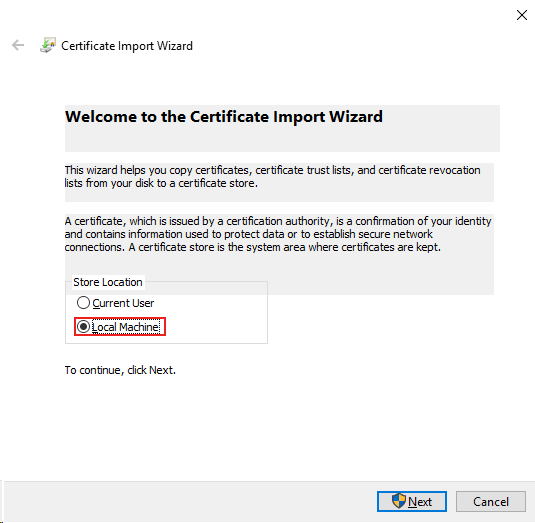
Note: Windows might ask for admin permission. Click Yes and keep using an admin account.
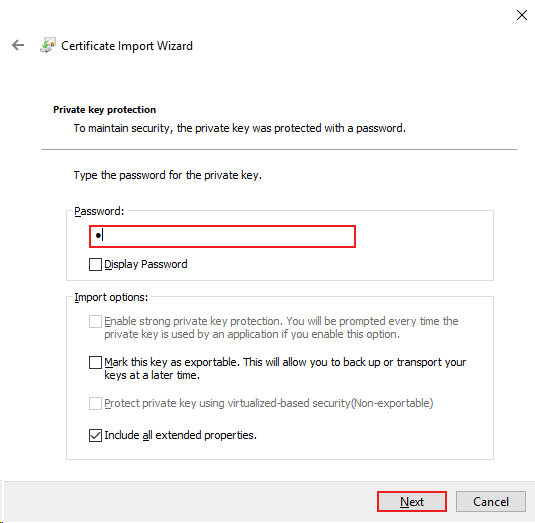
Enter PFX Password
Windows will ask for the password for the .pfx file. Enter the password you used when you got the certificate.
You can also choose extra options:
- Make this key exportable – This lets you export the certificate and private key again later.
- Include all extra properties – This imports more information about the certificate.
1. Enter the PFX password
2. Click Next
Select Certificate Store
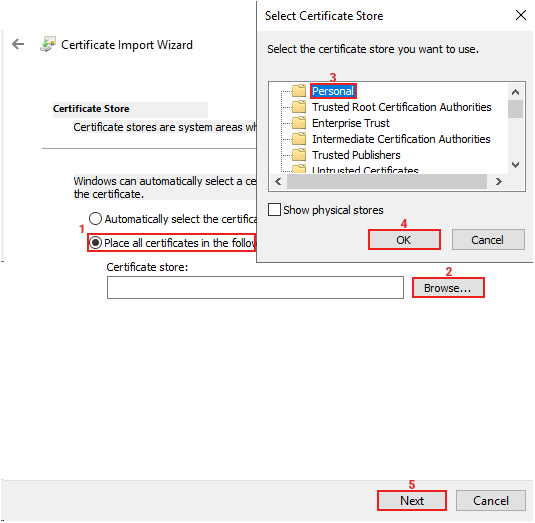
Choose to put all certificates in the store below, then pick the Personal certificate store.
1. Select Place all certificates in the following store
2. Click Browse
3. Choose Personal
4. Click OK
5. Click Next
Complete pfx Import
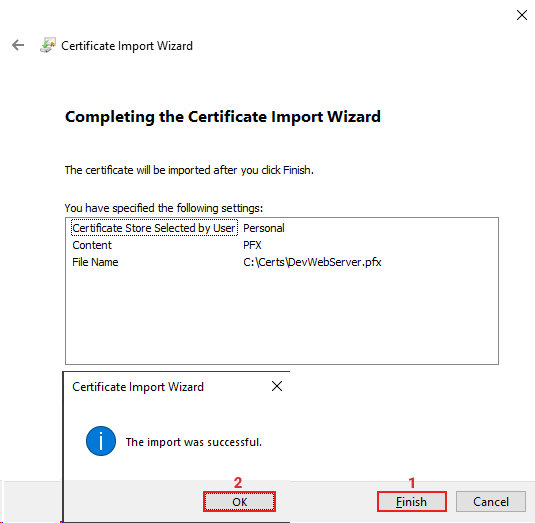
Check the settings you chose and click Finish to import the certificate. Windows will add the certificate and its private key to the chosen store.
If the import works, you will see the message:
“The import was successful.”
Install .cer Certificate in Windows
Websites with SSL need a public certificate issued by a Certificate Authority (CA) that includes only the public key. Installing a .cer can be done via the built-in Certificate Import Wizard.
You can install a self-signed certificate as a .cer with this method too, read first the generating SSL certificate.
Locate .cer Certificate
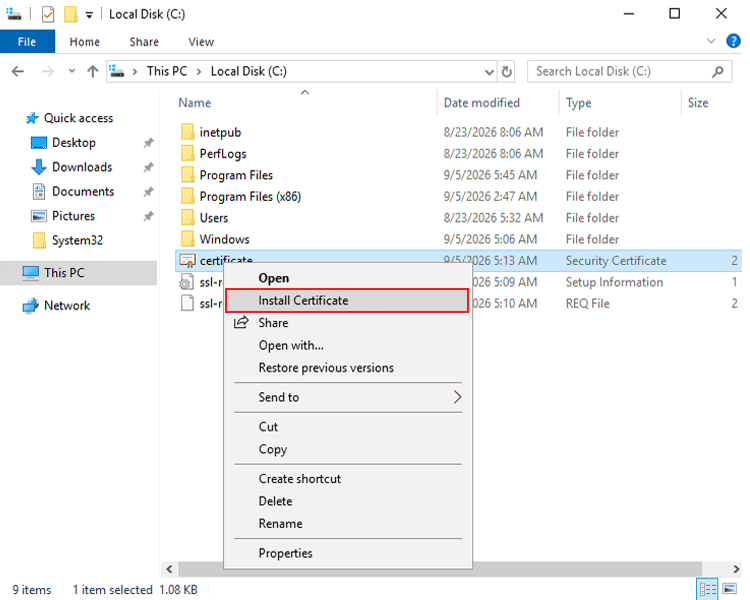
Find the .cer certificate file on your Windows Server. Right-click the certificate file and select Install Certificate.
1. Right-click the .cer file
2. Click Install Certificate
Choose SSL Certificate Store
Choose the certificate store. You have to choose Local Machine because you will use it for services and all users on the server.
Note: you’ll be prompted for administrative access; click Yes and make sure you’re using an admin user.
Choose “Place all certificates in the following store” to indicate which store you want to import the certificate into. Under Certificate Store, browse the store and select Personal; then click Next to continue.
1. Select Place all certificates in the following store
2. Click Browse
3. Choose the Personal certificate store
4. Click OK
5. Click Next
Confirm Certificate Import in Windows
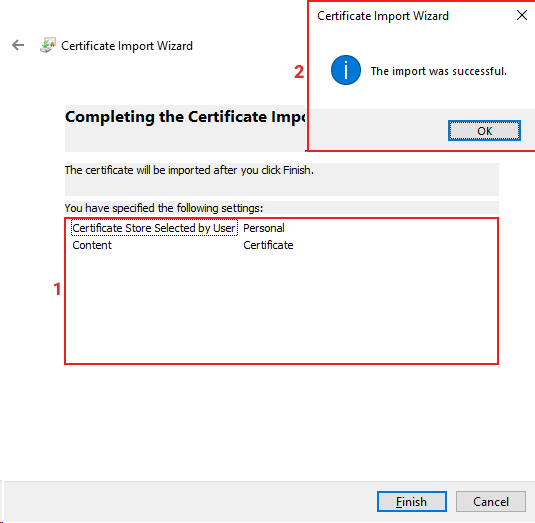
Review your selected options in the picture below, then click Finish to complete the certificate import. After clicking Finish, Windows will import the certificate into the selected certificate store.
Bind SSL Certificate to IIS
Windows has a built-in web server named IIS; you can use it for Windows Server instead of Nginx and other web servers.
IIS needs a certificate bound for HTTPS connections; if you provide a local web server, using a self-signed or ADCS certificate is enough for HTTPS connections between systems, but if you use it on the Internet, you need a certificate that is signed by a known Certificate Authority.
In this tutorial, we will use a self-signed or ADCS certificate.
Open IIS Manager
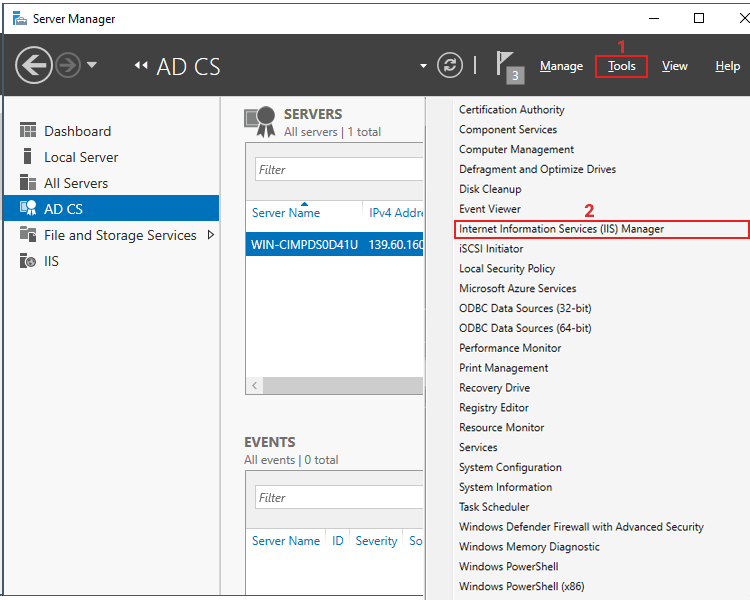
First, open IIS Manager to bind HTTPS. Navigate to Server Manager, select IIS under the Tools section.
1. Click Tools
2. Select IIS
Add HTTPS Binding in IIS
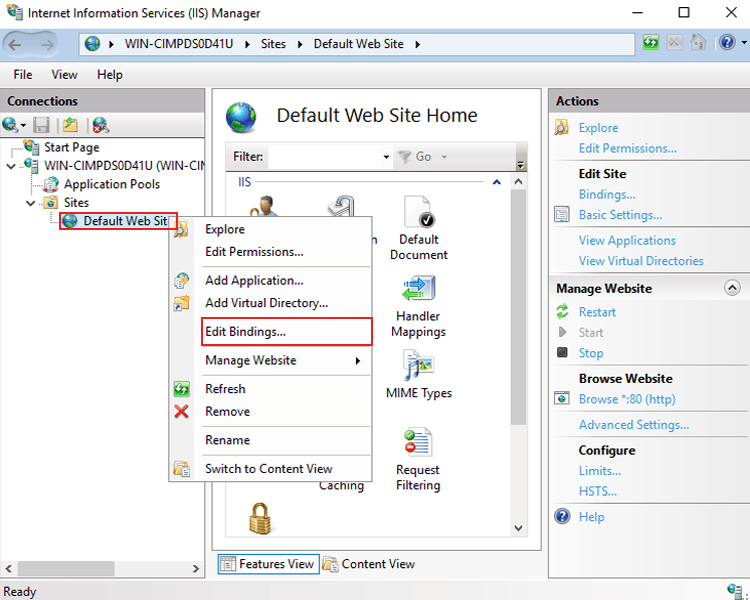
In IIS Manager, expand Sites and right-click the Default Web Site. You need to add a binding to your IIS for HTTPS connections, and it needs a valid certificate.
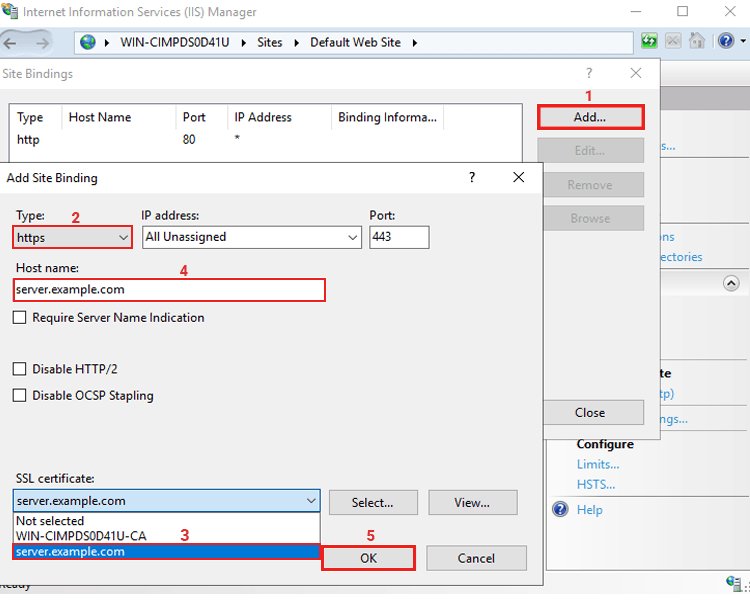
After expanding your website, follow the diagram below for binding HTTPS to IIS:
1. Click Add
2. In Types, select https
3. In SSL certificate, choose your newly imported certificate
4. Provide your Hostname in this section
5. Click OK to bind the certificate to IIS
Note: If the certificate does not appear in the SSL certificate dropdown, make sure it was imported into Local Computer > Personal > Certificates and that the certificate contains a private key.
Check IIS Certificate Binding
First, navigate to the server address and open it in your browser. If it’s with HTTPS, the website should load over HTTPS without a certificate warning.
Verify the SSL Certificate
After you install the SSL certificate, check that Windows Server has added it correctly. You can use Certificate Manager to see if the certificate is there and check important details like who issued it, how long it is valid, and the name of the domain or server it is for.
Verify SSL Certificate on Windows Server
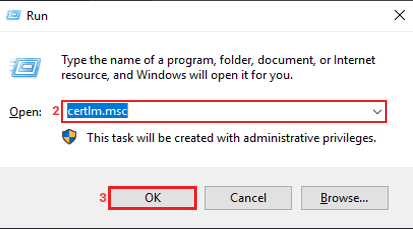
To check if the certificate is installed correctly, open Certificate Manager and find the certificate in the right store. For certificates on the local computer, use certlm.msc to see the certificates.
1. Press Windows + R on your keyboard
2. Type certlm.msc
3. Press Enter
4. Expand Personal or another store and select Certificates
5. Find your certificate in the list
6. Double-click the certificate to see its details
7. Check the Issued To, Issued By, and Valid From dates to make sure the certificate is correct and not expired
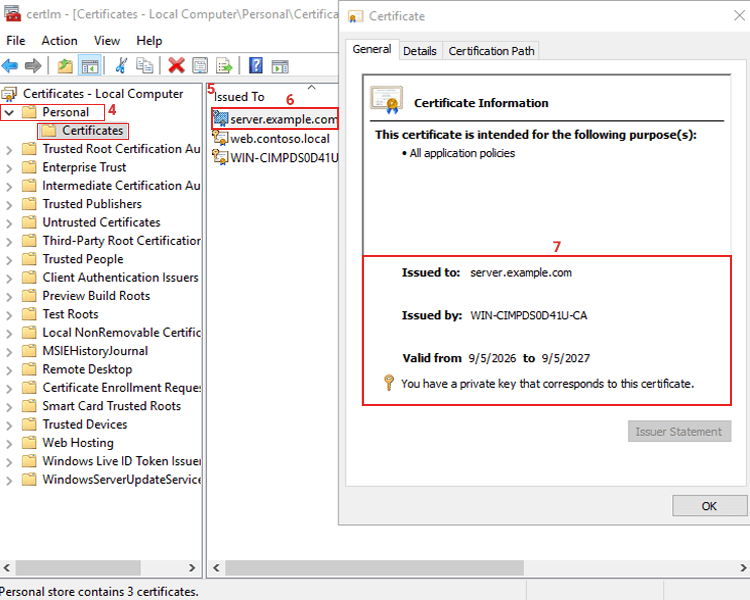
Note: certmgr.msc and certlm.msc display different certificate stores. If you import the PFX certificate into Local Computer > Personal, you will find it in certlm.msc, not certmgr.msc. For IIS and other Windows services, use the Local Computer > Personal > Certificates store.
Install Certificate in Trusted Root Certification Authorities
Installing a CA certificate in the Trusted Root Certification Authorities store helps Windows Server trust certificates from that CA. This is helpful for internal, private, or self-signed certificates that are not trusted by default.
Follow the steps below to add the .cer certificate to the right certificate store.
1. Right-click the certificate and choose Install Certificate
2. Select Local Machine
3. Click Next
Select Certificate Store
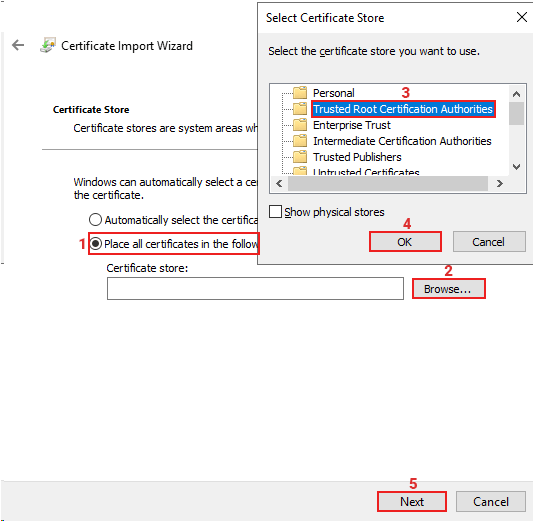
To add it to the root CA, make sure you choose it in the store selection.
1. Choose Place all certificates in the following store
2. Click Browse
3. Select Trusted Root Certification Authorities
4. Click OK
5. Click Next
Root CA Import Confirmation
Compare your settings store with the image below:
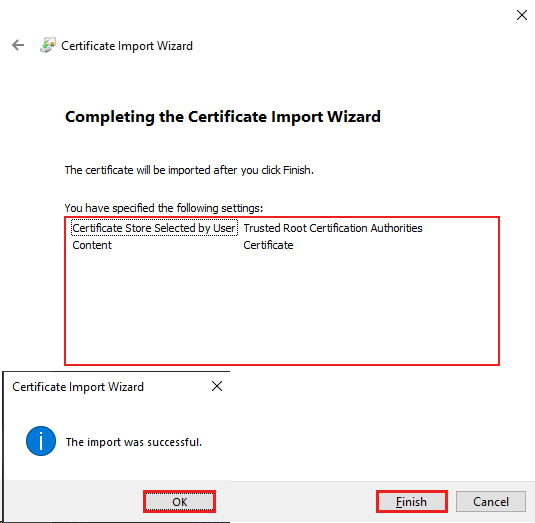
If you see a security warning, click Yes to confirm.
Note: Only install CA certificates from a trusted source. Adding an unknown certificate to the Trusted Root Certification Authorities can let that CA create certificates that the server trusts.
Summary
Installing an SSL certificate on Windows Server means picking the right format, store, and setup based on how you will use it.
This guide showed you how to import PFX and CER certificates, connect a certificate to IIS for HTTPS, and set up trust for AD CS and self-signed certificates.
You also learned how to check an installed certificate, see who issued it, its validity period, and private key. You should put CA certificates in the Trusted Root Certification Authorities store when needed.
Using the right certificate store and having the private key is important for setting up SSL on Windows Server.
FAQ
How to Choose the Correct Certification Store?
Choose where to save the certificate based on its use. For SSL certificates used by IIS or other services on your server, put the certificate in Local Computer > Personal > Certificates.
If you are adding a CA certificate to build trust, use Trusted Root Certification Authorities. Don’t put certificates in the wrong place, or apps may not find or use them.
pfx vs cer Certificate?
A PFX (.pfx) certificate has both the public certificate and the private key, and it is usually protected by a password.
This format is used when a Windows service, like IIS, needs the private key. A CER (.cer) file usually has only the public certificate and is often used to install a certificate or to trust a CA. If you want to use the certificate for HTTPS, make sure you have the private key.
Where Are SSL Certificates Stored in Windows Server?
SSL certificates on Windows Server are kept in Windows Certificate Stores, not in one folder. You can see certificates for the local computer using certlm.msc.
For IIS SSL certificates, you usually find them under Local Computer > Personal > Certificates. CA certificates for trust are usually stored under Trusted Root Certification Authorities or another suitable store.

The Author Robert Smite
Hello! I'm Robert, specializing in virtual servers and cloud technology. With expertise in managing and optimizing virtual servers, my focus is on delivering understandable and practical content in this field. My goal is to enhance knowledge and assist individuals in selecting the best virtual services for their needs.
More from Robert Smite