How To Install Remmina on Ubuntu for Remote Access
Installing Remmina on Ubuntu for remote access is so easy; anyone can do it and enjoy all the functionality of a remote access tool. These steps are for setting a configuration of Remmina and stepping up your remote desktop administration and problems.
Also, mobility is another important feature of a remote desktop program. One of the most important tools is Remmina Remote Desktop Client, which is for Ubuntu 22 ,20, 18 and works with a wide range of protocols, including VNC, SSH, RDP connection and others.
To install Remmina on Ubuntu for remote access, you have several straightforward methods:
- Using APT Repositories
- Via PPA Repositories
- Using Snap
- Using Flatpak
Every method has its own merits, whether it comes down to the traditional APT repositories, bleeding-edge PPA updates, sandboxed Snap packages, the controlled ease of the GUI to manage apps or the Android-like approach to the distribution of Flatpak.
Install Remmina on Ubuntu software
Remmina is typically installed on desktop systems, as the tool is designed for desktop users to access remote devices. Installing it on a server usually requires additional configuration to provide a suitable graphical environment.
It is a wonderful option that gives you enough space to manage and install software on your machine with just one click. Let’s walk through the step-by-step process:
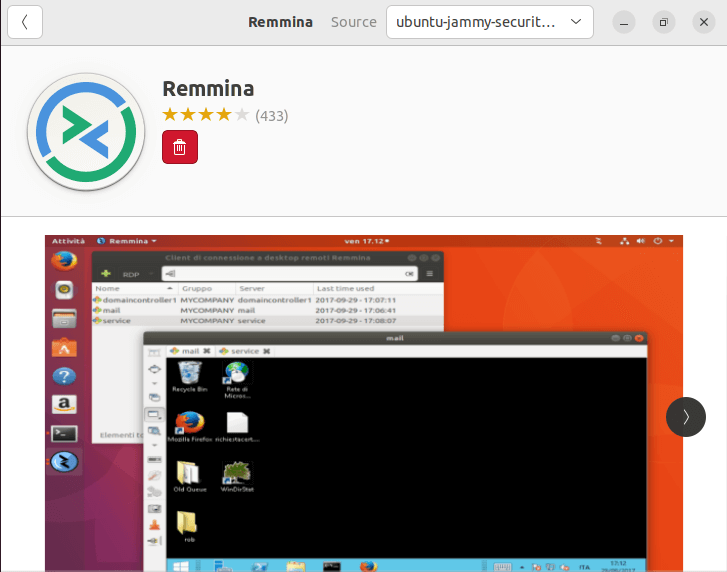
Step 1: Download and Install remmina in Ubuntu software
In the Ubuntu Software application, there is a search bar at the top right corner where you have to type in “remmina”. Once done typing, you will notice “Remmina Remote Desktop Client” in the resulting list.
Here you can continue to install Remmina with one click.
Step 2: Launch Remmina
Now, once the installation is done, you can close the Ubuntu Software application and navigate to the Ubuntu applications menu (normally represented by a square icon in the dock). Look for “Remmina” within the software applications and click on the icon to start up Remmina.
How To Install Remmina on Ubuntu for Remote Access?
“Remote access” to other computers or servers is a required feature for many IT specialists, system administrators, and others. Thanks to a stable remote desktop program, your day-to-day life will be both convenient and comfortable. You can manage a number of servers and clients without googling every problem.
Before Installation: Update Of Ubuntu Package Repository
First, we will update the Ubuntu package repository to make sure that we have the list of the latest programs available.
Login to Ubuntu Server: This is where you’ll get Linux VPS Server and run commands in order to have a conversation with the system.
Update Package Repository: At the terminal, type these below commands and press Enter:
sudo apt-get update

sudo apt-get upgrade -y
Note: When you come up to it, you need to type your root password (it is important to know that you cannot see the characters you type because it is for security reasons).
Now, we have to connect our package repository to continue installing the software for Ubuntu server. It is better to make a backup of the Linux server before installation so that you can restore it if needed. Get ready for more steps to come!
Method 1: Install Remmina on Ubuntu using APT Repositories
Let’s walk through the process of installing Remmina on Ubuntu step by step using the default APT repositories.
Step 1: Install Remmina and Plugins Under Insert Menu
Once the repositories are updated, install Remmina along with its necessary plugins (for RDP, secret storage, and Spice protocol) using the following command:
sudo apt install -y remmina remmina-plugin-rdp remmina-plugin-secret remmina-plugin-spice
It allows Remmina to provide proper plugins that are suitable for different types of remote connections.
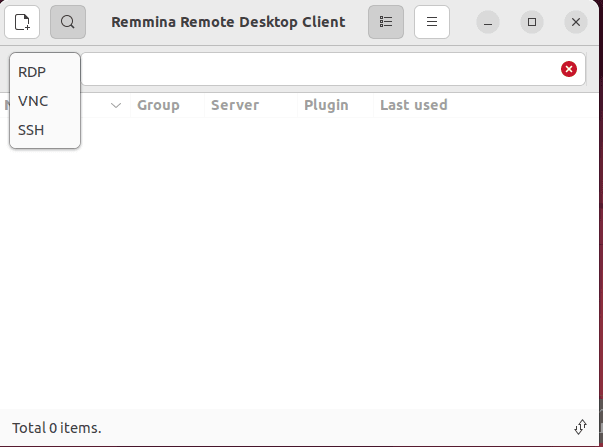
Step 2: Launch Remmina
After the installation is complete, you can launch Remmina directly from the terminal by typing:
remmina
By this command, you run the Remmina application and observe its main window open in front of you.
Optional: Explore Remmina
Remmina is set up and can be used now. You are able to control it such that it is connected to remote machines by just giving new connections in the Remmina interface.
Mehode 2: install Remmina on Ubuntu via the PPA(Personal Package Repositories).
Installing Remmina through the PPA repositories allows you to benefit from the latest version of Remmina with new features and updates that may not be available in the default Ubuntu repositories. This can be for many reasons, but it is mostly because the primary repository goes for stability and verified packages for long-term support (LTS) releases.
With the Remmina PPA owned by the Remmina development team, you can quickly activate and keep an eye on the latest Remmina versions.
Step 1: Add Remmina PPA Repository
Open your terminal and add the Remmina PPA repository to your system’s list of software sources using the add-apt-repository command:
sudo add-apt-repository ppa:remmina-ppa-team/remmina-next
Press Enter to proceed with adding the PPA repositories to your system.
Step 2: Update APT packages index
After adding the PPA, update your local package index to fetch the latest package information from all repositories, including the newly added PPA:
sudo apt update -y
Step 3: Authenticate PPA Repository
Use apt-cache to verify that the Remmina PPA repository has been successfully added to your system:
apt-cache policy remmina
Correct addition of the PPA will show output, which would indicate that remmina package is from remmina-ppa-team/remmina-next repository.
Step 4: Install Remmina from PPA Repository
Now that the PPA is added and your package index is up-to-date, you can proceed to install Remmina from the PPA repository:
sudo apt install -y remmina
This command will sign you up with the latest version of the Remmina that is available from the PPA repository.
Methode 3: Install Remmina on Ubuntu through Snap
Installing Remmina via Snap on Ubuntu can be considered a convenient method which guarantees you have an up-to-date version with all its dependencies isolated from your system.
Snap bags are standalone and are automatically updated to ensure that all the distributions are upgraded in the same and safe way.
Let’s walk through the step-by-step process to install Remmina using Snap on Ubuntu:
Step 1: Install Snapd (If There Is No Snapd Yet) Through the Terminal
First of all, make sure to have Snapd set up, which is the package manager for different types of Snaps. Open a Ubuntu server terminal and run the following command:
sudo apt install snapd
Input your password when you’re asked to do so, and let the installation run to its end. Snapd is to be updated if you have Snap packages installed.
Step 2: Install Remmina Using Snap
Following the installation process for Remmina, you ought to leverage the Snap package. In the terminal, run the following command:
sudo snap install remmina
This command will download and install the remote desktop Remmina Snap package on your Ubuntu platform. If your pipeline speed is adequate, the loading process may take a couple of minutes.
Step 3: Enable Additional Interfaces (optional)
To achieve this, hook certain interfaces to the Remmina Snap package to allow for more features and functionalities. These interfaces provide a mechanism for Remmina to access the system resources or services that are specific to your system. Execute the following commands in the terminal:
sudo snap connect remmina:avahi-observe :avahi-observe

sudo snap connect remmina:cups-control:cups-control

sudo snap connect remmina:mount-observe:mount-observe

sudo snap connect remmina:password-manager-service:password-manager-service
These commands articulate Remmina interface elements that provide an association to avahi-observe, cups-control, mount-observe, and password-manager-service and also advance the overall functionality within the Snap package.
Step 4: Launch Remmina
When installation is done successfully, it will be possible to launch the Remmina application from a Ubuntu applications menu. Alternatively, you can start Remmina from the terminal by typing:
remmina
This will start Remmina Remote Desktop Client and will carry out processes of configuring and connecting to different kinds of remote desktops.
Methode 4: Install Remmina on Ubuntu Through Flatpak Package
Installation of Remmina in Ubuntu through Flatpak offers yet another smooth way of managing software on the Linux operating system.
Thanks to its active containerisation method, which continues to separate packages from the system’s libraries, the Flatpak approach guarantees package independence. Let’s go through the step-by-step process:
Step 1: Install Flatpak
If you haven’t already installed Flatpak on your Ubuntu system, you can do so by opening a terminal and running the following command:
sudo apt install flatpack
Once prompted, enter your password to install the boarding pass software. Now, wait for the installation to complete.
Note: The command given below installs Flatpak with its required dependencies.
Step 2: Add the Flathub Repository
Furthermore, the Flathub repository is to be added to your system. Flathub is a Flatpak package version of the centralised repository containing a “decanter” of application types. Run the following command in the terminal:
flatpack remote-add --if-not-exists flathub https://flathub.org/repo/flathub.flatpakrepo

flatpak remote-add --if-not-exists flathub https://sudo flatpak remote-add --if-not-exists flathub. undefined undefined
This command adds the Flathub repository to Flatpak to access Flathub-hosted packages, which are already part of Flatpak.
Step 3: Install Remmina on Ubuntu via Flatpak
Once Flatpak and its repository Flathub are set up, you can go ahead and install Remmina using Flatpak. Run the following command in the terminal:
flatpak install flathub org. remmina.Remmina
This command downloads and installs the Remmina Flatpak package from the Flathub repository onto your Ubuntu system.
Step 4: Launch Remmina
When installation is done successfully, you can start Remmina from the terminal by typing “Remmina“.
Features of Remmina Remote Desktop Client
The Remmina Remote Desktop Client offers a range of features that make it a powerful tool for managing remote desktop connections on Ubuntu:
- Multi-Protocol Support: Remmina is capable of accommodating an enormous amount of network protocols such as RDP, VNC, SPICE, NX, XDMCP, SSH, and WWW protocols, thus ensuring seamless communication across platforms and architectures.
- Tabbed Interface: It has a tiled interface that gives us the ability to manage many connections to remote desktops at once. We can switch among the sessions and make sure the workflow is smooth and uninterrupted.
- Cross-Platform Compatibility: Remmina, which is capable of linking both Windows and Linux desktops, resolves the issue of cross-platform disparity, which has been there for a while. It, therefore, provides a unified remote desktop solution.
- Ubuntu Integration: As the default remote desktop client for Ubuntu 20.04, the Remmina solution takes advantage of seamless integration with the operating system, making it more convenient for the users to get it out of the box without much hassle.
- Customisation Options: The Remmina project, which is created with an open-source ideology, provides users with the possibility to adjust the remote desktop environment according to their professional or personal needs.
Conclusion
In a nutshell, Remmina Remote Desktop Client is a very strong and flexible tool for people using Ubuntu who require stable remote access capabilities. It provides support for various protocols, has an easy-to-use interface, and offers cross-platform compatibility that simplifies the management of remote machines for system admins, as well as technical support techs. Remmina software is an excellent tool that will significantly improve your productivity and efficiency as you interact with different computer environments remotely.
The Author Richard.M
Richard started out as a member of the support team and is now a full-stack web developer and support team lead at VPS Makers. He is passionate about providing people with top-notch technical solutions based on his 5 years of experience in web hosting, but as much as he enjoys coding and creating new works, he secretly dreams of becoming a sports star.
More from Richard.M