How to Install cPanel on Ubuntu Server 24.04
For a long time, it was not officially possible to install cPanel/WHM on Ubuntu, and many of the tutorials available on the Internet were written based on non-standard methods.
However, with the release of new versions of cPanel & WHM (v132 onwards), official support for Ubuntu 24.04 LTS has been added, as announced by the official cPanel documentation, and now this popular control panel can be installed on Ubuntu 24 in a completely legal, stable, and supportable manner.
In this article, we will review the official, step-by-step tutorial for installing cPanel on Ubuntu 24, which has been tested by the VPSMakers team on a real server.
System Requirements for installing cPanel on Ubuntu
Before starting the installation, be sure to check the following (According to the official cPanel site):
| Resources | Minimum | Recommended |
|---|---|---|
| CPU | 1 core | 2 core or more |
| RAM | 1 GB | 4–6 GB |
| Disk space | 20 GB | 40 GB or more |
| OS | Ubuntu 20.04/22.04 | Ubuntu 24.04 LTS |
| Access | root | root |
Software tips:
- The system must be freshly installed (Clean OS)
- There must be no web services, databases or mail servers installed before
- Root access is required
- A valid and fixed IP is required for license activation
You can choose your server resources and order your Ubuntu VPS server now.
Install cPanel on Ubuntu 24.04 LTS
After deployed Ubuntu Server 24.04, you first need to set up the server Hostname and make sure that the system is ready to install cPanel. After this step, you can begin the official cPanel installation process.
Setting the server hostname
First, set a valid hostname:
hostnamectl set-hostname server.your hostname.com
Check ubuntu server hostname:
hostname
Ubuntu operating system update
Update the system completely:
apt update && apt upgrade -y
After the update is complete, it is recommended to reboot the server:
reboot
Disable the firewall (Optional)
During the cPanel & WHM installation process, the installation script will automatically attempt to open the required ports on the server. For this reason, it is recommended to temporarily disable any active firewalls at the operating system level before starting the installation so that the installation process can proceed without interruption.
Important note: In Ubuntu distributions, it is possible to disable the operating system firewall from the very early stages of the installation. It is highly recommended to use this method to avoid possible problems during the cPanel installation.
To disable the firewall in Ubuntu, you can use the following commands (in this example, the path ~/firewall.rules indicates the firewall rules file):
iptables-save > ~/firewall.rules

systemctl stop ufw.service

systemctl disable ufw.service
After the installation is complete and you are sure that cPanel is running properly, you can set up and configure a powerful and manageable firewall such as CSF or APF on the server again.
Download the official cPanel installation script
After logging back into the server, enter the following command:
cd /home && curl -o latest -L https://securedownloads.cpanel.net/latest
This file is the official cPanel & WHM installation script that automatically checks operating system compatibility.
Installing cPanel on Ubuntu 24
Use the following command to start the installation process:
sh latest
Important points during installation:
Installation time: 30-60 minutes
Do not disconnect SSH
All dependencies are installed automatically
Reboot the server after the installation is complete.
Error EA4 in cPanel installation process
The EA4 error in the cPanel installation process usually occurs when the EasyApache 4 installation fails due to an operating system incompatibility, a problem with the software repositories, or incomplete dependencies.
Since EA4 is a core part of the web server and PHP setup, this error prevents the complete installation of cPanel and WHM.
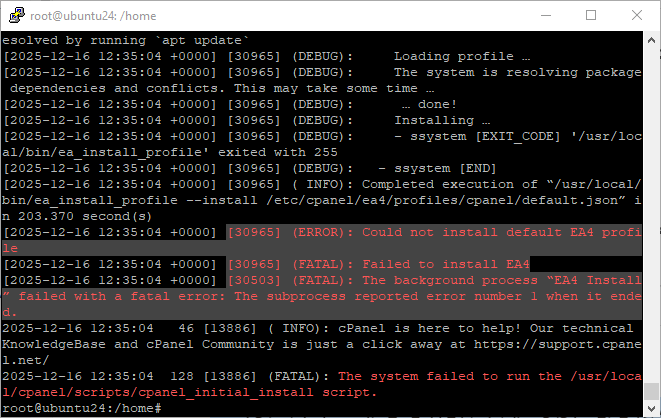
In many cases, if you reboot the server, you will be able to connect to WHM. You can also restart the EasyApache 4 installation process by deleting the EA4 related files and running the following command to fix the problem:
remove EA4 related files command:
rm -rf /etc/cpanel/ea4

rm -rf /var/cpanel/easyapache

rm -rf /usr/local/cpanel/3rdparty
Command to install EA4 related files manually:
/usr/local/cpanel/scripts/check_cpanel_pkgs --fix

/usr/local/cpanel/scripts/easyapache --build
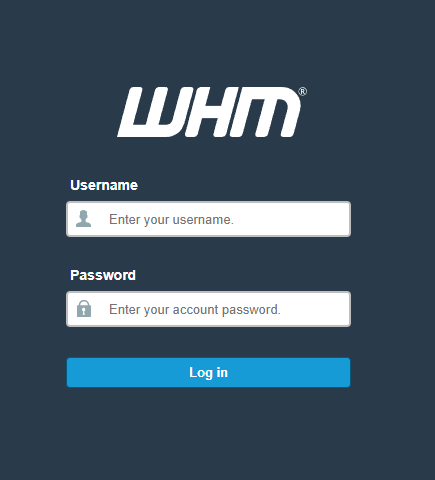
Logging into WHM
Once the installation is complete, you can log in to WHM at the following address:
URL: https://SERVER-IP:2087
Username: root
Password: Server password
cPanel License Activation
If the server IP is valid, the Trial license will be automatically activated for 1 month or you can buy cPanel license from the official cPanel website and add it in WHM.
You can also check the current WHM license status with the following command:
/usr/local/cpanel/cpkeyclt
Note: If the cPanel trial license is not activated and your server IP address has not been previously used to obtain a trial license, you can activate the one-month trial period for free by registering on the official cPanel website.
Important steps after installing cPanel
Now that WHM has been successfully installed on your Ubuntu server, there are a few initial steps that need to be taken before you can start using it and running services.
Performing these basic settings will help to ensure that WHM security is at the right level and that the server is ready for stable and secure operation.
To increase security and stability, you can take the following steps:
- Install and configure a firewall (CSF or Firewalld)
- Check essential WHM and cPanel ports and block unnecessary ports
- Enable automatic backups
- Complete testing before providing service to customers
For better control over checking and opening Linux server ports, you can read the “How to open port on Linux VPS” article.
conclusion
With the addition of official cPanel support to Ubuntu 24.04, you can now safely install this popular control panel on Ubuntu without any non-standard methods.
If you are looking for a stable, legal and commercial solution, this method will be the best choice for you as it has been tested by the VPSMakers team and Ubuntu VPS hosting are ready to run cPanel.
The Author Richard.M
Richard started out as a member of the support team and is now a full-stack web developer and support team lead at VPS Makers. He is passionate about providing people with top-notch technical solutions based on his 5 years of experience in web hosting, but as much as he enjoys coding and creating new works, he secretly dreams of becoming a sports star.
More from Richard.M