How to install Mikrotik CHR on VPS?
If you buy Mikrotik RouterBoard usually can be used directly without the need to install RouterOS, just enter the license only. But if you do not want to use Mikrotik RouterBoard or just want to use the PC as Mikrotik, of course, you have to install the proxy to the PC first. Well, there are several ways to install Mikrotik CHR.
How to install Mikrotik CHR on VPS?
Mikrotik can be installed on a PC in two ways :
- ISO Image
- Net Install
1 – How to Install Mikrotik CHR with ISO Image
MikroTik CHR (Cloud Hosted Router) is a powerful and flexible router software that can be installed on various platforms, including virtual machines, physical hardware, and cloud platforms. In this article, we will explain how to install MikroTik CHR using an ISO image and provide step-by-step instructions.
Step 1 – Download the MikroTik CHR ISO Image
The first step in installing MikroTik CHR is to download the ISO image from the official website. You can find the latest version of the MikroTik CHR ISO image on the MikroTik download page. Choose the appropriate version for your platform and Download the ISO image to your local machine.

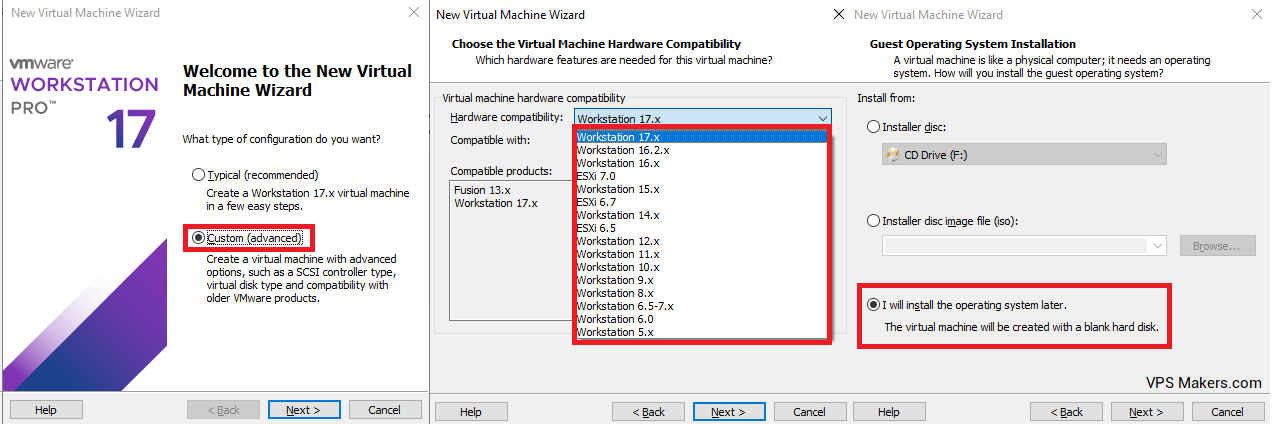
Step 2 – Create a New Virtual Machine
The next step is to create a new virtual machine that will host the MikroTik CHR instance. You can use any virtualization software that supports booting from a CD/DVD drive, such as VMware, VirtualBox, or Hyper-V.
To create a new virtual machine, follow these steps:
- Open your virtualization software and click on the “New Virtual Machine” button.

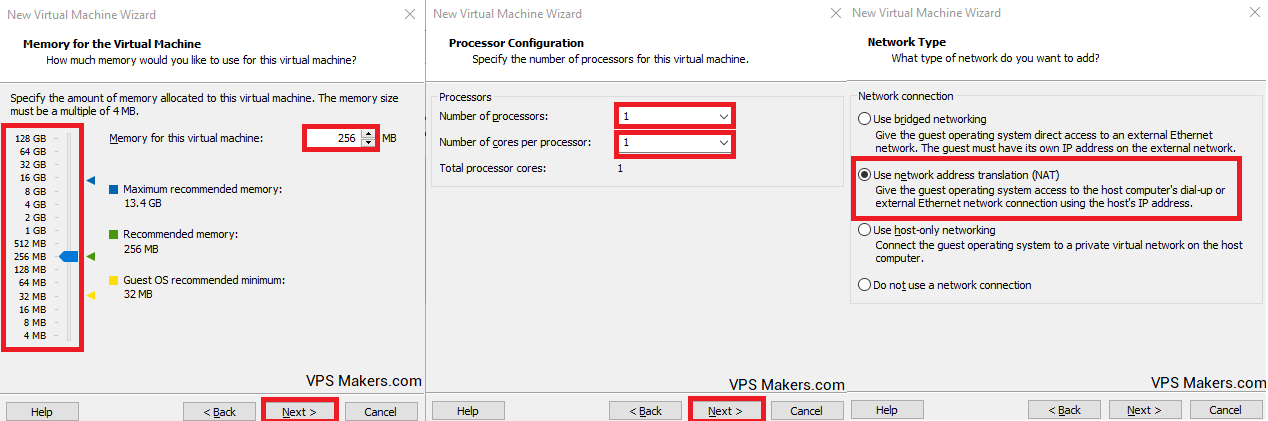
- Choose the appropriate settings for your virtual machine, including the amount of RAM, number of CPUs, and disk size.


- Open your virtualization software and click on the “New Virtual Machine” button.
3. Select the option to create a new virtual hard disk and choose the appropriate format.
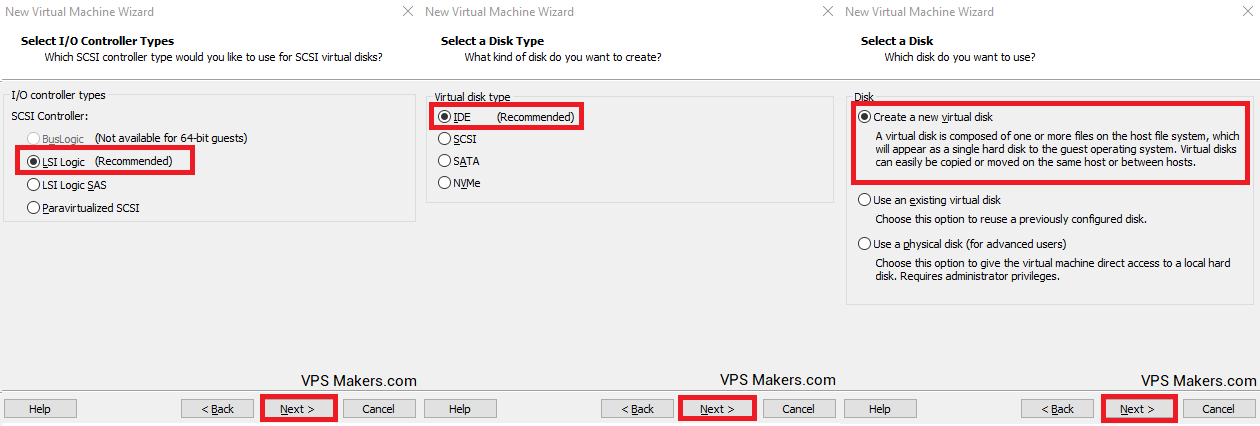
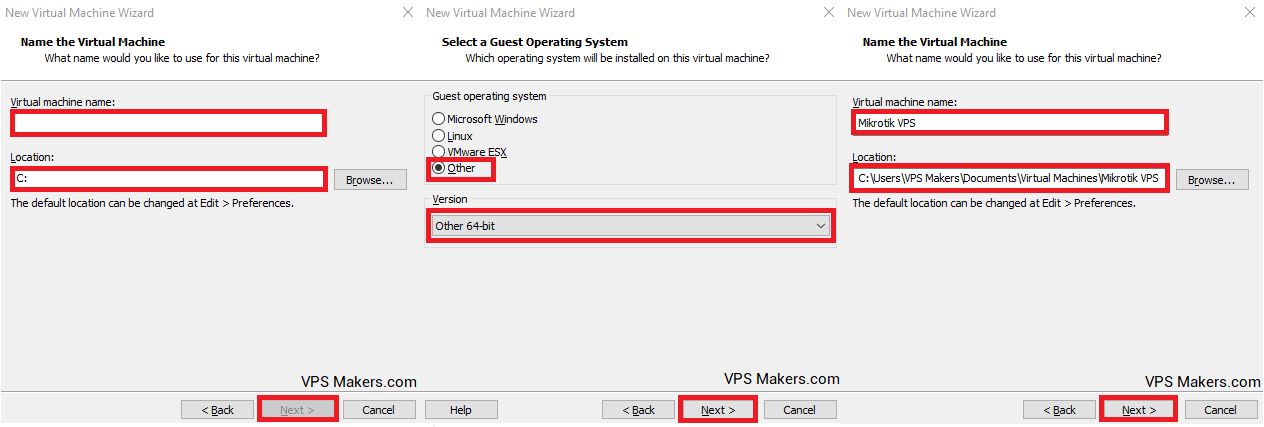
4. Follow the wizard to create the virtual machine.

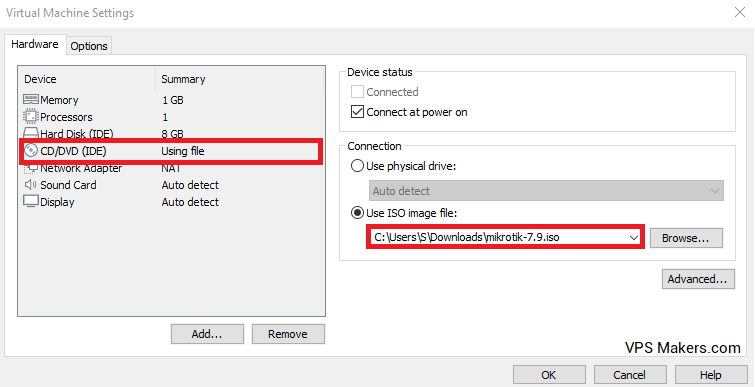
Step 3 – Mount the ISO Image
Once you have created the virtual machine, you need to mount the MikroTik CHR ISO image to the virtual machine’s CD/DVD drive. To do this, follow these steps:
- Right-click on the virtual machine and choose “Settings.”
- Click on the “CD/DVD” option.
- Select the “Use ISO image file” option and browse to the location where you saved the MikroTik CHR ISO image.
- Click on “OK” to save the settings.

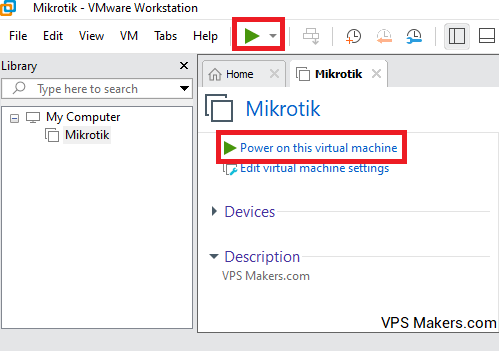
Step 4 – Power on the Virtual Machine
With the ISO image mounted to the virtual machine’s CD/DVD drive, you are ready to power on the virtual machine and boot from the ISO image.
To boot from the ISO image, follow these steps:
Power on the virtual machine.
As the virtual machine boots up, press the appropriate key to enter the boot menu. The key may vary depending on your virtualization software, but it is usually F2, F8, or F12.
Choose the CD/DVD drive as the boot device and press Enter.
The MikroTik CHR installation process should start.
Step 5 – Follow the Installation Wizard
Once you have booted from the MikroTik CHR ISO image, you will be presented with the installation wizard. Follow the steps below to complete the installation process:
- Choose the appropriate language and press Enter.
- Press Enter to start the installation process.
- Accept the license agreement and press Enter.
- Choose the disk where you want to install MikroTik CHR and press Enter.
- Choose the file system to use and press Enter. The default option is “ext4”.
- Confirm the installation and press Enter.
- The installation process will start, and you will be prompted to enter a hostname, IP address, and gateway. Enter the appropriate values and press Enter.
- You will also be prompted to set a password for the “admin” user. Enter a strong password and press Enter.
- The installation process will be complete, and you will be prompted to reboot the system. Press Enter to reboot.


Step 6 – Configure MikroTik CHR
After the virtual machine reboots, you can access MikroTik CHR by opening a web browser and entering the IP address you assigned during the installation process. The default port for the web interface is 80, so you can access it by typing “http://<IP Address>” in your web browser’s address bar.
From here, you can configure MikroTik CHR to suit your needs. Some common tasks include setting up firewall rules, creating VLANs, and configuring network interfaces.

Pros and Cons of Installing MikroTik CHR with ISO Image
Pros:
Easy to Install: Installing MikroTik CHR with an ISO image is a straightforward process that can be completed in just a few steps.
Customizable: The ISO image allows you to customize the installation process and choose the appropriate settings for your environment.
High Performance: Installing MikroTik CHR on a dedicated virtual machine can provide high performance and flexibility, making it ideal for complex network environments.
Cons:
Requires Virtualization Software: Installing MikroTik CHR with an ISO image requires you to have virtualization software installed on your computer or server.
Resource Intensive: Running MikroTik CHR on a virtual machine can be resource-intensive, requiring significant amounts of RAM and CPU resources.
Limited Scalability: The scalability of MikroTik CHR is limited by the resources of the virtual machine it is installed on. To scale beyond the capacity of a single virtual machine, you would need to set up a cluster of virtual machines, which can be complex and difficult to manage.
2 – How to install Mikrotik CHR with Net install
MikroTik Cloud Hosted Router (CHR) is a virtual router that runs on various platforms, including virtual machines and physical servers. If you want to install MikroTik CHR on a device using Netinstall, you can follow the steps outlined below.
Step 1 – Download and Install Netinstall
Firstly, download and install Netinstall on a computer that is connected to the same network as the device you want to install MikroTik CHR. You can download Netinstall from the MikroTik website. Once you have downloaded the software, extract the files and run the executable file.
Step 2 – Download the MikroTik CHR net install
Next, download the MikroTik CHR image that you want to install on the target device. You can download the CHR image from the MikroTik website as well.
Step 3 – Configure Netinstall
After you have downloaded and installed Netinstall and the CHR image, you need to configure Netinstall to install MikroTik CHR on the target device. To do this, follow the steps below:
Open Netinstall and click on the “Net Booting” tab.
Click on the “Create” button to create a new Net Booting configuration.
Enter a name for the configuration, such as “MikroTik CHR”.
Select the network interface you want to use for Net Booting.
Click on the “Add Image” button and select the MikroTik CHR image that you downloaded in Step 2.
Click on the “Save” button to save the configuration.
Step 4 – Boot the Target Device
Now, you need to boot the target device on that you want to install MikroTik CHR. During the boot process, press the appropriate key to enter the device’s boot menu. The key varies depending on the device, but it’s typically F8 or F12.
In the boot menu, select the network boot option to boot the device from the Netinstall server.
Step 5 – Select the Netinstall Configuration
After the device has booted from the Netinstall server, you’ll see a menu of Net Booting configurations. Select the “MikroTik CHR” configuration that you created in Step 3.
Step 6 – Install MikroTik CHR
Now, Netinstall will begin installing MikroTik CHR on the target device. The installation process typically takes a few minutes. Once the installation is complete, the device will reboot.
Step 7 – Access MikroTik CHR
After the device has rebooted, you can access MikroTik CHR by opening a web browser and entering the IP address that was assigned during the installation process. From here, you can configure MikroTik CHR to suit your needs.
Pros and Cons of Installing MikroTik CHR with Netinstall
Pros:
Easy to Use: Netinstall is a simple and easy-to-use tool that enables you to install MikroTik CHR on a variety of devices.
Fast Installation: Netinstall installs MikroTik CHR quickly and efficiently, making it ideal for large-scale deployments.
Flexibility: Netinstall supports a variety of devices, enabling you to install MikroTik CHR on a wide range of hardware.
Cons:
Limited to Supported Devices: Netinstall is limited to supported devices, so it may not be possible to install MikroTik CHR on some hardware.
Requires Physical Access: To install MikroTik CHR using Netinstall, you need physical access to the device, which can be inconvenient in some situations.
Conclusion:
Head over to VPSMakers and Buy a MikroTik VPS plan. Make sure to get a plan with decent resources, so your remote router can handle the tasks you have in mind for it.
The Author Emily.J
Emily started working as a member of the sales team, and because of his strong passion for providing solutions to the problems of users, he has become a successful person in the field of content creation, and so far he has been able to solve many problems. Also, Emily is trying to increase his expertise and experience with serious challenges.
More from Emily.J