How to block ports in Windows server firewall?
In order to keep out harmful programs and block unwanted ports, you can employ Windows firewalls. This handy Windows tool, accessible from the control panel, lets you disable or block any specific ports by using its Advanced Security console.
We will show you how to successfully block all inbound or outbound port with just a few steps on Windows VPS server.
How to disable or block port in Windows Firewall?
In just about all versions of Microsoft Windows, the firewall is enabled by default, so you don’t need to activate it manually in most cases as it already protects your PC and Windows VPS.
Sometimes it is necessary to open a specific port in the Windows VPS firewall, which you can use the article on How to open a port in Windows VPS, Or it may be that a process is executed on the port by another program and that port is unusable for other process, so we must identify and kill port in windows or change it.
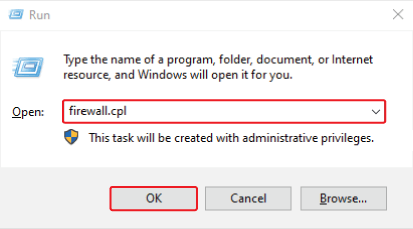
Step 1- Open Windows Defender Firewall
Press the Windows + R key to open the Run section of Windows and type “firewall.cpl” and click Ok.
Step 2- Firewall Advanced setting
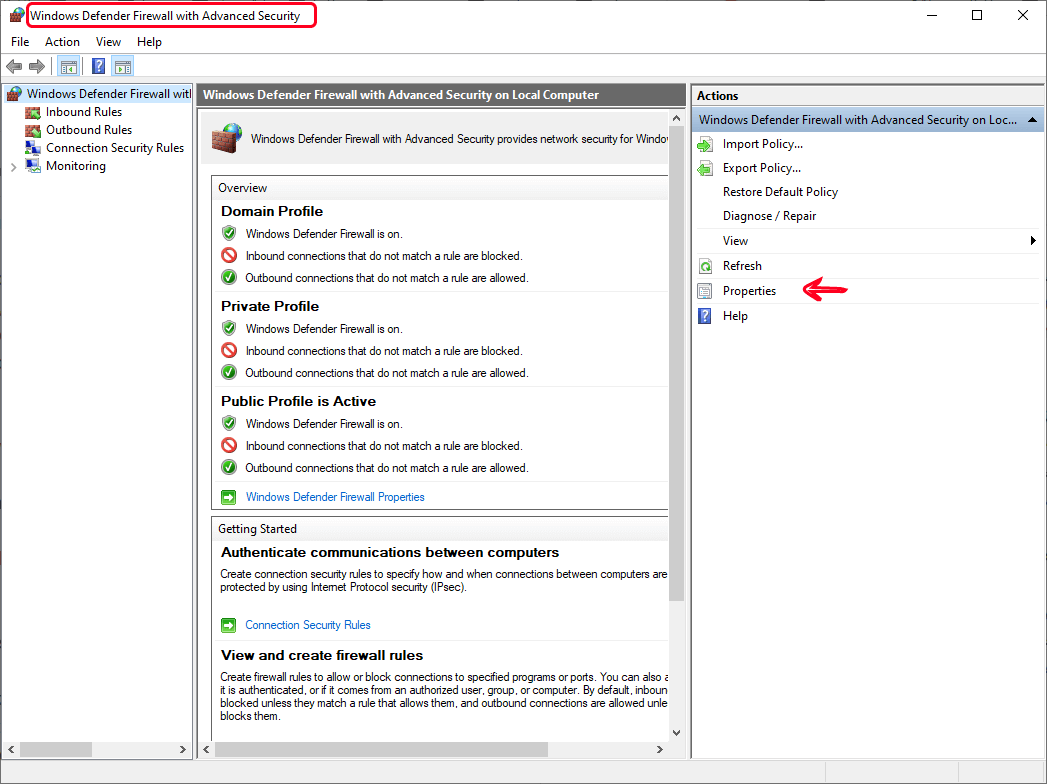
In this section, you can turn off or turn on your Windows server firewall, but we choose from the Advanced security setting section on the left bar.

Step 3- Select Properties
Now, take a look at the right side of the window that just popped up. There’s an option that says “Properties”.
Step 4- Turn on the firewall profile for different sections
In the opened pane, you must switch the firewall profile to On in all three tabs for domain, private and public networks.
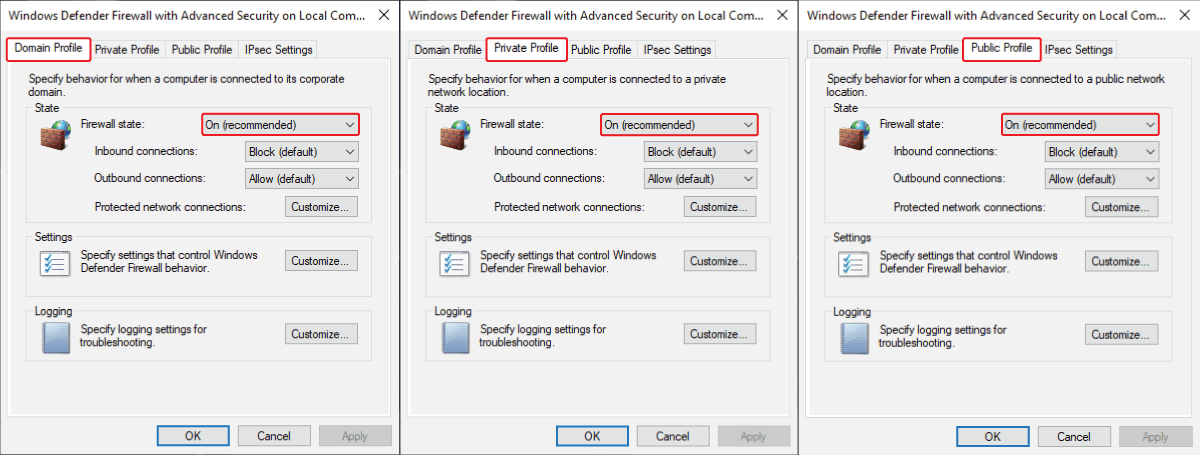
Note: On the first advanced security screen, the mode of private and public networks is displayed. If it is off, you can go to Properties to change it.
How to Disable Inbound Ports on Windows VPS Firewall?
Port blocking process is pretty similar across all versions of Windows, although there might be tiny differences. Just follow the steps to get those specific Inbound or Outbound ports closed.
Block Inbound Connections
Once the Windows Firewall with Advanced Security is up and running, you’ll find a menu on the left-hand pane. “Inbound Rules” and “Outbound Rules” can both be selected here.
Go with the “Inbound Rules“, if you value security and want to limit incoming traffic from a particular port. Here’s how you do it:
1- In the left-hand menu, choose “Inbound Rules“. In the right-hand pane, click “New Rule…“. open the New Inbound Rule Wizard.
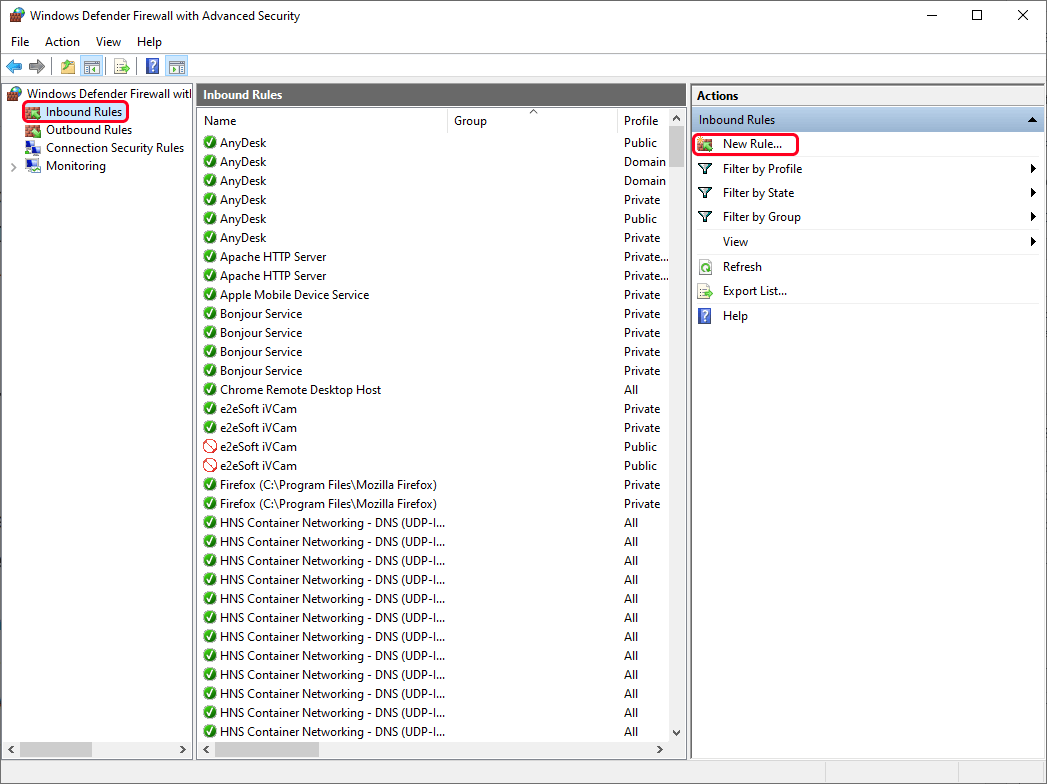
2- open the New Inbound Rule Wizard.
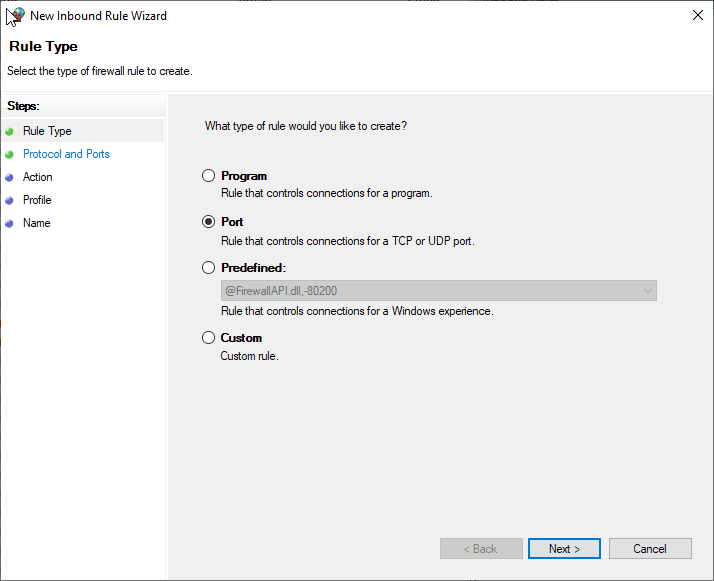
There are four types of rules available in Windows firewall: You can set rules for;
1- Program: To block or allow a program
2- Port: To block or open a port, port range or protocol
3- Predefined: To apply a predefined firewall rule
4- Custom: To specify a combination of application, port and IP address to block or unblock.
We need to close a port, so select the Port option and tap “Next“.
3- Up at the top, select your preferred protocol, i.e., TCP (to block Transmission Control Protocol data) or UDP (to block User Datagram Protocol data).
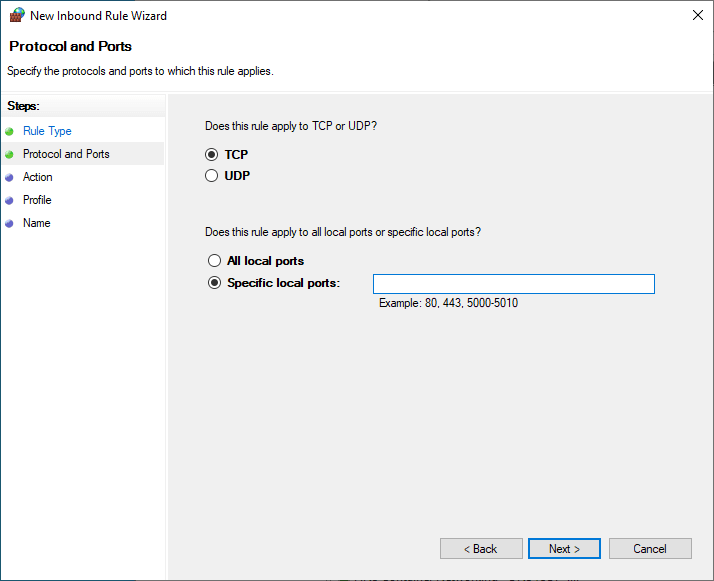
In the Specific local ports field listed below the Protocol and Ports page, enter the ports you want to block. Then hit “Next“.
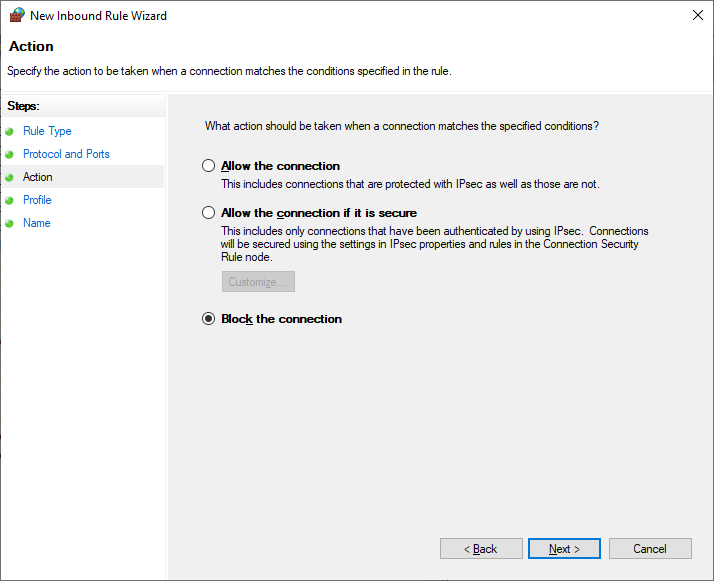
4- Select “Block the connection” and click “Next“.
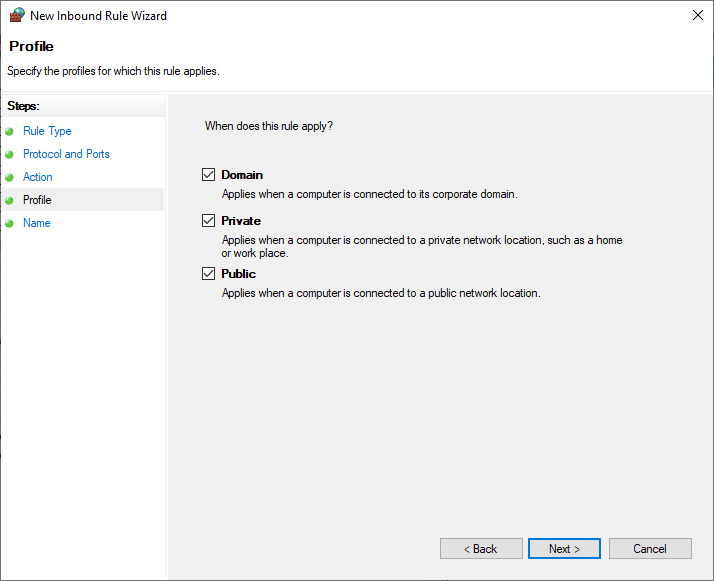
5- On the Profile page, a screen will appear asking which sorts of networks you wish to apply the rule to.
Whenever you’re connected to a private (home or work) network, use private profile and connections to public networks or direct Internet connections are considered public profile. Then, click “Next“.
6- Name your new rule and optionally include a brief description in the next field, so you can remember what it is for. Finally, click Finish to save your new rule.
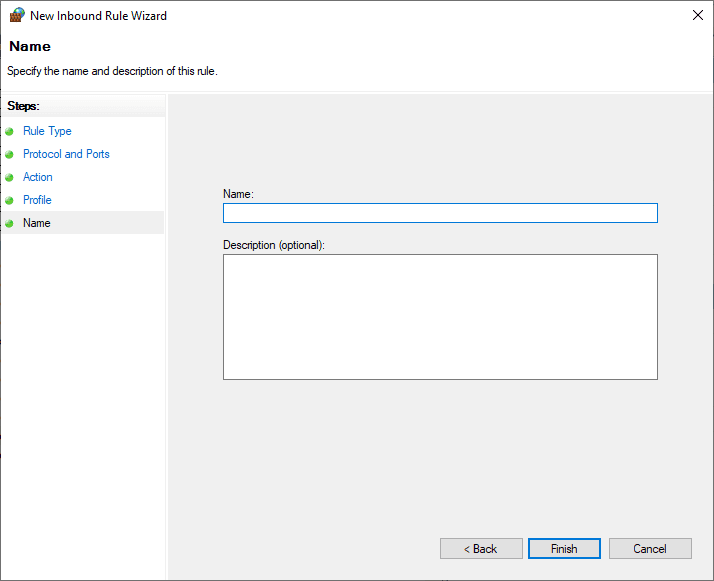
As a result, the new role is activated now and your preferred port is disabled.
How to Disable Outbound Ports on Windows VPS Firewall?
Outbound firewall rules are policies that specify which traffic can leave your network via secured ports. By default, there is no restriction applied to outgoing traffic.
Block Outbound Connections
Configuring outbound firewall rules will protect your data from being directed to malicious websites and untrusted domains.
Also, you can use outbound rules to decide which applications on your system can access the Internet and send data over the Web. Let’s find out how to set outbound rule in Windows firewall.
Outgoing traffic can be blocked by following a similar process to how you create an inbound rule.
1- in the top left corner of the window, find and click Outbound Rules.
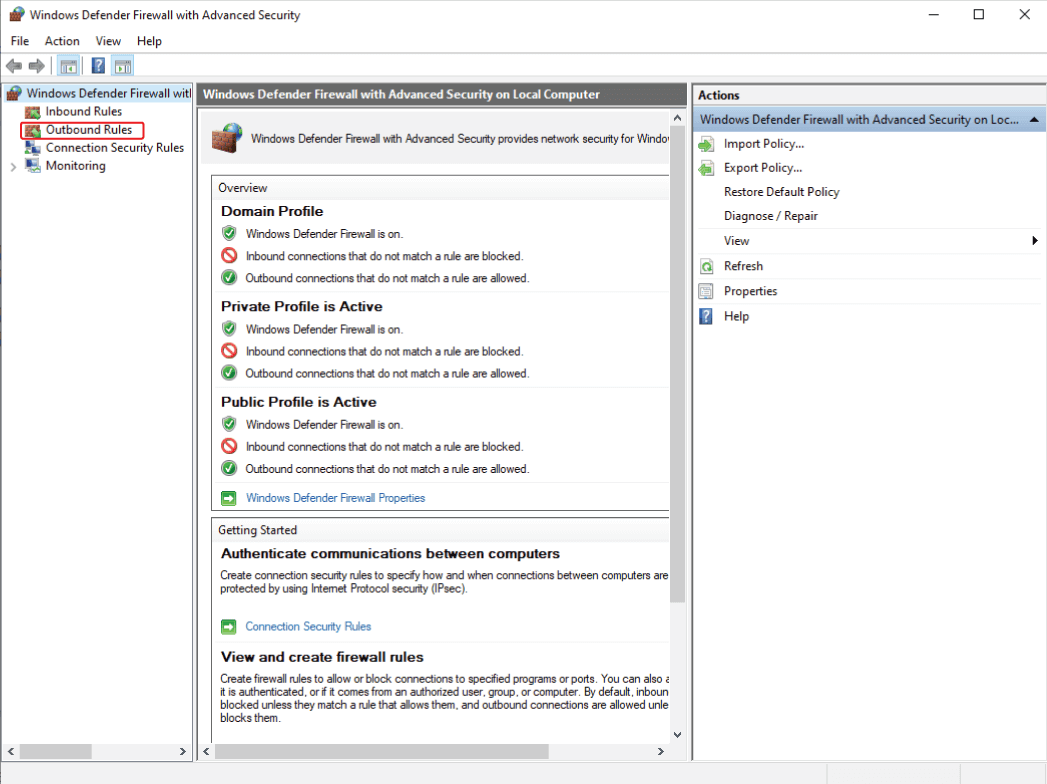
2- Now, enter the necessary port numbers and set up the rest of settings to configure a new outbound rule. For example, we have blocked one of the ports named abcd.
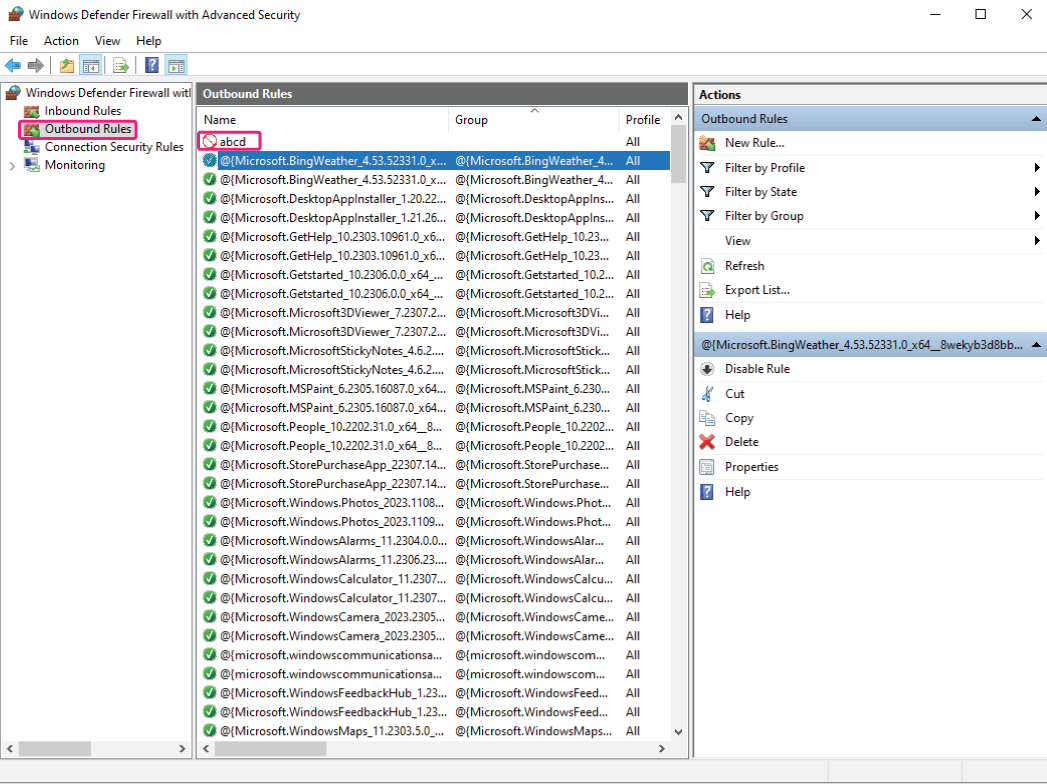
Well done! Now the traffic trying to leave your computer through this port has been successfully stopped.
Just keep in mind that the settings you’ve just adjusted are specific to the port number you’ve entered. In case you need to block other ports, repeat this process.
Conclusion
To sum up, port blocking is a powerful strategy provided by the Windows Firewall to secure your system. In this way, you block any communication channels that could be abused by dangerous software or unidentified users. This not only protects your system from hacking attempts, but it also improves your bandwidth by preventing unnecessary data exchanges.
Now that you understand how firewalls block inbound or outbound ports through the Advanced Security console, you can effectively control the data traffic entering or leaving your system.
In order to secure your system from potential threats, just follow the steps carefully and keep your firewall rules updated. Not to forget the settings are only effective as long as your Windows Firewall is active. If you disable the firewall, all the rules (including the one you just created) will be inactive.

