How to Block a Specific Port in Mikrotik Router?
Blocking port on the Mikrotik Router is an integral part of network administration. Not only does it improve security and allow for better traffic control, but it will also maximize network performance by securing certain ports. Means that mastering the method to effectively block specific ports is an essential step.
There are two common and reliable ways to disable a specific port in the Mikrotik router, one of which is the Winbox software firewall section, and the other is in the Winbox command line or using SSH (Putty) connection. Continue reading to learn more.
Block All Ports in MikroTik VPS Router Using the Winbox
Winbox tool is the most common way to connect and manage Mikrotik CHR router, which provides an easy-to-use interface for configuring and managing MikroTik settings. Here’s how to disable a specific port using Winbox software:
Step 1: Identify the Target Port Number
To begin, with, you can block all the ports you need on the MikroTik server, we have listed some important ports for you below:
| Port Number | Name | Assignment |
|---|---|---|
| 21 | FTP | File Transfer Protocol (Command Control) |
| 22 | SSH | Secure Shell ( Secure Login) |
| 23 | Telnet | remote login service, unencrypted text messages |
| 25 | SMTP | Simple Mail Transfer Protocol (email delivery) |
| 80 | HTTP | Hypertext Transfer Protocol (used in the World Wide Web) |
Step 2: Access Your MikroTik Router
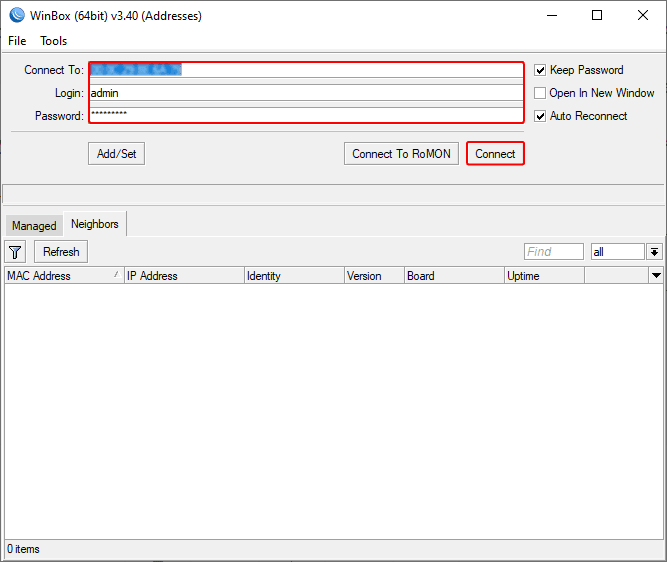
Open Winbox application and enter your username and password to log in to your MikroTik router. Download Winbox from the MikroTik website if you don’t have it already.
Step 3: Switch to Firewall
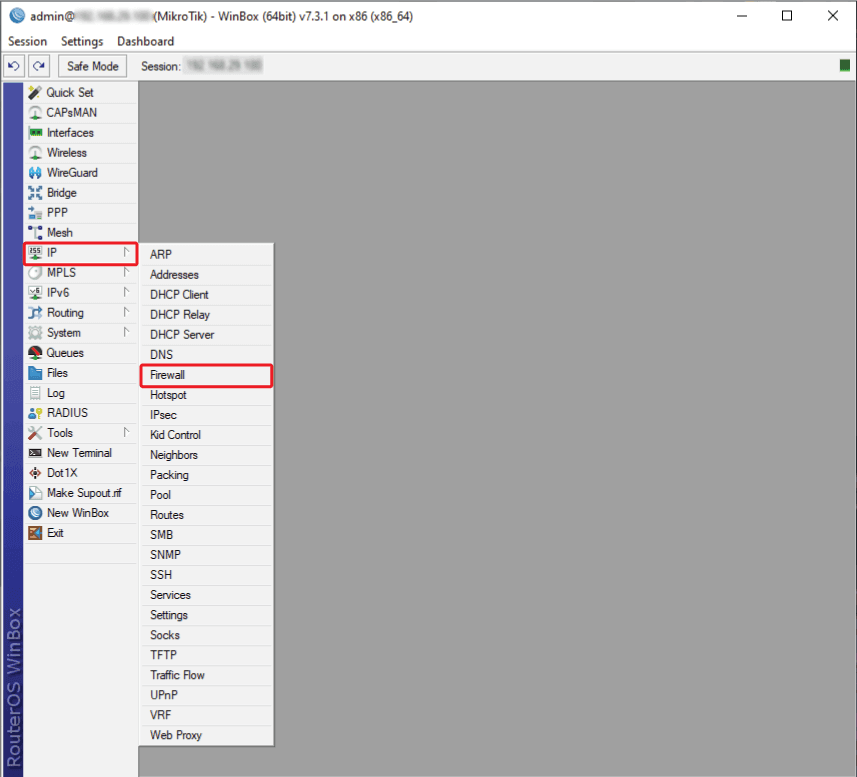
On the left-hand side of Winbox interface, click on the “IP” field, then select “Firewall” subsection.
Step 4: Add a New Firewall Rule:
To add a new firewall rule, first tap on the “Filter Rules”. Next click on “plus” sign (+).
Step 5: Create Rule:
When the new firewall rule window appears, in the General tab, complete the following sections:
Set the “chain” option. Select the:
- Forward chain; to block traffic passing through the router.
- Input chain; to block traffic headed for the router itself.
- Output chain; to block packets leaving the router, especially those coming from the router itself.
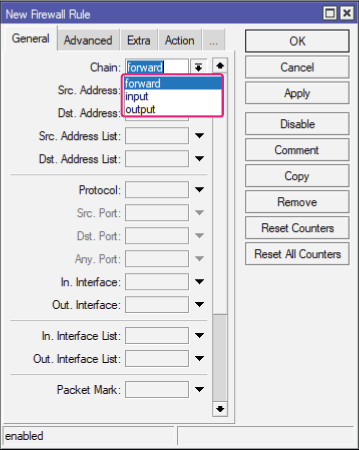
In the” source(Src.)” and “destination(Dst.)” addresses box, put the IP ranges or specific IP addresses that will be affected by the rule.

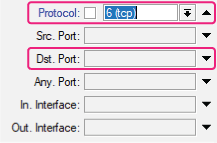
Based on the specific requirements of the network traffic you are dealing with, select the appropriate protocol, “TCP” or “UDP”. The “Dst. Port” field is where you can enter the certain port number that you intend to block.
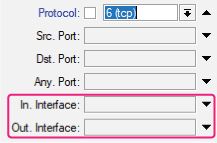
Finally, make sure to select the right interface. If you are blocking incoming traffic, make use of the “in interface“, whereas if you are closing outgoing traffic, make use of the “out interface“.
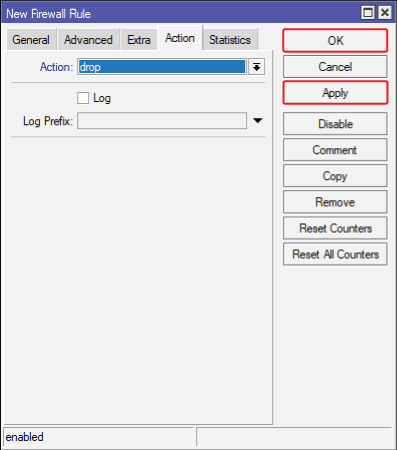
Step 6: Switch to Action tab
The fourth tab of the new firewall rule window is the Action tab, which provides options such as “accept“, “drop“, “reject” and “jump“. When you set the action to “drop“, it means that any traffic on that specified port will be blocked by the router.
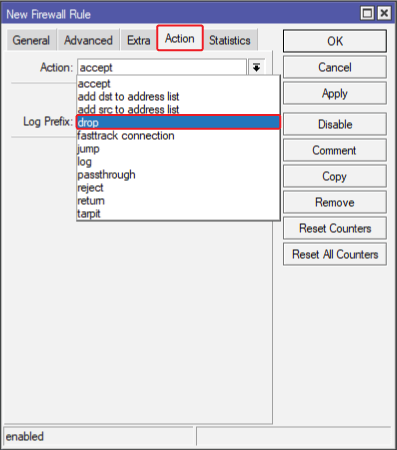
Step 7: Apply Changes
After making adjustments to firewall rules hit the “Apply” button and click on “OK” to save the changes.
Step 8: Review the Filter Rules
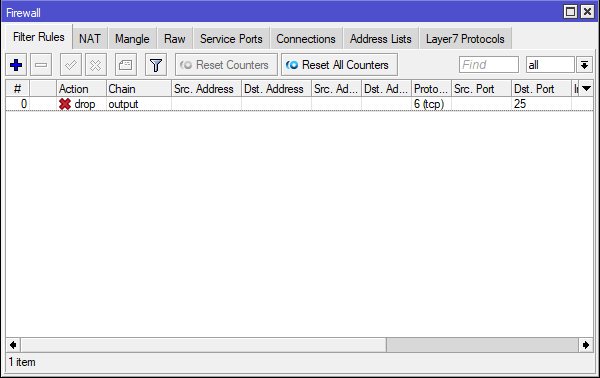
Finally, to ensure that the new rule is listed among the existing ones, check the firewall rules. Based on your set up order, it will often appear at the top or bottom of the list. Be sure that the new rule meets all the necessary criteria, including source and destination addresses, ports, protocols and actions.
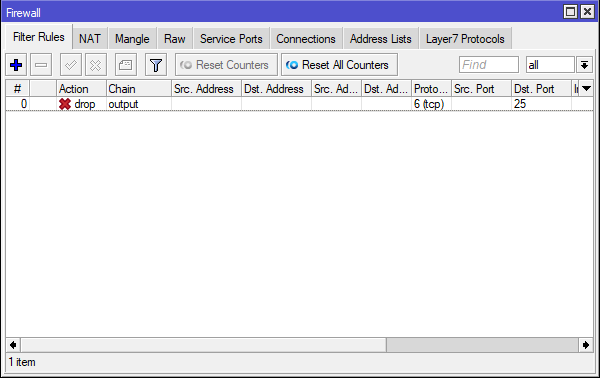
Note: With the above rules, all outgoing packages from port 25 are blocked.
Block Port in Mikrotik Router Using the Winbox Termina
In MikroTik routers, blocking ports using the Secure Shell protocol, allows you to remotely access the router’s command-line interface (CLI) and restrict traffic to certain ports. This method will give you more flexibility and automation through scripting. Here’s how to do it;
Step 1: Connect to MikroTik Router
We have used the terminal available in Winbox, you can also use an SSH client like PuTTY to access your MikroTik router.

Step 2: Run the Firewall Filter Rules
Enter the following command in the Winbox terminal to go to the Mikrotik server firewall section:
ip firewall filter
Step 3: Add a New Rule and Block the Desired Port
To block the port, you’ll need to run a command like this:
add chain=input protocol=tcp dst-port=80 action=drop
In this step, you can block a specific port with a five-part command. The five sections are as follows:
- add: Adds a new rule.
- chain=input or output: indicates whether the rule applies to incoming or outgoing traffic.
- protocol=tcp or udp: Filters TCP or UDP traffic.
- dst-port=80: Targets traffic headed for port 80 (HTTP). To block other ports, replace 80 with one you want to disable.
- action=drop: Drops (blocks) the traffic.
This command drops all incoming TCP traffic on port 80 by adding a rule to the firewall filter.
Step 5: Check firewall rules
Check the status of the rule by typing the following command and pressing Enter to see a list of firewall rules, including the one you just added.
print
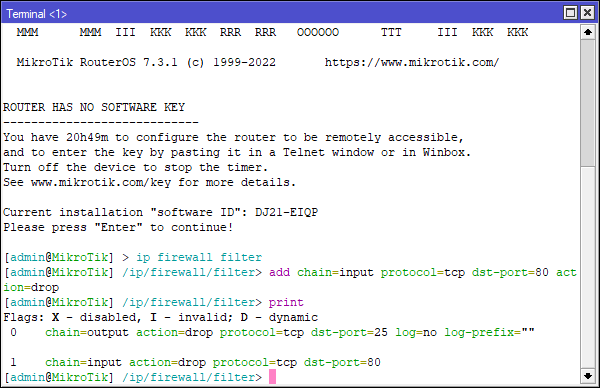
Note: You can also use these commands in VNC or SSH connection
Conclusion
To sum up, if you want to enhance the security of your network, it may be necessary to block specific ports in Mikrotik Router. Administrators can avoid unwanted access and secure their data from potential threats by employing tools like the Winbox user interface and terminals such as SSH remote management or console port direct physical access.
On the whole, the process includes determining the port number, generating a new firewall rule and applying it to the router to block incoming or outgoing traffic on the specified port. Although it may seem difficult at first, but once you understand the router’s interface and run the right commands, it becomes straightforward.
After making any changes to your router settings, remember to double-check them and test your network to ensure you haven’t blocked any ports that are needed for the network’s functionality.

